
Instruction for Use


EN
9
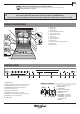
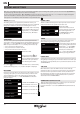
CONNECTIVITY (Remote Control) MENU
Wi-Fi connectivity allows your Smart dishwasher to connect to the Internet and interact with the „6th Sense Live” application from your
Tablet / Smartphone
. This connection opens up several Smart options to you.
LIVE APPLICATION REMOTE CONTROL / SET UP PROCEDURE
The „6th Sense Live” application feature allows to operate and
supervise the appliance remotely by external device. To enable the
appliance to be remotely controlled, you rst have to complete
successfully the connectivity set up process. This process is necessary
to register your appliance and connect to your home network. The
set up procedure has to be carried out only once. You have to carry it
out again if you change your router set up properties (network name
or password or data provider).
BEFORE STARTING THE SET UP PROCESS
1. To use this feature You need to own:
• a smart phone running Android 4.3 (or higher) with a 1280x720
(or higher) screen or a tablet or a smart phone running iOS 8
(or higher);
• a wireless router 2.4Ghz WiFi b/g/n connected to internet (verify
with your smart device that the signal strength of your home
wireless network close to the appliance is good).
2. Download & Install the free „6th Sense Live” application on your
Android smart-phone or iPAD/iPhone from the store. The App will
guide you, step by step, through the installation process.
3. If You do not have an account already, create one and subscribe
(legal terms) to service to be able to benet the features provided
through the appliccation.
4. Register your appliance following the App instructions. For
the registration process You will need the „Smart Appliance
IDentier” (SAID) number, in Connectivity Menu of HMI.
The SAID is composed by numbers and letters (10 chars ). You can take
a note of your appliance SAID here:
SAID: ... ... ... ... ... ... ... ... ... ...
PROVISIONING
• Before starting the installation process turn on your router and
verify that the wireless signal of your home router is reaching the
appliance. To verify the WiFi strength signal use a Tablet / Smartphone
connected only to the Wi-Fi router, disable any other data
connections, and place the device close to the appliance. Open any
internet web page in a browser and check that it is downloaded
fast correctly. If the internet connection of your home is working
correctly but the page is not downloaded, you may need to install a
Wi-Fi extender device (not provided with the appliance).
• If your router supports WPS 2.0 (or gather ), follow the automatic set
up procedure to connect your appliance to router. If your router is
not supported by WPS, follow the scan to connect setup procedure .
Follow the instructions on your „6th Sense Live” application on your
Tablet / Smartphone to connect the appliance to your wi network.
Otherwise read the next section for Scan to Connect or WPS methods.
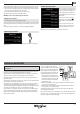
SETUP INSTRUCTION (rst time use) – scan to connect method
This procedure uses the Easy connect technology and is always
applicable in particular if your router does not support WPS
1. Install in your smart device the „6th Sense Live” application.
2. Assure that you smart device is connected to same WiFi network
where you want to join the appliance.
3. On internal UI select Connectivity menu and active, pressing OK, the
scan to connect item.
4. On APP select + to add a new appliance, selecting dishwasher and
Easy connect/scan to connect method.
5. The SAID code may be scanned from label on the inner door
or displayed on internal UI and manually inputted on APP.
6. Proceed following the App suggestions (provisioning wizard).
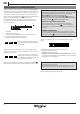
AUTOMATIC SETUP INSTRUCTION – WPS
This procedure is applicable only if your router supports (WiFi Protected
Setup) WPS2.0 (or greater).
1. On your appliance activate the WPS provisioning process.
The appliance is being set to a “search” mode for a local network.
The Connectivity icon on the appliance starts blinking fast.
2. On wireless router press the WPS button to establish a
connection between the two products. An indicator light on your
router will begin blinking.
3. When the appliance successfully connects to the local router, the
WiFi icon switches from fast to slow blinking (supported not in
all appliances).
4. The appliance try to connect to Backend system. Connectivity icon
be comes steady.
If the WiFi icon does not stop blinking after few minutes, then the
appliance has failed to nd the connections to home network using
WPS. Try the procedure again and if not successful.
WEB CONNECTION INSTRUCTION
1. On your computer or smartphone/tablet, access your home network
wireless settings and view the list of available wireless networks.
Your appliance will recieved SSID like WP_88_A1_23_B3_66_C3.
2. Select your appliance from the list. It will be identied with the charac-
ters of MAC ADDRESS but without colons
(e.g. WP_88_A1_23_B3_66_
C3).
You may need to refresh the list of networks.
3. In the network passphrase enter the SAID
*)
number. Note: This
passphrase is case sensitive, click SUBMIT, then connect to the network.
*)
You may nd SAID on the label located on door edge.
4. Open a web browser. If nothing appears, type “192.168.10.1” in
the address bar and press Enter. In the drop down list of available
networks, select the name of your home wireless network.
If home wireless network is hidden, select OTHER and manually
enter its name and security protocol. Enter passphrase for your home
wireless network, if required, and submit.
5. Access your wireless settings and re-open the view of available
wireless networks. Ensure that your computer is once again
connected to your home wireless network. If it is not, select your
home wireless network and connect.
6. Proceed to REGISTRATING YOUR APPLIANCE.
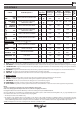
SAID: 0123456789
MAC ID: 88:E7:12:XX:YY:ZZ
QR
code
Contains FCC ID: A5UWICHIN01
Contains ID: 10248A- WICHIN01