MICROWAVE OVEN Use & Care Guide For questions about features, operations/performance, parts, accessories, or service, call: 1-800-253-1301 or visit our website at www.whirlpool.com. Table of Contents..............................................
TABLE OF CONTENTS MICROWAVE OVEN SAFETY.........................................................3 INSTALLATION INSTRUCTIONS....................................................5 Unpacking.....................................................................................5 Location Requirements.................................................................5 Electrical Requirements................................................................5 PARTS AND FEATURES...........................................
MICROWAVE OVEN SAFETY Your safety and the safety of others are very important. We have provided many important safety messages in this manual and on your appliance. Always read and obey all safety messages. This is the safety alert symbol. This symbol alerts you to potential hazards that can kill or hurt you and others. All safety messages will follow the safety alert symbol and either the word “DANGER” or “WARNING.
IMPORTANT SAFETY INSTRUCTIONS ■ Liquids, such as water, coffee, or tea are able to be overheated beyond the boiling point without appearing to be boiling. Visible bubbling or boiling when the container is removed from the microwave oven is not always present. THIS COULD RESULT IN VERY HOT LIQUIDS SUDDENLY BOILING OVER WHEN THE CONTAINER IS DISTURBED OR A SPOON OR OTHER UTENSIL IS INSERTED INTO THE LIQUID. To reduce the risk of injury to persons: – Do not overheat the liquid.
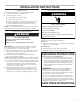
INSTALLATION INSTRUCTIONS Unpacking Electrical Requirements 1. Empty the microwave oven of any packing materials. 2. Clean the inside with a soft, damp cloth. 3. Check for damage, such as: ■■ a door that is not lined up correctly, ■■ damage around the door, or WARNING dents on the interior or exterior of the microwave oven. If there is any damage, do not operate the microwave oven until a designated service technician has checked it and made any needed repairs.
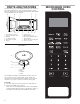
PARTS AND FEATURES This manual may cover several different models. The model you have purchased may have some or all of the features shown here. The appearance of your particular model may differ slightly from the illustrations in this manual. A B K C J D I F. G. H. I. J. K. A. Door handle (on models without push button open) B. Window C. Cooking guide label D. Microwave oven light E.
Display Clock When power is first supplied to the microwave oven, “0:00” will appear in the display. If the “0:00” appears in the display at any other time, a power failure has occurred. Reset the clock if needed. See the “Clock” section. NOTE: The display language may be set to French, and the weight entry mode may be set to metric within the first 5 minutes of power-up. See the “Language” and “Weight Entry Mode” sections. This is a standard 12-hour clock (1:00-12:59). The Clock cannot be erased.
MICROWAVE OVEN USE A magnetron in the microwave oven produces microwaves which reflect off the metal floor, walls, and ceiling and pass through the turntable and appropriate cookware to the food. Microwaves are attracted to and absorbed by fat, sugar, and water molecules in the food, causing them to move, producing friction and heat which cooks the food. Cooking Guidelines Covering ■■ To avoid damage to the microwave oven, do not lean on or allow children to swing on the microwave oven door.
Cookware and Dinnerware Cookware and dinnerware must fit on the turntable. Always use oven mitts or pot holders when handling because any dish may become hot from heat transferred from the food. Do not use cookware and dinnerware with gold or silver trim. Use the following chart as a guide, then test before using.
Manual Cooking NOTE: To cook at 100% power, begin by touching the number keypads to enter cook time, then touch START. To Use: 1. Place food on the turntable and close the door. 2. Touch COOK TIME. “00:00” will appear in the display. Enter the length of time to cook. If cooking with 100% power, skip Step 3. 3. Touch POWER LEVEL. The default power level PL10 will appear in the display. Enter the desired power level. See the “Microwave Cooking Power” section. 4. Touch the Start keypad.
Menu (sensor and non-sensor) The following menu items are preprogrammed for quick and easy cooking/reheating. For added convenience, the available/recommended amounts shown in the following chart are included on the Cooking Guide label (see the “Parts and Features” section for its location). Menu Item Serving Size Instructions POPCORN (non-sensor) 3.5 oz (99 g) 3.0 oz (85 g) 1.75 oz (50 g) ■■ To avoid damage to the microwave oven, do not use regular paper bags or glassware.
Weight Defrost/Timed Defrost The Weight Defrost feature’s preset programs can be used, the Timed Defrost feature can be used, or the microwave oven can be manually set to defrost. ■■ Unwrap foods and remove lids (for example, from fruit juice containers) before defrosting. ■■ Shallow packages will defrost more quickly than deep blocks. ■■ Separate food pieces as soon as possible during or at the end of the cycle for more even defrosting.
MICROWAVE OVEN CARE General Cleaning IMPORTANT: Before cleaning, make sure all controls are off and the microwave oven is cool. Always follow label instructions on cleaning products. Soap, water, and a soft cloth or sponge are suggested unless otherwise noted. MICROWAVE OVEN CAVITY To avoid damage to the microwave oven cavity, do not use soap-filled scouring keypads, abrasive cleaners, steel-wool pads, gritty washcloths, or some recycled paper towels.
TROUBLESHOOTING First try the solutions suggested here. If you need further assistance or more recommendations that may help you avoid a service call, refer to the warranty page in this manual and scan the code there with your mobile device, or visit producthelp.whirlpool.com. Contact us by mail with any questions or concerns at the address below: In the U.S.A.
If you experience Recommended Solutions Radio, TV, or cordless Check the following: phone interference ■■ Proximity: Move the receiver away from the microwave oven or adjust the radio or TV antenna. If the microwave oven is plugged into the same outlet, try a different outlet for the electronic device. ■■ Soil: Make sure the microwave oven door and sealing surfaces are clean. ■■ Frequency: Some 2.
WHIRLPOOL® COUNTERTOP MICROWAVE LIMITED WARRANTY ATTACH YOUR RECEIPT HERE. PROOF OF PURCHASE IS REQUIRED TO OBTAIN WARRANTY SERVICE.