KITCHENAID® BUILT-IN MICROWAVES WITH TRIM KITS Thank you for Choosing KitchenAid® Appliances. We hold our company to the highest quality standards and it is important to us that you have a positive experience owning a KitchenAid® product. Register your microwave oven at www.kitchenaid.com/owners. In Canada, register your microwave oven at www.kitchenaid.ca/owners.
IMPORTANT SAFETY INSTRUCTIONS ■ ■ ■ ■ ■ ■ ■ ■ ■ ■ ■ Use the microwave oven only for its intended use as described in the manual. Do not use corrosive chemicals or vapors in the microwave oven. This type of oven is specifically designed to heat, cook, or dry food. It is not designed for industrial or laboratory use. As with any appliance, close supervision is necessary when used by children.
Electrical Requirements GROUNDING INSTRUCTIONS ■ For all cord connected appliances: The microwave oven must be grounded. In the event of an electrical short circuit, grounding reduces the risk of electric shock by providing an escape wire for the electric current. The microwave oven is equipped with a cord having a grounding wire with a grounding plug. The plug must be plugged into an outlet that is properly installed and grounded.
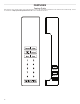
FEATURES Feature Guide This manual covers several models. Your model may have some or all of the items listed. Refer to this manual or the Product Help section of our website at http://producthelp.kitchenaid.com for more detailed instructions.
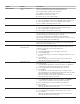
Keypad Feature Instructions Options/Clock Set the Clock This microwave uses a 12 hour clock (1:00 - 12:59). To set the clock, follow the instructions below: 1. Press the OPTIONS/CLOCK button repeatedly until Clock is displayed. 2. Press the number keys to set the clock. 3. Press START or OPTIONS/CLOCK to save the time. NOTE: Timer Set/Off Options/Clock ■ After power loss, it may be necessary to reset the clock. ■ The default clock value in the memory is “ : ”.
Keypad Feature Instructions Options/Clock Set the Sound (Tones) on/off Disable or enable button tones, and set the volume level. Press the OPTIONS/CLOCK button repeatedly until Sound. Press number button 1-Button Tones, 2-Volume. Press START or OPTIONS/CLOCK to save. ■ Button Tones: Press 1-On, 2-Off ■ Volume: Press 1-Low, 2-Med, 3-High Options/Clock Set Scrolling Speed Scrolling speed options will be between Low, Medium and High speeds. 1.
Keypad Feature Instructions SOFTEN/MELT Soften/Melt The Soften/Melt function is used to soften or melt food. To use: 1. Touch SOFTEN/MELT repeatedly to select food category, see SOFTEN/ MELT section for the food category or the door sticker on the unit. 2. Use the number button to enter the quantity. Close the door. 3. Press START button. When the stop time is reached, the microwave oven will shut off automatically, and the end tone will sound.
MICROWAVE OVEN USE A magnetron in the microwave oven produces microwaves which reflect off the metal floor, walls, and ceiling and pass through the turntable and appropriate cookware to the food. Microwaves are attracted to and absorbed by fat, sugar, and water molecules in the food, causing them to move, producing friction and heat which cooks the food. Size and Shape Smaller pieces of food will cook more quickly than larger pieces, and uniformly shaped foods cook more evenly than irregularly shaped food.
Cookware and Dinnerware Cookware and dinnerware must fit on the turntable. Always use oven mitts or pot holders when handling because any dish may become hot from heat transferred from the food. Do not use cookware and dinnerware with gold or silver trim. Use the following chart as a guide, then test before using. Microwave Cooking Power Many recipes for microwave cooking specify which cooking power to use by percent, name, or number. For example, 70%=Medium-High=7.
Popcorn Soften/Melt Two choices, press Popcorn repeatedly. Small bag: 1.75 oz (50 g) only Large bag: Senses 3.0-3.5 oz (85-99 g) Soften and Melt functions may be used to soften or melt your food. Times and cooking powers have been preset for a number of food types. Use the following chart as a guide. ■ Do not use regular paper bags or glassware. Item Food Category Quantity Preparation ■ Pop only one package of popcorn at a time.
Defrost ■ For optimal results, food should be 0°F (-18°C) or colder when defrosting. ■ Unwrap foods and remove lids (from fruit juice) before defrosting. ■ Shallow packages will defrost more quickly than deep blocks. ■ Separate food pieces as soon as possible during or at the end of the cycle for more even defrosting. ■ Foods left outside the freezer for more than 20 minutes or frozen ready-made food should not be defrosted using the Defrost feature but should be defrosted manually.
MICROWAVE OVEN CARE General Cleaning IMPORTANT: Before cleaning, make sure all controls are off and the microwave oven is cool. Always follow label instructions on cleaning products. Soap, water, and a soft cloth or sponge are suggested first, unless otherwise noted. STAINLESS STEEL (on some models) NOTE: To avoid damage to stainless steel surfaces, do not use soap-filled scouring pads, abrasive cleaners, cooktop polishing creme, steel-wool pads, gritty washcloths, or abrasive paper towels.
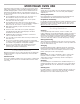
MICROWAVE OVEN CARE 4. Remove the 4 screws which fasten the trim kit frame to the microwave oven, and set the 4 screws aside. A 9. Unplug the LED terminal. Terminal B C A. Trim Kit Frame B. #7-18x7/16" round head sheet metal screw (4) C. Screw holes (4) 10. Connect replacement LED to terminal and snap it into place, securing with the hook. Hook 5. Pull the Trim Kit Frame away from the front of the microwave to release it.
TROUBLESHOOTING First try the solutions suggested here. If you need further assistance or more recommendations that may help you to avoid a service call, refer to the warranty page in this manual or visit www.kitchenaid.com/owners. Contact us by mail with any questions or concerns at the address below: In the U.S.A.: KitchenAid Brand Home Appliances Customer eXperience Center 553 Benson Road Benton Harbor, MI 49022-2692 Please include a daytime phone number in your correspondence.
MICROONDAS EMPOTRABLES KITCHENAID® CON KITS DE MOLDURAS Le agradecemos por elegir los electrodomésticos KitchenAid®. Nuestra compañía mantiene las reglas más estrictas de calidad, y para nosotros es importante que usted tenga una experiencia positiva como propietario de un producto KitchenAid®. Registre su horno de microondas en www.kitchenaid.com/owners. En Canadá, registre su horno de microondas en www.kitchenaid.ca/owners.
INSTRUCCIONES IMPORTANTES DE SEGURIDAD ■ ■ ■ ■ ■ ■ ■ ■ ■ No opere el horno de microondas si el cable o el enchufe están dañados, si el horno no funciona correctamente o si se ha dañado o caído. El horno de microondas debe ser reparado sólo por personal técnico calificado. Llame a una compañía de servicio autorizada para el examen, reparación o ajuste. No cubra ni bloquee ninguna abertura en el horno de microondas. No guarde este horno de microondas a la intemperie.
Requisitos eléctricos ADVERTENCIA INSTRUCCIONES PARA LA CONEXIÓN A TIERRA ■ Peligro de Choque Eléctrico Conecte a un contacto de pared de conexión a tierra de 3 terminales. No quite la terminal de conexión a tierra. No use un adaptador. No use un cable eléctrico de extensión. No seguir estas instrucciones puede ocasionar la muerte, incendio o choque eléctrico. Respete todos los códigos y las ordenanzas vigentes.
FUNCIONES Guía de funciones Este manual abarca varios modelos. Su modelo puede contar con algunos o todos los elementos enumerados. Consulte este manual o la sección de Ayuda del producto de nuestro sitio web en http://producthelp.kitchenaid.com para obtener instrucciones más detalladas.
Tecla Función Instrucciones Options/Clock (Opciones/reloj) Ajustar el reloj Este microondas utiliza un reloj de 12 horas (1:00 - 12:59). Para ajustar el reloj, siga las instrucciones a continuación: 1. Presione el botón OPTIONS/CLOCK (Opciones/reloj) repetidamente hasta que aparezca Clock (Reloj) en la pantalla. 2. Use las teclas numéricas para configurar el reloj. 3. Presione START (Iniciar) o OPTIONS/CLOCK (Opciones/reloj) para guardar la hora.
Tecla Función Instrucciones Options/Clock (Opciones/reloj) Configurar el sonido (tonos) encendido/ apagado Active o desactive los tonos de los botones, y configure el nivel de volumen. Presione el botón OPTIONS/CLOCK (Opciones/reloj) repetidamente hasta que aparezca Sound (Sonido). Presione el botón numérico 1-Tonos de botones, 2-Volumen. Presione START (Iniciar) o OPTIONS/CLOCK (Opciones/reloj) para guardar.
Tecla Función Instrucciones REHEAT (Recalentar) Recalentar automáticamente Para recalentar con las funciones preestablecidas, siga las instrucciones a continuación: 1. Toque REHEAT (Recalentar) repetidamente para seleccionar la categoría de alimento, consulte la sección REHEAT (Recalentar) para ver las categorías de alimentos o consulte la calcomanía pegada en la puerta de la unidad. 2. Toque el botón numérico para ingresar la cantidad. Cierre la puerta. 3. Toque START (Iniciar).
USO DEL HORNO DE MICROONDAS El magnetrón del horno de microondas produce microondas que se reflejan del piso de metal, las paredes y el techo y atraviesan la bandeja giratoria y los utensilios adecuados hasta los alimentos. La grasa, el azúcar y las moléculas de agua de los alimentos atraen y absorben las microondas, que los hace mover y producir la fricción y el calor que cocinan los alimentos. ■ Para evitar daños al horno de microondas, no se apoye en la puerta ni permita que los niños jueguen con ella.
Utensilios de cocina y vajilla Los utensilios de cocina y la vajilla deben caber en la bandeja giratoria. Siempre use guantes para hornear o agarraderas para manipular los utensilios, ya que cualquier plato puede calentarse por el calor transferido de los alimentos. No use utensilios ni vajilla con bordes dorados o plateados. Use el cuadro siguiente a modo de guía y luego pruebe los utensilios antes de utilizarlos.
Potencia de cocción del microondas Muchas recetas para cocinar en microondas especifican la potencia de cocción que se debe utilizar por porcentaje, por nombre o por número. Por ejemplo, 70% = media-alta = 7. Use la tabla siguiente como guía general para la potencia de cocción sugerida para alimentos específicos.
Soften/Melt (Ablandar/derretir) Popcorn (Palomitas de maíz) Dos opciones, presione repetidamente Popcorn (Palomitas de maíz). Bolsa pequeña: Solo de 1,75 oz (50 g) Bolsa grande: Detecta de 3,0 a 3,5 oz (85 a 99 g) Las funciones de ablandar y derretir se puede utilizar para ablandar o derretir alimentos. Se han ajustado previamente tiempos e intensidades de cocción para varios tipos de alimentos. Utilice la siguiente tabla como guía. ■ No use bolsas de papel común ni utensilios de vidrio.
Defrost (Descongelar) ■ Para obtener resultados óptimos, los alimentos deben estar a 0 °F (-18 °C) o más fríos al descongelarlos. ■ Quite el envoltorio de los alimentos y retire las tapas (de los jugos de fruta) antes de descongelar. ■ Los paquetes poco profundos se descongelarán con más rapidez que los bloques profundos. ■ Separe los trozos de alimentos lo antes posible, durante o al final del ciclo, para lograr un descongelado más uniforme.
CUIDADO DEL HORNO DE MICROONDAS Limpieza general IMPORTANTE: Antes de la limpieza, asegúrese de que todos los controles estén apagados y que el horno de microondas esté frío. Siempre siga las instrucciones de las etiquetas de los productos de limpieza. En primer lugar, se sugiere el empleo de jabón, agua y una esponja o paño suave, salvo que se indique lo contrario.
CUIDADO DEL HORNO DE MICROONDAS 4. Retire los 4 tornillos que sujetan el marco del kit de molduras al horno de microondas y deje los 4 tornillos a un lado. A 9. Desconecte el terminal de LED. Terminal B C A. Marco del kit de molduras B. Tornillo de cabeza redonda para chapa n.° 7-18 x 7/16" (4) C. Orificios para tornillos (4) 10. Conecte el LED de repuesto al terminal, trábelo en su lugar y fíjelo con el gancho. Gancho 5. Tire del marco del kit de molduras hacia afuera para liberarlo.
SOLUCIÓN DE PROBLEMAS Pruebe primero las soluciones sugeridas aquí. Si necesita asistencia adicional o más recomendaciones que puedan ayudarle a evitar una llamada al servicio técnico, consulte la página de la garantía de este manual o visite www.kitchenaid.com/owners. Si tiene preguntas o dudas, contáctenos por correo a la dirección que aparece a continuación: En los EE. UU.
ACCESORIOS/PIEZAS DE REPUESTO Para obtener accesorios en EE. UU., puede visitar nuestro sitio web en https://www.kitchenaid.com/owners o llamarnos al 1-800-422-1230.
NOTAS 31
NOTAS W11416161B ® /™ ©2020 All rights reserved. Todos los derechos reservados.