
Installation Instruction


2
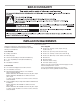
BUILT-IN OVEN SAFETY
INSTALLATION REQUIREMENTS
Tools and Parts
Gather the required tools and parts before starting
installation. Read and follow the instructions provided
with any tools listed here.
Tools Needed
■ Phillips screwdriver
■ Measuring tape
■ Hand or electric drill (for wall cabinet installations)
■ 1" (2.5 cm) drill bit (for wall cabinet installations)
■ Level
■ Flat-blade screwdriver
Parts Needed
■ UL Listed or CSA Approved conduit connector
■ UL Listed wire connectors
■ Warming Drawer Deflector Kit (for ovens installed
above a warming drawer):
Order Part Number W11123007 for bronze 30" (76.2 cm) kit
Order Part Number W10536339 for stainless steel 30"
(76.2 cm) kit
To order, see the “Assistance or Service” section of the Use
and Care Guide.
■ Flush Installation Kit (for Single and Double installed at flush
installation):
Order Part Number W11123003 for stainless steel 30"
(76.2 cm) kit
Order Part Number W11123005 for bronze 30" (76.2 cm) kit
To order, see the “Assistance or Service” section of the Use
and Care Guide.
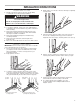
Parts Supplied
■ #8-14 x 3/4" (19 mm) screws: single ovens (2),
double ovens (4)
■ #8-18 x 3/8" (9.5 mm) screws: bottom vent (2)
■ #8-18 x 1/4" 6.4 mm) screws: bottom vent trim (4)
■ #8-18 x 3/8" (09.5 mm) screws: double oven feet (4)
■ Bottom vent
■ Bottom vent trim
■ Rear feet: double oven (2)
■ Front feet: double oven (2)
Check local codes. Check existing electrical supply. See the
“Electrical Requirements” section.
It is recommended that all electrical connections
be made by a licensed, qualified electrical installer.