BUILT-IN ELECTRIC SINGLE AND DOUBLE OVEN USER INSTRUCTIONS THANK YOU for purchasing this high-quality product. Register your new oven at www.whirlpool.com. In Canada, register your oven at www.whirlpool.ca. For future reference, please make a note of your product model and serial numbers. These can be located on the right-hand side underneath the control panel. Model Number___________________________________________ Serial Number____________________________________________ Table of Contents OVEN SAFETY...
OVEN SAFETY IMPORTANT SAFETY INSTRUCTIONS WARNING: To reduce the risk of fire, electrical shock, injury to persons, or damage when using the oven, follow basic precautions, including the following: ■ Proper Installation – Be sure the oven is properly installed and grounded by a qualified technician. ■ Never Use the Oven for Warming or Heating the Room. ■ Do Not Leave Children Alone – Children should not be left alone or unattended in area where oven is in use.
State of California Proposition 65 Warnings: WARNING: This product contains one or more chemicals known to the State of California to cause cancer. WARNING: This product contains one or more chemicals known to the State of California to cause birth defects or other reproductive harm. OVEN USE Feature Guide This manual covers several models. Your model may have some or all of the items listed. Refer to this manual or Frequently Asked Questions (FAQs) section of our website at www.whirlpool.
Touch Panel Set-Up and Demo Mode The touch panel houses the control menu and function controls. The touch keypads are very sensitive and require only a light touch to activate. Scroll up, down, left, or right to explore the different options and features. For more information about the individual controls, see their respective sections in this manual. 1. Select STORE DEMO MODE to enter Demo Mode. OR 1. Select NEXT to enter into product use. 2.
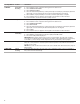
Cooking Methods WARNING Food Poisoning Hazard Do not let food sit in oven more than one hour before or after cooking. Doing so can result in food poisoning or sickness. Cooking Method Feature Instructions BAKE Baking and Roasting 1. 2. 3. 4. BROIL Broiling 1. 2. 3. 4. CONVECT BAKE Convection Baking 1. 2. 3. 4. CONVECT BROIL Convection Broiling 1. 2. 3. 4. Press the Oven Power or Upper/Lower keypad for the desired oven. Select COOKING METHODS. Select BAKE.
Cooking Method Feature Instructions CONVECT Convection Roasting 1. 2. 3. 4. KEEP WARM Keep Warm Food must be at serving temperature before placing it in the warmed oven. 1. Press the Oven Power or Upper/Lower keypad for the desired oven. 2. Select COOKING METHODS. 3. Select KEEP WARM. 4. Select the desired temperature by scrolling left to right or manually by selecting the grid in the upper right corner and entering the desired temperature into the keypad. 5. Select START. 6.
Favorites The Favorites feature stores the oven mode and temperature for your favorite recipe. As you continue to utilize your Favorites tool, your product will refine and tailor suggestions towards your cooking cravings/ needs. NOTE: A select set of Favorites and suggestions may be automatically shown on the Home screen based on your meal times. To save a recipe, select the Favorites keypad (heart icon) and follow the prompts on the screen to customize your favorites.
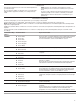
Tools The Tools keypad allows you access to functions and customization options for your oven. These tools allow you to set the clock, change the oven temperature between Fahrenheit and Celsius, turn the audible signals and prompts on and off, adjust the oven calibration, change the language, and more. Select the Tools keypad to view the Tools features: Preferences ■■ Remote Enable ■■ Kitchen Timer Times and Dates Set time and date preferences.
More Modes Temperature Calibration Sabbath Mode IMPORTANT: Do not use a thermometer to measure the oven temperature. Elements will cycle on and off as needed to maintain a consistent temperature but may run slightly hot or cool at any point in time due to this cycling. Opening the oven door will affect cycling of the elements and impact the temperature. The oven provides accurate temperatures and has been thoroughly tested at the factory.
OVEN USE Convection Cooking Aluminum Foil IMPORTANT: To avoid permanent damage to the oven bottom finish, do not line the oven bottom with any type of foil or liner. For best cooking results, do not cover entire oven rack with foil because air must be able to move freely. To catch spills, place foil on rack below dish. Make sure foil is at least 1/2" (13 mm) larger than the dish and that it is turned up at the edges.
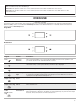
To Replace Roll-Out Extension Rack: Roll-Out Extension Rack The roll-out extension rack allows easy access to position food in the oven, and remove food from the oven. It can be used in rack positions 1 through 6. Open Position A B 1. U sing two hands, grasp the front of the closed rack and the sliding shelf. Place the closed rack and the sliding shelf on the rack guide. 2. Using two hands, lift up on the front edge of the rack and the sliding shelf together. 3.
Preheating and Oven Temperature Preheating When beginning a Bake, Convect Bake or Convect Roast cycle, the oven will begin preheating after Start is pressed. The oven will take approximately 12 to 17 minutes to reach 350°F (177°C) with all of the oven racks provided with your oven inside the oven cavity. Higher temperatures will take longer to preheat. The preheat cycle rapidly increases the oven temperature.
Convection Cooking In a convection oven, the fan-circulated hot air continually distributes heat more evenly than the natural movement of air in a standard thermal oven. This movement of hot air helps maintain a consistent temperature throughout the oven, cooking foods more evenly, crisping surfaces while sealing in moisture and yielding crustier breads.
Self-Cleaning Cycle WARNING Burn Hazard Do not touch the oven during the Self-Cleaning cycle. Keep children away from oven during Self-Cleaning cycle. Failure to follow these instructions can result in burns. IMPORTANT: The health of some birds is extremely sensitive to the fumes given off during the Self-Cleaning cycle. Exposure to the fumes may result in death to certain birds. Always move birds to another closed and well-ventilated room. Self-clean the oven before it becomes heavily soiled.
Steam Clean General Cleaning The Steam Clean feature is designed for light oven cavity bottom cleaning on models that have hidden bake in both ovens. Allow the oven to cool to room temperature before using the Steam Clean feature. If your oven cavity is above 200°F (93°C), the Steam Clean feature will not activate until it cools down. Remove all racks and accessories from the oven cavity. For best results, use 11/4 cups (295.7 mL) of distilled or filtered water. Do not use oven cleaners.
OVEN RACKS Cleaning Method: ■■ Steel-wool pad. ■■ For racks that have discolored and are harder to slide, a light coating of vegetable oil applied to the rack guides will help them slide. OVEN CAVITY AND OVEN DOOR INTERIOR Do not use oven cleaners. Food spills should be cleaned after the oven cools. At high temperatures, foods react with porcelain and staining, etching, pitting, or faint white spots can result. Cleaning Method: ■■ Self-Cleaning cycle: See the “Self-Cleaning Cycle” section first.
TROUBLESHOOTING First try the solutions suggested here. If you need further assistance or more recommendations that may help you avoid a service call, refer to the warranty page in this manual, or visit http://www.whirlpool.com/product_help. In Canada, visit http://www.whirlpool.ca. Contact us by mail with any questions or concerns at the address below: In the U.S.A.
ASSISTANCE OR SERVICE Before calling for assistance or service, please check the “Troubleshooting” section. It may save you the cost of a service call. If you still need help, follow the instructions below. When calling, please know the purchase date and the complete model and serial number of your appliance. This information will help us to better respond to your request.
WHIRLPOOL® MAJOR APPLIANCE LIMITED WARRANTY ATTACH YOUR RECEIPT HERE. PROOF OF PURCHASE IS REQUIRED TO OBTAIN WARRANTY SERVICE. Please have the following information available when you call the Customer eXperience Center: ■■ Name, address and telephone number ■■ Model number and serial number ■■ A clear, detailed description of the problem ■■ Proof of purchase including dealer or retailer name and address IF YOU NEED SERVICE: 1.
FOUR ÉLECTRIQUE SIMPLE ET DOUBLE, ENCASTRÉ INSTRUCTIONS D'UTILISATION Nous vous REMERCIONS d’avoir acheté ce produit de haute qualité. Enregistrez votre nouveau four sur www.whirlpool.com. Au Canada, enregistrer votre four sur www.whirlpool.ca. Pour référence ultérieure, consignez par écrit les numéros de modèle et de série de votre produit. Ceux-ci se trouvent sur le côté droit sous le tableau de commande.
SÉCURITÉ DU FOUR Votre sécurité et celle des autres est très importante. Nous donnons de nombreux messages de sécurité importants dans ce manuel et sur votre appareil ménager. Assurez-vous de toujours lire tous les messages de sécurité et de vous y conformer. Voici le symbole d’alerte de sécurité. Ce symbole d’alerte de sécurité vous signale les dangers potentiels de décès et de blessures graves à vous et à d’autres.
Avertissements de la Proposition 65 de l'État de la Californie : AVERTISSEMENT : Ce produit contient au moins un produit chimique connu par l’État de Californie pour être à l’origine de cancers. AVERTISSEMENT : Ce produit contient au moins un produit chimique connu par l’État de Californie pour être à l’origine de malformations et autres déficiences de naissance. UTILISATION DU FOUR Guide des caractéristiques Ce manuel concerne plusieurs modèles.
Panneau tactile Le panneau tactile regroupe le menu de commande et les commandes des différentes fonctions. Le panneau tactile est très sensible, il suffit d’un léger toucher pour l’activer. Naviguer vers le haut, le bas, la gauche ou la droite pour explorer les différentes options et fonctions. Pour plus d’information sur chaque commande, voir leurs sections respectives dans ce manuel. Affichage L’affichage est pour le menu et les commandes de fonctionnement du four.
Méthodes de cuisson AVERTISSEMENT Risque d'empoisonnement alimentaire Ne pas laisser des aliments dans un four plus d'une heure avant ou après la cuisson. Le non-respect de cette instruction peut causer un empoisonnement alimentaire ou une maladie. Méthode de cuisson Fonction Instructions BAKE (cuisson au four) Cuisson au four et rôtissage 1. Appuyer sur la touche Oven Power (alimentation du four) ou Upper/Lower (supérieur/inférieur) pour le four désiré. 2.
Méthode de cuisson Fonction Instructions CONVECT (cuisson par convection) Cuisson au gril par convection 1. Appuyer sur la touche Oven Power (alimentation du four) ou Upper/Lower (supérieur/inférieur) pour le four désiré. 2. Sélectionner COOKING METHODS (méthodes de cuisson). 3. Sélectionner CONVECT BROIL (cuisson au gril par convection). 4.
Favoris La fonction des favoris sauvegarde le mode et la température du four pour vos recettes préférées. Au fur et à mesure que l’outil Favoris est utilisé, cet appareil affinera et adaptera les suggestions concernant les envies/besoins alimentaires de l’utilisateur. REMARQUE : Un ensemble de favoris et de suggestions peut être automatiquement affiché à l’écran d’accueil selon l’heure du repas.
Outils La touche Tools (outils) permet d’accéder aux fonctions et aux options de personnalisation du four. Ces outils permettent de régler l’horloge, d’alterner entre unités Fahrenheit et Celsius pour la température du four, d’activer ou de désactiver les signaux sonores et les messages, de régler le calibrage du four, de choisir la langue et plus. Sélectionner le clavier des outils pour afficher les outils.
Préférences Heures et dates Régler les préférences pour l’heure et la date. REMARQUE : Si l'utilisateur est connecté au Wi-Fi, la date et l'heure seront programmées automatiquement. Your Meal Times (Vos heures de repas) Régler quand petit déjeuner/déjeuner/dîner s'affiche ■■ Time (Heure) ■■ Date Time Format (Format de l'heure, AM/PM ou 24 heures [format militaire]) Sound Volume (Volume sonore) Régler les préférences pour le volume sonore.
Plus de modes Calibrage de température Mode Sabbat IMPORTANT : Ne pas utiliser de thermomètre pour mesurer la température du four. Les éléments chauffants s’allument et s’éteignent en alternance pour maintenir une température constante, mais leur température peut varier légèrement dans un sens ou dans l’autre du fait de cette alternance. L’ouverture de la porte du four affecte la mise en marche alternée des éléments et influence la température.
Papier d'aluminium IMPORTANT : Pour éviter des dommages permanents au fini du fond du four, ne pas recouvrir le fond avec du papier d’aluminium ou un revêtement quelconque. Pour obtenir les meilleurs résultats de cuisson, ne pas couvrir entièrement la grille d’aluminium, car l’air doit pouvoir circuler librement. Pour récupérer les renversements, placer du papier d’aluminium sur la grille sous le plat. S’assurer que l’aluminium est au moins 1/2" (13 mm) plus grand que le plat et que les bords sont relevés.
Grille déployante coulissante La grille déployante offre un accès facile à l’utilisateur pour le positionnement et le retrait des aliments. Elle peut être utilisées sur les positions de grille 1 à 6. Ne pas nettoyer la grille coulissante déployante au lave-vaisselle. Ceci pourrait enlever le lubrifiant de la grille et nuire à ses facultés de glissement. Voir la section “Nettoyage général” pour plus de renseignements. Position déployée Évent(s) du four A B A B C D A. Grille déployante B.
Température du four En cours d’utilisation, les éléments chauffants du four s’allument et s’éteignent en alternance pour maintenir une température constante, mais leur température peut varier légèrement dans un sens ou dans l’autre du fait de cette alternance. L’ouverture de la porte du four en cours d’utilisation laisse échapper l’air chaud et refroidit le four, ce qui peut modifier la durée nécessaire et le résultat de la cuisson.
Cuisson par convection Dans un four à convection, l’air chaud que fait circuler le ventilateur répartit plus uniformément la chaleur que le mouvement naturel de l’air dans un four thermique standard. Ce déplacement de l’air chaud aide à maintenir une température constante dans tout le four, ce qui permet de cuire les aliments plus uniformément, de faire croustiller la surface des aliments tout en conservant leur humidité naturelle et de donner des pains plus croustillants.
ENTRETIEN DU FOUR Programme d’autonettoyage AVERTISSEMENT Risque de brûlures Ne pas toucher le four au cours du programme d'autonettoyage. Garder les enfants loin du four au cours du programme d'autonettoyage. Le non-respect de ces instructions peut causer des brûlures. IMPORTANT : La santé de certains oiseaux est très sensible aux émanations qui surviennent durant le programme d’autonettoyage. L’exposition aux émanations peut entraîner la mort de certains oiseaux.
Pour arrêter le programme d’autonettoyage à tout moment : Toucher Oven Cancel (annulation de la fonction d’alimentation du four) ou Upper/Lower (supérieur/inférieur) sur les modèles à four double. Si la température du four est trop élevée, la porte reste verrouillée. Elle ne se déverrouille pas tant que le four n’a pas refroidi.
GRILLES DU FOUR Lampes du four Méthode de nettoyage : ■■ Tampon en laine d’acier. ■■ Pour les grilles ternies qui glissent difficilement, enduire légèrement les glissières d’huile végétale; cela facilitera leur glissement. CAVITÉ DU FOUR ET INTÉRIEUR DE LA PORTE DU FOUR Ne pas utiliser de nettoyants à four. Les éclaboussures alimentaires doivent être nettoyées lorsque le four a refroidi.
Problème Causes et solutions possibles Des messages s’affichent Panne de courant : Sur certains modèles, régler de nouveau l’horloge au besoin. Voir la rubrique “Préférences” dans la section “Outils”. Code d’erreur (l’afficheur indique une lettre suivie d’un numéro) : Appuyer sur la touche Cancel (annulation) pour effacer l’affichage. S’il réapparaît, appeler le service de dépannage. Voir la section “Garantie” pour plus de renseignements.
ASSISTANCE OU SERVICE Avant de faire un appel pour assistance ou service, veuillez consulter la section “Dépannage”. Cette vérification peut vous faire économiser le coût d’une intervention de dépannage. Pour de l’aide supplémentaire, suivre les instructions ci-dessous. Avant d’appeler, avoir à portée de la main la date d’achat et les numéros de modèle et de série complets de l’appareil. Ces renseignements nous aideront à mieux répondre à votre demande.
GARANTIE LIMITÉE DES GROS APPAREILS MÉNAGERS WHIRLPOOL® ATTACHEZ ICI VOTRE REÇU DE VENTE. UNE PREUVE D’ACHAT EST OBLIGATOIRE POUR OBTENIR L’APPLICATION DE LA GARANTIE.
HORNO ELÉCTRICO SIMPLE O DOBLE INTEGRADO. INSTRUCCIONES PARA EL USUARIO AGRADECEMOS su compra de este producto de alta calidad. Registre su nuevo horno en www.whirlpool.com. En Canadá, registre el horno en www.whirlpool.ca. Para referencia futura, tome nota de los números de modelo y de serie de su producto. Se encuentran en el lado derecho, debajo del panel de control.
SEGURIDAD EN EL USO DEL HORNO Su seguridad y la seguridad de los demás es muy importante. Hemos incluido muchos mensajes importantes de seguridad en este manual y en su electrodoméstico. Lea y obedezca siempre todos los mensajes de seguridad. Este es el símbolo de alerta de seguridad. Este símbolo le llama la atención sobre peligros potenciales que pueden ocasionar la muerte o una lesión a usted y a los demás.
Advertencias de la Proposición 65 del estado de California: ADVERTENCIA: Este producto contiene una o más sustancias químicas identificadas por el estado de California como causantes de cáncer. ADVERTENCIA: Este producto contiene una o más sustancias químicas identificadas por el estado de California como causantes de defectos congénitos o algún otro tipo de daños en la función reproductora. USO DEL HORNO Guía de funciones Este manual abarca varios modelos.
Panel táctil El panel de control aloja el menú de control y los controles de las funciones. Las teclas táctiles son muy sensibles y se activan con un toque ligero. Desplácese hacia arriba, abajo, derecha o izquierda para explorar las distintas opciones y funciones. Para obtener más información acerca de los controles individuales, consulte las secciones respectivas en este manual. Pantalla La pantalla contiene los controles de las funciones de menú y del horno.
Métodos de cocción ADVERTENCIA Peligro de Intoxicación Alimentaria No deje sus alimentos en el horno por más de una hora antes o después de su cocción. No seguir esta instrucción puede ocasionar intoxicación alimentaria o enfermedad. Método de cocción Función Instrucciones BAKE (horneado) Horneado y asado 1. Presione la tecla de Oven Power (Encendido del horno) o la tecla Upper/Lower (Superior o Inferior) para elegir el horno que desee. 2. Seleccione COOKING METHIODS (los métodos de cocción). 3.
Método de cocción Función Instrucciones CONVECT (convección) Asado a la parrilla por convección 1. Presione la tecla de Oven Power (Encendido del horno) o la tecla Upper/Lower (Superior o Inferior) para elegir el horno que desee. 2. Seleccione COOKING METHODS (los métodos de cocción). 3. Seleccione CONVECT BROIL (asado a la parrilla por convección). 4.
Favoritos La función Favoritos almacena el modo y la temperatura del horno de sus recetas favoritas. Cuando sigue utilizando su herramienta de favoritos, su producto pule y personaliza las sugerencia de sus necesidades de cocción. NOTA: Es posible que la pantalla inicial muestre automáticamente un conjunto seleccionado de favoritos y recomendaciones basado en sus tiempos de cocción.
Herramientas La tecla Herramientas permite acceder a funciones y opciones de personalización del horno. Con dichas herramientas puede ajustar el reloj, cambiar la temperatura del horno entre Fahrenheit y Celsius, activar o desactivar las señales y mensajes sonoros, ajustar la calibración del horno o cambiar el idioma, entre otras cosas.
Preferencias Horas y fechas Ajuste las preferencias de hora y fecha. NOTA: Si el usuario está conectado a una red Wi-Fi, la hora y la fecha se ajustan automáticamente. Your Meal Times (Sus horarios de comidas) Ajuste cuando aparezca desayuno/almuerzo/cena ■■ Time (Hora) ■■ Date (Fecha) Time Format (Formato horario,AM/PM o de 24 horas [horario militar]) Sound Volume (Volumen de sonido) Ajuste las preferencias de volumen de sonido.
Otros modos Calibración de la temperatura Modo Sabbat IMPORTANTE: No use un termómetro para medir la temperatura del horno. Los elementos se encenderán y se apagarán según sea necesario para mantener una temperatura uniforme, pero es posible que funcione en algún momento ligeramente caliente o frío a causa de este ciclo. La apertura del horno afecta a los ciclos de los elementos y a la temperatura. El horno proporciona temperaturas precisas y se ha sometido a pruebas exhaustivas en la fábrica.
Cocción por convección Papel de aluminio IMPORTANTE: Para evitar daños permanentes en el acabado de la base del horno, no lo cubra con ningún tipo de papel de aluminio o revestimiento. Para obtener resultados de cocción óptimos, no cubra toda la parrilla del horno con papel de aluminio, ya que el aire debe poder circular libremente. Para recoger las salpicaduras, coloque papel de aluminio en la parrilla que está debajo del recipiente de hornear.
Cómo volver a poner la parrilla deslizable extensible: Parrilla deslizable extensible La parrilla deslizable extensible permite un acceso fácil para mover los alimentos en el horno y retirarlos del horno. Puede utilizarse en las posiciones 1 a 6 de la parrilla. Posición abierta A B A. Parrilla deslizable extensible B. Estante deslizante 1. U sando ambas manos, sujete el frente de la parrilla enganchada y el estante deslizable.
Precalentamiento y temperatura del horno Precalentamiento Cuando comience un ciclo de horneado, horneado por convección o asado por convección, el horno comenzará a precalentarse después de que se presione el botón Start (Inicio). El horno tardará 12 a 17 minutos aproximadamente para alcanzar 177°C (350°F) con todas las parrillas de horno provistas con el horno dentro de la cavidad. Cuanto mayor sea la temperatura, más tiempo tardará el horno en precalentarse.
Asado a la parrilla Cocción por convección Para asar a la parrilla no se necesita el precalentamiento, a menos que lo indique la receta. Coloque el alimento sobre la rejilla en una bandeja para asar y sitúela en el centro de la parrilla del horno. Cierre la puerta para asegurar la temperatura adecuada para asar. NOTA: Es normal que haya olores y humo cuando el horno se use las primeras veces o si tiene mucha suciedad.
CUIDADO DEL HORNO Ciclo de autolimpieza ADVERTENCIA Peligro de Quemadura No toque el horno durante el ciclo de autolimpieza. Mantenga a los niños lejos del horno durante el ciclo de autolimpieza. No seguir estas instrucciones puede ocasionar quemaduras. IMPORTANTE: La salud de algunos pájaros es sumamente sensible a los gases emanados durante el ciclo de autolimpieza. La exposición a los gases puede ocasionar la muerte de ciertos pájaros.
Para detener la autolimpieza en cualquier momento: Toque Oven Cancel keypad (cancelar horno) en los modelos con un horno, Upper/Lower keypad (superior/inferior) en los modelos con dos hornos. Si la temperatura es demasiado alta, las puertas de los hornos permanecerán bloqueadas. No se desbloquearán hasta que se enfríen los hornos.
CAVIDAD ABIERTA E INTERIOR DE LA PUERTA DEL HORNO No use productos de limpieza para hornos. Las salpicaduras de alimentos deben limpiarse cuando el horno se enfríe. A altas temperaturas, la reacción química de los alimentos con la porcelana puede dar lugar a manchas, corrosión, picaduras o puntos blancos decolorados. Método de limpieza: ■■ Ciclo de autolimpieza: Consulte primero la sección “Ciclo de autolimpieza”.
Problema Posibles causas y/o soluciones La pantalla muestra mensajes Corte de corriente: En algunos modelos, reinicie el reloj si es necesario. Consulte “Preferencias” en la sección “Herramientas”. Código de error (la pantalla muestra una letra seguida de un número): Presione CANCEL (cancelar) para borrar la pantalla. Si vuelve a aparecer, solicite servicio técnico. Consulte la sección “Garantía” para obtener la información de contacto.
ASISTENCIA O SERVICIO TÉCNICO Antes de solicitar ayuda o servicio técnico, por favor consulte la sección “Solución de problemas”. Esto le podría ahorrar el costo de una visita de servicio técnico. Si considera que aún necesita ayuda, siga las instrucciones que aparecen a continuación. Cuando llame, tenga a mano la fecha de compra y el número completo del modelo y de serie del aparato. Esta información nos ayudará a atender mejor a su pedido.
GARANTÍA LIMITADA DE LOS ELECTRODOMÉSTICOS PRINCIPALES DE WHIRLPOOL® ADJUNTE SU RECIBO AQUÍ. SE REQUIERE LA PRUEBA DE COMPRA PARA OBTENER SERVICIO BAJO LA GARANTÍA. Tenga a mano la siguiente información cuando llame al Centro para la eXperiencia del cliente: ■■ Nombre, dirección y número de teléfono ■■ Número de modelo y de serie ■■ Una descripción clara y detallada del problema ■■ Prueba de compra incluido el nombre y la dirección del distribuidor o vendedor SI NECESITA SERVICIO TÉCNICO: 1.
® W11220325A /™ ©2018 Whirlpool. Used under license in Canada. All rights reserved. Utilisé sous licence au Canada. Tous droits réservés. Usado en Canadá bajo licencia. Todos los derechos reservados.