
Specification


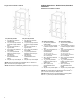


Table Of Contents
- BUILT-IN OVEN SAFETY
- Built-In Oven Safety
- OVEN MAINTENANCE AND CARE
- General Cleaning
- Self-Cleaning Cycle
- Steam Clean
- INSTALLATION INSTRUCTIONS
- REQUIREMENTS
- Tools and Parts
- Location Requirements
- Electrical Requirements
- INSTALLATIONS
- Prepare Built-In Oven
- Remove Oven Door(s)
- Positioning Oven Feet for Multiple Cabinet Cutout Heights
- Make Electrical Connection
- Install Oven
- Install Warming Drawer Deflector Kit (Only for Ovens Installed Above Warming Drawers)
- Replace Oven Door(s)
- Complete Installation
- SECURITE DU FOUR ENCASTRE
- Securite du four encastre
- ENTRETIEN ET REPARATION DU FOUR
- Nettoyage general
- Programme d'autonettoyage
- Nettoyage a la vapeur
- INSTRUCTIONS D'INSTALLATION
- SPECIFICATIONS
- Outils et pieces
- Exigences d'emplacement
- Specifications electriques
- INSTALLATION
- Preparer le four encastre
- Enlever la/les porte(s) du four
- Positionner les pieds du four pour des ouvertures de decoupe dans l'armoire
- Raccordement electrique
- Installation du four
- Installer l'ensemble de deflecteurs pour tiroir-rechaud (uniquement pour les fours installes par-dessus des tiroirs-rechauds)
- Reinstallation de la/des porte(s) du four
- Achever l'installation
- SEGURIDAD DEL HORNO INTEGRADO
- Seguridad del horno integrado
- MANTENIMIENTO Y CUIDADO DEL HORNO
- General Cleaning
- Ciclo de autolimpieza
- Steam Clean
- INSTRUCCIONES DE INSTALACION
- REQUISITOS
- Tools and Parts
- Location Requirements
- Requisitos electricos
- INSTALACIONES
- Preparacion del horno empotrado
- Retire las puertas del horno
- Ubicacion de las patas del horno para multiples alturas de corte del armario
- Como hacer la conexion electrica
- Install Oven
- Instale el kit de deflector para cajon de calentamiento (solo para hornos instalados encima de un cajon de calentamiento)
- Vuelva a colocar las puertas del horno
- Finalizacion de la instalacion

10
Cabinet Dimensions - Double Ovens, Flush Installations
NOTE: This is an alternate option to install your product in the
cabinet and obtain a flush look. For standard installation, refer
section “Cabinet Dimensions - Double Ovens, Standard
Installation”.
A 25
3
/
8
" (64.4 cm) minimum cutout depth is required.
These dimensions will result in a 1/4" (6 mm) reveal on the top, a
1/4" (6 mm) reveal on the sides, and a 1/8" (3 mm) reveal on the
bottom of the wall oven.
The front face of the cleats and platform will be visible and should
be treated as a finished surface.
Double Ovens Installed in Cabinet
Front View
27" (68.6 cm) Models
A. 9/16" (1.4 cm) top cleat*
B. 27
1
/
4
" (69.2 cm) minimum
width of flush inset cutout
C. 25
7
/
8
" (65.7 cm) minimum
width of opening
D. 52" (132.1 cm) minimum
height of flush inset cutout
E. 51
7
/
16
" (130.6 cm)
recommended cutout
height
F. 11/16" (1.7 cm) side cleat*
G. 1/4" x 2" (0.64 cm x 5.1
cm) spacer the entire
depth of the cutout*
H. Recommended junction
box location
I. 4
5
/
8
" - 14
3
/
4
" (11.7 - 37.5
cm) bottom of cutout to
floor
J. 25
3
/
8
" (64.4 cm) minimum
depth of cutout
Side View
30" (76.2 cm) Models
A. 9/16" (1.4 cm) top cleat*
B. 30
1
/
4
" (76.8 cm) minimum
width of flush inset cutout
C. 28
7
/
8
" (73.3 cm) minimum
width of opening
D. 52" (132.1 cm) minimum
height of flush inset cutout
E. 51
7
/
16
" (130.6 cm)
recommended cutout
height
F. 11/16" (1.7 cm) side cleat*
G. 1/4" x 2" (0.64 cm x 5.1
cm) spacer the entire
depth of the cutout*
H. Recommended junction
box location
I. 4
5
/
8
" - 32" (11.7 - 81.3 cm)
bottom of cutout to floor
J. 25
3
/
8
" (64.4 cm) minimum
depth of cutout
* Cleats and spacers must be recessed 1
3
/
8
" (3.5 cm) from the
front of the cabinet.
Top View
27" (68.6 cm) Models
A. 1/4" x 2" (0.64 cm x 5.1 cm)
spacer the entire depth of
the cutout*
B. 25
3
/
8
" (64.4 cm) depth of
cutout
C. 1
3
/
8
" (3.5 cm) recess from
front of cabinet
D. 11/16" (1.7 cm) side cleat*
30" (76.2 cm) Models
A. 1/4" x 2" (0.64 cm x 5.1 cm)
spacer the entire depth of
the cutout*
B. 25
3
/
8
" (64.4 cm) depth of
cutout
C. 1
3
/
8
" (3.5 cm) recess from
front of cabinet
D. 11/16" (1.7 cm) side cleat*
* Cleats and spacers must be recessed 1
3
/
8
" (3.5 cm) from the
front of the cabinet.
Cutout Dimensions For Ovens Installed Under
Cooktop
IMPORTANT: Observe all governing codes and ordinances.
Cooktop must be approved for use over an oven. See cooktop
Installation Instructions for cutout dimensions. Center the cooktop
cutout over oven cutout.
To avoid damage to your cabinets, check with your builder or
cabinet supplier to make sure that the materials used will not
discolor, delaminate or sustain other damage. This oven has been
designed in accordance with UL and CSA International and
complies with the maximum allowable wood cabinet temperatures
of 194°F (90°C).
Approved Built-In Oven and Electric Radiant/Coil Cooktop
Combinations
A. 24" (61 cm) cabinet depth
B. 25" (63.5 cm) countertop
depth
C. Recommended oven and
cooktop junction box
locations
D. Allow 5/8" (1.6 cm) for
oven trim to overlap on
each side
E. 27
3
/
4
" (70.5 cm) minimum
cutout height
F. 36" (91.4 cm) from cabinet
base to countertop
G.
4
5
/
8
" (11.7 cm) maximum
from cabinet base
H. See Cutout Dimensions
chart
I. 31
3
/
8
" (79.7 cm) from top
of countertop to bottom of
cutout