
Installation guide
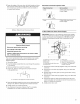
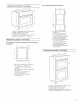

3-Wire Cable from Home Power Supply = U.S. Only
iMPORTANT: Use the 3-wire cable from home power supply
where local codes permit a 3-wire connection.
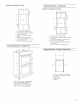
A
B
C G
D
A. Cable from home power supply
B. Junction box
C. Black wires
D. White wires
E. Green (or bare) ground wire
(from oven)
F.4-wire flexible cable from
oyen
G. Red wires
H. UL-fisted wire connectors
L UL-Iisted or CSA-approved
conduit connector
1. Connect the 2 black wires (C) together using a UL-listed wire
connector.
2. Connect the 2 white wires (D) and the green (or bare) ground
wire (of the oven cable) using a UL-listed wire connector.
3. Connect the 2 red wires (G) together using a UL-listed wire
connector.
4. Install junction box cover.
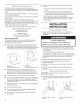
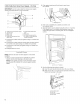
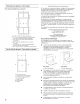
2. Push against seal area of front frame to push oven
into cabinet.
A
A. Shipping foot
3. Push oven completely into cabinet and center oven
into cabinet cutout.
4. Securely fasten oven to cabinet using the # 8-14 x 1" screws
(2 for single oven, 4 for double oven) provided. Insert the
screws through holes in mounting rails. Do not overtighten
screws.
NOTE: Remove side and vent trims taped to oven before
installing.
1. Using 2 or more people, lift oven partially into cabinet
cutout. Use the oven opening as an area to grip.
NOTE: Push against seal area of oven front frame when
pushing oven into cabinet. Do not push against outside
edges.
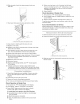
I
\
A. # 8-14 x 1" screws
5. See the following instructions to install.
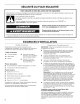
[] Insert the vent tabs (B) into slots (A) in the oven frame.
[] With one # 8-18 x s/8" screw (C) for each side of the vent,
fasten vent securely to the oven.
A B
\
D
C
A. Oven frame slot
B. Vent tab
C. # 8-18 x _8" screw
D. Oven vent
6