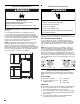
REFRIGERATOR USER INSTRUCTIONS THANK YOU for purchasing this high-quality product. Register your new refrigerator at www.whirlpool.com. In Canada, register your refrigerator at www.whirlpool.ca. For future reference, please make a note of your product model and serial numbers. These can be located on the inside wall of the refrigerator compartment.
REFRIGERATOR SAFETY Your safety and the safety of others are very important. We have provided many important safety messages in this manual and on your appliance. Always read and obey all safety messages. This is the safety alert symbol. This symbol alerts you to potential hazards that can kill or hurt you and others. All safety messages will follow the safety alert symbol and either the word “DANGER” or “WARNING.
Proper Disposal of Your Old Refrigerator WARNING Suffocation Hazard Remove doors from your old refrigerator. Failure to do so can result in death or brain damage. IMPORTANT: Child entrapment and suffocation are not problems of the past. Junked or abandoned refrigerators are still dangerous – even if they will sit for “just a few days.” If you are getting rid of your old refrigerator, please follow these instructions to help prevent accidents.
Location Requirements Electrical Requirements WARNING WARNING Electrical Shock Hazard Explosion Hazard Plug into a grounded 3 prong outlet. Keep flammable materials and vapors, such as gasoline, away from refrigerator. Do not remove ground prong. Failure to do so can result in death, explosion, or fire. Do not use an adapter. Do not use an extension cord. IMPORTANT: This refrigerator is designed for indoor, household use only. To ensure proper ventilation for your refrigerator, allow for ¹⁄₂" (1.
Water Pressure A cold water supply with water pressure of between 35 and 120 psi (241 and 827 kPa) is required to operate the water dispenser and ice maker. If you have questions about your water pressure, call a licensed, qualified plumber. Reverse Osmosis Water Supply IMPORTANT: The pressure of the water supply coming out of a reverse osmosis system going to the water inlet valve of the refrigerator needs to be between 35 and 120 psi (241 and 827 kPa).
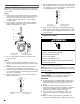
Connect to Refrigerator Depending on your model, the water line may come down from the top or up from the bottom. Follow the connection instructions for your model. 5. Using an adjustable wrench, hold the nut on the plastic water line to keep it from moving. Then, with a second wrench turn the compression nut on the copper tubing counterclockwise to completely tighten. Do not overtighten. A B Style 1 C 1. Remove plastic cap from water valve inlet port.
French Doors Replace and Remove Handles WARNING Standard Door ■ ■ ■ To replace the handle, align the handle on the door or drawer as shown. Using a Phillips screwdriver, attach the handle with the handle screws. To replace the handle trim pieces, using your hand, apply firm pressure on the face of the trim and slide the trim piece toward the center of the handle. To remove handles, reverse directions. Disconnect power before removing doors.
5. Tighten all screws. Set aside the door until hinges and freezer compartment drawer are in place. Freezer door 1. Remove the freezer handle assembly as shown in Graphic 4. Keep all parts together. 2. Remove door stop. Move to opposite side of freezer door as shown in Graphic 3. 3. Attach handle to opposite side of freezer door. 4. Tighten all screws. Set the door aside. 5. Remove the base grille by grasping the grille firmly with both hands and pulling it toward you.
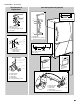
Standard Door - Freezer Door Door Swing Reversal (optional) Door Removal & Replacement 2 Top Hinge 1 A A 1 B C A A. ⁵⁄₁₆" Hex-Head Hinge Screws B D C A. Hinge Cover Screw B. Top Hinge Cover C. 5/16" Hex-Head Hinge Screws D. Top Hinge C A Center Hinge A A. Handle Trim B. Refrigerator Door Handle C. Flat-Head Handle Screws B C A. Hinge Pin Cover B. Center Hinge C. Hinge Screws Side View 3 Front View A. Door Stop Screws B. Door Stop A B 5 A Bottom Hinge 4 A B C D E A.
Standard Door - Freezer Drawer Door Removal & Replacement Door Swing Reversal (optional) 2 Top Hinge A A B C 1 B C A A. Hinge Screws D A. Hinge Cover Screw B. Top Hinge Cover C. 5/16" Hex-Head Hinge Screws D. Top Hinge B A Bottom Hinge A. Handle Trim B. Flat-Head Handle Screws C. Refrigerator Door Handle A B Side View 3 Front View C A. Hinge Pin Cover B. Bottom Hinge C. Hinge Screws A. Door Stop Screws B. Door Stop A B 5 A B C B A A. Handle Trim B. Flat-Head Handle Screws C.
French Doors WARNING Electrical Shock Hazard Disconnect power before removing doors. Failure to do so can result in death or electrical shock. Door Removal and Replacement Top Hinges A B C 1 D A. Hinge Cover Screw B. Top Hinge Cover C. 5/16" Hex Head Hinge Screws D. Top Hinge Bottom Hinges A A B C A. Hinge Pin Cover B. Bottom Hinge C. Hinge Screws A. ³⁄₃₂" or ¹⁄₈" Setscrew 2 Wiring Plug A A. ³⁄₃₂" or ¹⁄₈" Setscrew Drawer Front Removal Drawer Front Replacement A A.
Door Closing and Door Alignment The base grille covers the leveling screws and roller assemblies located at the bottom of the refrigerator cabinet below the freezer door or drawer. Before making adjustments, remove the base grille and move the refrigerator to its final location. 1. Remove the two screws fastening the base grille to the cabinet, and set the screws aside. Grasp the grille and pull it toward you. ¹⁄₄" 2. Move the refrigerator to its final location.
NOTE: Except when first turning on the refrigerator, do not adjust either temperature control more than one setting at a time. Wait 24 hours between adjustments for the temperature to stabilize. Using the Controls The control center is located at the top front of the refrigerator compartment. Temperature Controls For your convenience, your temperature controls are preset at the factory. When you first install your refrigerator, make sure the controls are still set to the recommended set points as shown.
Press the Temp Alarm touch pad until the indicator light is lit, to turn on this feature. Press and hold Temp Alarm for 3 seconds until the indicator light goes off to turn off this feature. Temperature alarm: An alarm will sound repeatedly if the freezer or refrigerator compartment temperatures exceed normal operating temperatures for an hour or more. ■ The temperature displays will alternately show the current temperatures and the highest temperatures the compartments reached.
■ Do not store anything on top of the ice maker or in the ice storage bin. Water Dispenser IMPORTANT: ■ ■ After connecting the refrigerator to a water source or replacing the water filter, flush the water system. Use a sturdy container to depress and hold the water dispenser lever for 5 seconds, then release it for 5 seconds. Repeat until water begins to flow. Once water begins to flow, continue depressing and releasing the dispenser lever (5 seconds on, 5 seconds off) until a total of 4 gal.
3. Clean the exterior surfaces. Painted metal: Wash painted metal exteriors with a clean, soft cloth or sponge and a mild detergent in warm water. Rinse surfaces with clean, warm water and dry immediately to avoid water spots. Stainless steel: Wash stainless steel surfaces with a clean, soft cloth or sponge and a mild detergent in warm water. Rinse surfaces with clean, warm water and dry immediately to avoid water spots.
7. Take out all removable parts, wrap them well, and tape them together so they don’t shift and rattle during the move. 8. Depending on the model, raise the front of the refrigerator so it rolls more easily OR raise the leveling screws so they don’t scrape the floor. See “Adjust the Door(s)” or “Door Closing and Door Alignment.” 9. Tape the doors closed and tape the power cord to the back of the refrigerator.
■ The doors are difficult to open WARNING ■ Water filter installed on the refrigerator? Remove filter and operate ice maker. If ice volume improves, then the filter may be clogged or incorrectly installed. Replace filter or reinstall it correctly. Reverse osmosis water filtration system connected to your cold water supply? This can decrease water pressure. See “Water Supply Requirements.” The ice cubes are hollow or small NOTE: This is an indication of low water pressure.
■ Reverse osmosis water filtration system connected to your cold water supply? This can decrease water pressure. See “Water Supply Requirements.” Water from the dispenser is warm NOTE: Water from the dispenser is only chilled to 50°F (10°C). Water is leaking from the dispenser system NOTE: One or two drops of water after dispensing is normal. ■ ■ ■ ■ Glass not being held under the dispenser long enough? Hold the glass under the dispenser 2 to 3 seconds after releasing the dispenser lever.
PERFORMANCE DATA SHEETS Interior Water Filtration System Model UKF8001AXX-750 Capacity 750 Gallons (2839 Liters) System tested and certified by NSF International against NSF/ANSI Standard 42, 53, 401 and CSA B483.1 for the reduction of contaminants specified on the Performance Data Sheet. This system has been tested according to NSF/ANSI Standards 42, 53, 401 and CSA B483.1 for the reduction of the substances listed below.
Water Filtration System Model UKF8001AXX-200/UKF8001 Capacity 200 Gallons (757 Liters) System tested and certified by NSF International against NSF/ANSI Standard 42, 53, 401 and CSA B483.1 for the reduction of contaminants specified on the Performance Data Sheet. This system has been tested according to NSF/ANSI Standards 42, 53, 401 and CSA B483.1 for the reduction of the substances listed below.
WHIRLPOOL® REFRIGERATION LIMITED WARRANTY ATTACH YOUR RECEIPT HERE. PROOF OF PURCHASE IS REQUIRED TO OBTAIN WARRANTY SERVICE. Please have the following information available when you call the Customer eXperience Center: ■ Name, address and telephone number ■ Model number and serial number ■ A clear, detailed description of the problem ■ Proof of purchase including dealer or retailer name and address IF YOU NEED SERVICE: 1.
INSTRUCCIONES PARA EL USUARIO DEL REFRIGERADOR LE AGRADECEMOS la compra de este producto de alta calidad. Registre su refrigerador en www.whirlpool.com. En Canadá, registre su refrigerador en www.whirlpool.ca. Para referencia futura, tome nota del número de modelo y de serie del producto, ubicados en la pared interior del compartimiento del refrigerador.
Advertencias de la Proposición 65 del estado de California: ADVERTENCIA: Este producto contiene una o más sustancias químicas identificadas por el estado de California como causantes de cáncer. ADVERTENCIA: Este producto contiene una o más sustancias químicas identificadas por el estado de California como causantes de defectos congénitos o algún otro tipo de daños en la función reproductora.
Limpieza antes del uso Una vez que usted haya quitado todos los materiales de empaque, limpie el interior de su refrigerador antes de usarlo. Vea las instrucciones de limpieza en “Cuidado de su refrigerador”. Información importante para saber acerca de los estantes y tapas de vidrio: No limpie los estantes y tapas de vidrio con agua caliente mientras están fríos. Los estantes y tapas pueden romperse si se exponen a cambios bruscos de temperatura o impacto, como sería un golpe brusco.
■ Requisitos eléctricos ■ ADVERTENCIA Use tubería de cobre y revise si hay fugas. Instale la tubería de cobre sólo en áreas donde la temperatura vaya a permanecer por encima del punto de congelación. Para modelos con filtros de agua, el filtro de agua desechable deberá reemplazarse por lo menos cada 6 meses. Presión del agua Peligro de Choque Eléctrico Conecte a un contacto de pared de conexión a tierra de 3 terminales. No quite la terminal de conexión a tierra. No use un adaptador.
Estilo 1 Conexión a la línea de agua 1. Desenchufe el refrigerador o desconecte el suministro de energía. 2. CIERRE el suministro principal de agua. ABRA la llave de agua más cercana el tiempo suficiente para que la tubería de agua se vacíe. 3. Busque una tubería vertical de agua fría de ¹⁄₂" a 1¹⁄₄" (12,7 mm a 31,8 mm) cercana al refrigerador. IMPORTANTE: ■ Asegúrese de que sea una tubería de agua fría.
5. Con una llave de tuercas ajustable, sostenga la tuerca sobre la línea de agua de plástico para evitar que se mueva. Luego, con una segunda llave, gire la tuerca de compresión que está en la tubería de cobre, en el sentido contrario de las manecillas del reloj para apretar completamente. No apriete demasiado. ■ ■ A B ■ C D Todas las ilustraciones a las que se hace referencia en las siguientes instrucciones se incluyen más adelante en esta sección, después de “Pasos finales”.
3. Quite los componentes de la bisagra superior como se muestra en la ilustración Bisagra superior. Levante y quite la puerta del refrigerador de la carcasa. 4. Saque el pasador de la bisagra central y los tornillos de la bisagra, como se muestra en la ilustración Bisagra central. Levante y quite la puerta del congelador de la carcasa. 5. Saque la rejilla de la base sujentándola firmemente con ambas manos y jalándola hacia usted. 6.
Cómo volver a poner la(s) puerta(s) y las bisagras en su lugar Cómo quitar y volver a colocar el cajón del congelador IMPORTANTE: Puerta estándar NOTA: Si el sentido de abertura de la puerta se cambia, la imagen de la puerta podría quedar invertida. Modelos con congelador de cajón 1. Vuelva a poner los componentes de la bisagra inferior en su sitio como se indica. Apriete los tornillos. NOTA: Mientras quita las bisagras siempre disponga de un soporte adicional para la puerta.
Puerta estándar–Congelador con puerta Cómo quitar y volver a poner la puerta en su lugar Cambio del sentido de abertura de las puertas (opcional) 2 1 Bisagra superior A A 1 A. Tornillos de cabeza hexagonal para bisagra de ⁵⁄₁₆" A B C B C D A. Tornillo para la cubierta de la bisagra B. Cubierta de la bisagra superior C. Tornillos de cabeza hexagonal para bisagra de ⁵⁄₁₆" D. Bisagra superior C A A. Adorno de la manija B. Manija de la puerta del refrigerador C.
Puerta estándar–Congelador de cajón Cómo quitar y volver a poner la puerta en su lugar Cambio del sentido de abertura de las puertas (opcional) 2 Bisagra superior A A B C 1 B C A D A. Tornillos para bisagra A. Tornillo para la cubierta de la bisagra B. Cubierta de la bisagra superior C. Tornillos de cabeza hexagonal para bisagra de ⁵⁄₁₆" D. Bisagra superior Bisagra inferior A B B A A. Adorno de la manija B. Tornillos de cabeza plana para la manija C.
Dos puertas con congelador en la parte inferior ADVERTENCIA Peligro de Choque Eléctrico Desconecte el suministro de energía antes de sacar las puertas. No seguir esta instrucción puede ocasionar la muerte o choque eléctrico. Cómo quitar y volver a poner la puerta en su lugar Bisagras superiores A B C 1 D A. Tornillo para la cubierta de la bisagra B. Cubierta de la bisagra superior C. Tornillos de cabeza hexagonal para bisagra de ⁵⁄₁₆" D. Bisagra superior Bisagras inferiores A A B C A.
Cierre y alineamiento de la puerta La rejilla de la base cubre los ensamblajes de tornillos niveladores y rodillos, ubicados en la base de la carcasa del refrigerador, debajo de la puerta o del cajón del congelador. Antes de hacer ajustes, quite la rejilla de la base y traslade el refrigerador hacia su ubicación final. 1. Quite los dos tornillos que sujetan la rejilla de la base a la carcasa y coloque los tornillos a un lado. Tome la rejilla con firmeza y jálela hacia usted. 5.
■ Cuando ambas puertas están cerradas, la junta con bisagras forma automáticamente un sello entre las dos puertas. ■ Presione el botón táctil (-) del refrigerador o del congelador para encender el refrigerador. Cómo ajustar los controles A El control del REFRIGERADOR regula la temperatura del compartimiento del refrigerador. El control del CONGELADOR regula la temperatura del compartimiento del congelador.
Humidity Control (Control de humedad) ■ La función de control de humedad enciende un calentador para ayudar a reducir la humedad en el sello de la bisagra de la puerta. Úselo en ambientes húmedos o cuando usted nota humedad en el sello de la bisagra de la puerta. El refrigerador utiliza más energía cuando el Control de humedad (Humidity Control) está encendido.
Fábrica de hielo IMPORTANTE: Enjuague el sistema de agua antes de encender la fábrica de hielo. Vea “Despachador de agua”. Para encender y apagar la fábrica de hielo Para ENCENDER la fábrica de hielo, sencillamente baje el brazo de control de alambre. Para APAGAR la fábrica de hielo manualmente, levante el brazo de control de alambre a la posición de OFF (Apagado - brazo elevado) y escuche el chasquido. NOTA: La fábrica de hielo tiene un apagado automático.
■ Reemplazo del filtro de agua Para comprar filtros de agua de reemplazo, modelo UKF8001AXX-750 o UKF8001AXX-200, póngase en contacto con su distribuidor o llame al 1-800-253-1301 en EE.UU. o al 1-800-807-6777 en Canadá. IMPORTANTE: El aire que quede atrapado en el sistema de agua puede hacer que se salga agua y el filtro. Siempre despache agua por un mínimo de 2 minutos antes de quitar el filtro o la tapa azul de paso. 1. Gire el filtro en el sentido contrario a las manecillas del reloj para sacarlo. 2.
■ Parte superior del compartimiento del refrigerador Deslice la pantalla de la luz hacia la parte posterior del compartimiento para liberarla del ensamblaje de luz. Mudanza Si Ud. muda su refrigerador a una casa nueva, siga los pasos a continuación para prepararse para la mudanza. 1. Si su refrigerador tiene fábrica de hielo automática: ■ Cierre el suministro de agua a la fábrica de hielo por lo menos un día antes. 3.
SOLUCIÓN DE PROBLEMAS Pruebe primero las soluciones sugeridas aquí. Si necesita asistencia adicional o más recomendaciones, para evitar posiblemente el costo de una visita de servicio técnico, consulte la página de la garantía de este manual y escanee el código con su dispositivo móvil o visite www.whirlpool.com/product_help. Contáctenos por correo electrónico con sus preguntas o dudas a la dirección que aparece a continuación: En Canadá: En los EE.UU.
■ Es difícil abrir las puertas ADVERTENCIA ■ ■ Peligro de Explosión ■ Use un limpiador no inflamable. No seguir esta instrucción puede ocasionar la muerte, explosión o incendio. ■ ¿Están las juntas sucias o pegajosas? Limpie las juntas y las superficies de contacto con jabón suave y agua tibia. Enjuague y seque con un paño suave.
El despachador de agua no funciona debidamente ■ ■ ■ ■ ■ ■ ■ ■ ¿Se ha conectado el refrigerador a un suministro de agua y se ha abierto la válvula de cierre? Conecte el refrigerador al suministro de agua y abra completamente la válvula de cierre. ¿Hay un estrechamiento en la tubería de suministro de agua? Enderece la tubería de suministro de agua. ¿Es nueva la instalación? Enjuague y llene el sistema de agua. Vea “Despachador de agua”.
HOJA DE DATOS DEL RENDIMIENTO Sistema interno de filtración de agua Modelo UKF8001AXX-750 Capacidad 750 galones (2839 litros) Sistema probado y certificado por NSF International según las normas NFS/ANSI Estándar 42, 53, 401 y CSA B483.1 para la reducción de contaminantes especificados en la Hoja de datos de rendimiento. Este sistema ha sido probado según las normas NSF/ANSI 42, 53, 401 y CSA B483.1 para la reducción de las sustancias citadas a continuación.
Sistema de filtración de agua Modelo UKF8001AXX-200/UKF8001 Capacidad de 200 galones (757 litros) Sistema probado y certificado por NSF International según las normas NFS/ANSI Estándar 42, 53, 401 y CSA B483.1 para la reducción de contaminantes especificados en la Hoja de datos de rendimiento. Este sistema ha sido probado según las normas NSF/ANSI 42, 53, 401 y CSA B483.1 para la reducción de las sustancias citadas a continuación.
GARANTÍA LIMITADA DEL REFRIGERADOR WHIRLPOOL® ADJUNTE SU RECIBO AQUÍ. SE REQUIERE UN COMPROBANTE DE COMPRA PARA OBTENER SERVICIO BAJO LA GARANTÍA. Tenga a mano la siguiente información cuando llame al Centro para la eXperiencia del cliente: ■ Nombre, dirección y número de teléfono ■ Número de modelo y de serie ■ Una descripción clara y detallada del problema ■ Comprobante de compra incluido el nombre y la dirección del distribuidor o vendedor SI NECESITA SERVICIO TÉCNICO: 1.
EXCLUSIÓN DE GARANTÍAS IMPLÍCITAS LAS GARANTÍAS IMPLÍCITAS, INCLUYENDO CUALQUIER GARANTÍA IMPLÍCITA DE COMERCIABILIDAD O GARANTÍA IMPLÍCITA DE CAPACIDAD PARA UN PROPÓSITO PARTICULAR, SE LIMITAN A UN AÑO O AL PERÍODO MÁS CORTO PERMITIDO POR LEY. Algunos estados y provincias no permiten la limitación de la duración de las garantías implícitas de comerciabilidad o capacidad, de modo que la limitación arriba indicada quizá no le corresponda.
INSTRUCTIONS D'UTILISATION DU RÉFRIGÉRATEUR Nous vous REMERCIONS d’avoir acheté ce produit de haute qualité. Enregistrer votre nouveau réfrigérateur sur le site internet www.whirlpool.ca. Pour référence ultérieure, consigner par écrit les numéros de modèle et de série de votre produit. Ceux-ci sont situés sur la paroi interne du compartiment de réfrigération.
Avertissements de la proposition 65 de l'État de Californie : AVERTISSEMENT : Ce produit contient au moins un produit chimique connu par l’État de Californie pour être à l’origine de cancers. AVERTISSEMENT : Ce produit contient au moins un produit chimique connu par l’État de Californie pour être à l’origine de malformations et autres déficiences de naissance.
Nettoyage avant l’utilisation Après avoir enlevé tous les matériaux d’emballage, nettoyer l’intérieur du réfrigérateur avant de l’utiliser. Voir les instructions de nettoyage dans “Entretien du réfrigérateur”. Importants renseignements à savoir au sujet des tablettes et des couvercles en verre : Ne pas nettoyer les tablettes ou couvercles en verre avec de l’eau tiède quand ils sont froids.
REMARQUE : Avant d’exécuter tout type d’installation, nettoyage ou remplacement d’une ampoule d’éclairage, désactiver le réfrigérateur. Selon votre modèle, mettre la commande du congélateur à la position OFF (arrêt) ou appuyer sur la touche Moins bas jusqu’à ce qu’un tiret (–) apparaisse sur l’affichage du réfrigérateur et du congélateur – voir l’illustration. Débrancher ensuite le réfrigérateur de la source d’alimentation électrique.
5. À l'aide d'une perceuse sans fil, percer un trou de ¹⁄₄" dans le tuyau de canalisation d’eau froide choisie. 2. Créer une boucle de service avec le tube de cuivre. Éviter les déformations en pliant le tube de cuivre. Fixer le tube en cuivre à la caisse du réfrigérateur avec une bride en “P”. A B A C B D E F G C D A. Canalisation d’eau froide B. Bride de tuyau C. Tube en cuivre D. Écrou de compression E. Bague de compression F. Robinet d’arrêt G. Écrou de serrage 6.
5. À l’aide d’une clé à molette, fixer l’écrou sur la canalisation d’eau pour l'empêcher de se déplacer. Ensuite, à l’aide d’une deuxième clé, tourner l’écrou sur le tube de cuivre dans le sens antihoraire pour serrer complètement. Ne pas serrer excessivement. ■ ■ A B Installation et enlèvement des poignées C Porte standard D ■ ■ A. Bride en “P” B.
5. Retirer la grille de la base en la saisissant fermement avec les deux mains et en la tirant vers vous. 6. Enlever les pièces de la charnière inférieure - voir l’illustration de la charnière inférieure. Porte à deux battants AVERTISSEMENT Risque de choc électrique Déconnecter la source de courant électrique avant d'enlever les portes. Le non-respect de cette instruction peut causer un décès ou un choc électrique. 1. Débrancher le réfrigérateur ou déconnecter la source de courant électrique. 2.
Modèles de compartiments de congélation avec porte 1. S’assurer que la plaque de charnière est bien fixée à la bride de la roulette et que l’axe de charnière est inséré dans le trou extérieur. Serrer complètement toutes les vis des brides de roulettes. Voir l’illustration 6. 2. Retirer la cale que vous avez placée sous le bord avant de la caisse du réfrigérateur. Réinstaller la porte du congélateur. REMARQUE : Prévoir un support additionnel de la porte pendant la réinstallation des charnières.
Porte standard - Porte du compartiment de congélation Inversion du sens d'ouverture des portes (option) Dépose et réinstallation de la porte 2 1 Charnière supérieure A A 1 A. Vis de charnière à tête hexagonale de 5/16" A B C B C D A. Vis de couvercle de charnière supérieure B. Couvercle de charnière supérieure C. Vis de charnière à tête hexagonale de 5/16" D. Charnière supérieure C A A. Garniture de poignée B. Poignée du compartiment de réfrigération C.
Porte standard - Tiroir de congélation Dépose et réinstallation de la porte Charnière supérieure Inversion du sens d'ouverture des portes (option) 2 A A B C 1 B C D A A. Vis de charnière A. Vis du couvercle de la charnière B. Couvercle de la charnière supérieure C. Vis de charnière à tête hexagonale de 5/16" D. Charnière supérieure Charnière inférieure A B A A. Garniture de poignée B. Vis de la poignée à tête plate C. Poignée du compartiment de réfrigération B A.
Portes à deux battants AVERTISSEMENT Risque de choc électrique Déconnecter la source de courant électrique avant d'enlever les portes. Le non-respect de cette instruction peut causer un décès ou un choc électrique. Dépose et réinstallation de la porte Charnières supérieures A B C 1 D A. Vis du couvercle de la charnière B. Couvercle de la charnière supérieure C. Vis de charnière à tête hexagonale de 5/16" D. Charnière supérieure Charnières inférieures A A B C A. Couvercle de l'axe de la charnière B.
Fermeture et alignement de la porte La grille de la base recouvre les vis de nivellement et les roulettes situées sous la caisse du réfrigérateur, sous la porte ou le tiroir du compartiment de congélation. Avant de réaliser les ajustements, retirer la grille de la base et déplacer le réfrigérateur à son emplacement définitif. 1. Retirer les deux vis fixant la grille de la base à la caisse, et les mettre de côté. Saisir la grille et la tirer vers vous. 5. Vérifier l’alignement de la porte.
■ Lorsque les deux portes sont fermées, le joint à charnière assure automatiquement l’étanchéité entre les deux portes. ■ A Appuyer sur la touche (-) du réfrigérateur ou du congélateur pour mettre le réfrigérateur en marche. Ajustement des réglages de commande La commande du RÉFRIGÉRATEUR règle la température du compartiment de réfrigération. La commande du CONGÉLATEUR règle la température du compartiment de congélation.
Humidity Control (contrôle de l’humidité) Max Cool (refroidissement maximum) La caractéristique Humidity Control déclenche la mise en marche d’un élément chauffant, qui aide à réduire l’humidité sur le joint de charnière de la porte. À utiliser dans des environnements humides ou en cas d’humidité sur le joint de charnière de la porte. Le réfrigérateur consomme plus d’énergie lors de l’activation de cette caractéristique.
Machine à glaçons IMPORTANT : Vidanger le système d’approvisionnement en eau avant de mettre en marche la machine à glaçons. Voir “Distributeur d'eau”. Mise en marche/arrêt de la machine à glaçons Pour mettre la machine à glaçons en MARCHE, il suffit d’abaisser le bras de commande en broche. Pour ARRÊTER manuellement la machine à glaçons, soulever le bras de commande en broche à la position OFF (élevée) et attendre le clic. REMARQUE : Votre machine à glaçons a un arrêt automatique.
Nettoyage de votre réfrigérateur : Remplacement du filtre à eau Pour acheter des filtres à eau de rechange, modèle UKF8001AXX750 ou modèle UKF8001AXX-200, contacter votre marchand ou appeler le 1-800-253-1301 aux É.-U. ou le 1-800-807-6777 au Canada. IMPORTANT : L’air emprisonné dans le système d’eau peut provoquer une expulsion de l’eau et du filtre. Toujours faire couler l’eau pendant au moins 2 minutes avant de retirer le filtre ou le dispositif de décharge bleu. 1.
3. Retirer la/les DEL grillée(s) et la/les remplacer par une ampoule de même taille, forme et puissance. ■ Pour remplacer l’ampoule du compartiment de congélation par une ampoule DEL, commander la pièce numéro W10565137 (3,6 watts). ■ REMARQUE : Certaines ampoules DEL de rechange ne sont pas recommandées pour des environnements humides/mouillés. Les compartiments de réfrigération et de congélation sont considérés comme des environnements humides/mouillés.
DÉPANNAGE Essayer d’abord les solutions suggérées ici. Pour obtenir de l’aide ou des conseils qui permettront peut-être d’éviter une intervention de dépannage, consulter la page de garantie de ce manuel et scanner le code avec votre appareil intelligent, ou consulter le site internet www.whirlpool.com/product_help ou www.whirlpool.ca.
■ Les portes sont difficiles à ouvrir AVERTISSEMENT ■ ■ Risque d'explosion ■ Utiliser un produit de nettoyage ininflammable. ■ Le non-respect de cette instruction peut causer un décès, une explosion ou un incendie. ■ Les joints d’étanchéité sont-ils sales ou collants? Nettoyer les joints et les surfaces de contact au savon doux et à l’eau tiède. Rincer et sécher avec un linge doux.
■ Le distributeur d’eau ne fonctionne pas correctement Le réfrigérateur est-il connecté à l’alimentation en eau et le robinet d’arrêt d’eau est-il ouvert? Brancher le réfrigérateur à l’alimentation en eau et ouvrir le robinet d’arrêt d’eau complètement. La canalisation de la source d’eau du domicile comportet-elle une déformation? Redresser la canalisation d’eau. S’agit-il d’une nouvelle installation? Rincer et remplir le système de distribution d’eau. Voir “Distributeur d’eau”.
FEUILLES DE DONNÉES SUR LA PERFORMANCE Système de filtration d’eau intérieur Modèle UKF8001AXX-750 /Capacité : 750 gallons (2839 litres) Système testé et certifié par NSF International selon la norme NSF/ ANSI 42, 53, 401 et CSA B483.1 pour la réduction des contaminants spécifiés sur la fiche technique de rendement. Ce système a été testé selon les normes NSF/ANSI 42, 53, 401 et CSA B483.1 pour la réduction des substances énumérées ci-dessous.
Système de filtration d’eau Modèle UKF8001AXX-200/UKF8001 Capacité 200 gallons (757 litres) Système testé et certifié par NSF International selon la norme NSF/ANSI 42, 53, 401 et CSA B483.1 pour la réduction des contaminants spécifiés sur la fiche technique de rendement. Ce système a été testé selon les normes NSF/ANSI 42, 53, 401 et CSA B483.1 pour la réduction des substances énumérées ci-dessous.
GARANTIE LIMITÉE DES APPAREILS DE RÉFRIGÉRATION WHIRLPOOL® ATTACHEZ ICI VOTRE REÇU DE VENTE. UNE PREUVE D’ACHAT EST OBLIGATOIRE POUR OBTENIR L’APPLICATION DE LA GARANTIE.
CLAUSE D’EXONÉRATION DE RESPONSABILITÉ AU TITRE DES GARANTIES IMPLICITES LES GARANTIES IMPLICITES, Y COMPRIS LES GARANTIES APPLICABLES DE QUALITÉ MARCHANDE OU D’APTITUDE À UN USAGE PARTICULIER, SONT LIMITÉES À UN AN OU À LA PLUS COURTE PÉRIODE AUTORISÉE PAR LA LOI. Certains États et provinces ne permettent pas de limitation sur la durée des garanties implicites de qualité marchande ou d’aptitude à un usage particulier, de sorte que la limitation ci-dessus peut ne pas être applicable dans votre cas.
NOTES 71
SP PN W10597601B W10597594C ® /™ ©2016 Whirlpool. Used under license in Canada. All rights reserved. Usada en Canadá bajo licencia. Todos los derechos reservados. Utilisé sous licence au Canada. Tous droits réservés.