
Installation Sheet
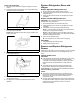
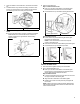
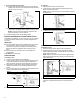
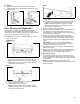
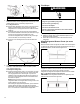
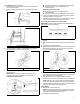
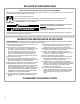
Table Of Contents
- REFRIGERATOR SAFETY
- Refrigerator Safety
- REFRIGERATOR CARE
- Cleaning
- Changing the LED Module
- Refrigerator Shelves
- Opening and Closing Doors
- Vacation and Moving Care
- INSTALLATION INSTRUCTIONS
- Unpack the Refrigerator
- Location Requirements
- Electrical Requirements
- Water Supply Requirements
- Connect the Water Supply
- Complete the Installation
- Install Air Filter (on some models)
- Install Produce Preserver (on some models)
- REFRIGERATOR FEATURES
- Crisper Humidity Control (on some models)
- Water and Ice Dispensers (on some models)
- Ice Maker and Storage Bin
- Water Filtration System
- DOOR AND HANDLE INSTRUCTIONS
- Door and Drawers
- Remove and Replace Handles
- Remove Refrigerator Doors and Hinges
- Reset Bottom Refrigerator Door Hinge
- Replace Refrigerator Doors and Hinges
- Remove and Replace Refrigerator Drawer
- Door Closing and Alignment
- PERFORMANCE DATA SHEET
- Performance Data Sheet
- SÉCURITÉ DU RÉFRIGÉRATEUR
- Sécurité du réfrigérateur
- ENTRETIEN DU RÉFRIGÉRATEUR
- Nettoyage
- Remplacer le module à DEL
- Tablettes du réfrigérateur
- Ouverture et fermeture des portes
- Précautions à prendre avant les vacances ou le déménagement
- INSTRUCTIONS D’INSTALLATION
- Déballage du réfrigérateur
- Exigences d’emplacement
- Spécifications électriques
- Spécifications de l’alimentation en eau
- Raccordement à la canalisation d’eau
- Terminer l’installation
- Installer le filtre à air (sur certains modèles)
- Installation du conservateur de produits frais (sur certains modèles)
- CARACTÉRISTIQUES DU RÉFRIGÉRATEUR
- Commande d’humidité dans le bac à légumes (sur certains modèles)
- Distributeur d’eau et de glaçons (sur certains modèles)
- Machine à glaçons et bac d’entreposage
- Système de filtration de l’eau
- INSTRUCTIONS POUR LA PORTE ET LA POIGNÉE
- Porte et tiroirs
- Pour enlever et réinstaller les poignées
- Démontage des portes et charnières du réfrigérateur
- Réinitialiser la charnière inférieure du réfrigérateur
- Réinstallation des portes et charnières
- Retrait et réinstallation du tiroir de congélation
- Fermeture et alignement des portes
- FICHE DE DONNÉES DE PERFORMANCE
- Fiche de données de performance

26
A. Brake foot A. Brake front
B. Front roller
2. Make sure the doors are even at the top and that the space
between the bottom of the refrigerator doors and the top of the
freezer drawer is even. If necessary, align the doors.
� To Align the Doors:
� Keeping both refrigerator doors closed, pull out the freezer
drawer. Locate the bottom hinge pin of the right-hand
refrigerator door. The alignment screw is inside the bottom
hinge pin.
� Insert the short end of the 1/8" hex key (packed with the
Door Handle Installation Instructions) into the bottom hinge
pin until it is fully engaged in the alignment screw.
To raise the refrigerator door, turn the hex key to the right.
To lower the door, turn the hex key to the left.
� Continue to turn the alignment screw until the doors are
aligned.
A. Bottom Hinge Pin B. 1/8” hex key
3. Make sure the refrigerator is steady. If the refrigerator seems
unsteady or rolls forward when a door or drawer is pulled
open, adjust the brake feet.
To Steady the Refrigerator:
� Open the freezer drawer. Using a 1/4" hex driver, turn both
brake feet clockwise the same amount until the brake feet
are snug against the floor. Check again. If you are not
satisfied, continue to adjust the brake feet by half turns of
the screw until the refrigerator does not roll forward when
the drawer is opened.
NOTE: Having someone push against the top of the
refrigerator takes some weight off the leveling screws. This
makes it easier to turn the screws.
After making all appropriate adjustments, replace the base
grille by aligning the ends of the grille with the leveling
assemblies on each side and snapping the grille into place.
Use a 1/4" hex driver to reinstall screws if applicable.
Final Steps
WARNING
Electrical Shock Hazard
Plug into a grounded 3 prong outlet.
Do not remove ground prong.
Do not use an adapter.
Do not use an extension cord.
Failure to follow these instructions can result in death,
fire, or electrical shock.
1. Plug into a grounded 3 prong outlet
2. Reset the controls. See “Control Panel Descriptions” in the
Quick Start Guide for details.
3. Return all removable door parts to doors and the food to
refrigerator.
Align Refrigerated Drawer Fronts (on some
models)
When the drawer fronts are aligned, the width of the vertical space
(A) between the refrigerator doors (B) and the drawer fronts (C) is
the same thickness, and the drawers appear level.
A. Vertical space between doors C. Drawer fronts
B. Drawer fronts
Aligning the drawer fronts is a two-step process. The first step is
to adjust the drawer fronts up and down. The second step shifts
the drawer fronts from side to side. Visually inspect the
refrigerator for alignment and adjust the drawer fronts as needed.
Step 1 - Adjust the Drawer Fronts Up/Down
IMPORTANT: Each refrigerated drawer can be adjusted up and
down on both the left and the right sides.