
Owners Manual
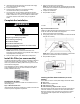
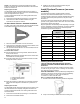
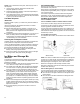
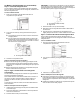
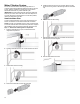
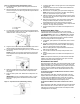
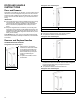
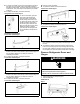
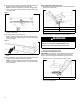
Table Of Contents
- REFRIGERATOR SAFETY
- Refrigerator Safety
- REFRIGERATOR CARE
- Cleaning
- Changing the Light Bulb
- Refrigerator Shelves
- Opening and Closing Doors
- Vacation and Moving Care
- INSTALLATION INSTRUCTIONS
- Unpack the Refrigerator
- Location Requirements
- Electrical Requirements
- Water Supply Requirements
- Connect the Water Supply
- Complete the Installation
- Install Air Filter (on some models)
- Install Produce Preserver (on some models)
- REFRIGERATOR FEATURES
- Crisper Humidity Control (on some models)
- Water and Ice Dispensers (on some models)
- Ice Maker and Storage Bin
- Water Filtration System
- DOOR AND HANDLE INSTRUCTIONS
- Door and Drawers
- Remove and Replace Handles
- Remove Refrigerator Doors and Hinges
- Reset Bottom Refrigerator Door Hinge
- Replace Refrigerator Doors and Hinges
- Remove and Replace Refrigerator Drawer
- Door Closing and Alignment
- PERFORMANCE DATA SHEET
- Performance Data Sheet
- SÉCURITÉ DU RÉFRIGÉRATEUR
- Sécurité du réfrigérateur
- ENTRETIEN DU RÉFRIGÉRATEUR
- Nettoyage
- Remplacer l’ampoule d’éclairage
- Tablettes du réfrigérateur
- Ouverture et fermeture des portes
- Précautions à prendre avant les vacances ou le déménagement
- INSTRUCTIONS D’INSTALLATION
- Déballage du réfrigérateur
- Exigences d’emplacement
- Spécifications électriques
- Spécifications de l’alimentation en eau
- Raccordement à la canalisation d’eau
- Terminer l’installation
- Installer le filtre à air (sur certains modèles)
- Installation du conservateur de produits frais (sur certains modèles)
- CARACTÉRISTIQUES DU RÉFRIGÉRATEUR
- Commande d’humidité dans le bac à légumes (sur certains modèles)
- Distributeur d’eau et de glaçons (sur certains modèles)
- Machine à glaçons et bac d’entreposage
- Système de filtration de l’eau
- INSTRUCTIONS POUR LA PORTE ET LA POIGNÉE
- Porte et tiroirs
- Pour enlever et réinstaller les poignées
- Démontage des portes et charnières du réfrigérateur
- Réinitialiser la charnière inférieure du réfrigérateur
- Réinstallation des portes et charnières
- Retrait et réinstallation du tiroir de congélation
- Fermeture et alignement des portes
- Fiche de données de performance
- Blank Page
- Blank Page
- Blank Page
- Blank Page

18
DOOR AND HANDLE
INSTRUCTIONS
Door and Drawers
Depending on the width of your doorway, you may need to remove
the doors to move the refrigerator into your home. Also, the door
hinges are factory installed on the right-hand side. If you want the
door to open from the other direction, you must reverse the door
swing.
IMPORTANT:
� If the refrigerator was previously installed and you are moving
it out of the home, before you begin, turn the refrigerator
control Off, and unplug the refrigerator or disconnect power.
Remove food and any adjustable door or utility bins from
doors.
� Keep the refrigerator doors closed until you are ready to lift
them free from the cabinet. Provide additional support for the
refrigerator door while the hinges are being removed. Do not
depend on the door gasket magnets to hold the door in place
while you are working.
Tools Needed: 5/16", 3/8", and 1/4" hex head socket wrenches,
Torx®† T25 screwdriver, #2 Phillips screwdriver, and a flat-blade
screwdriver.
Remove and Replace Handles
REFRIGERATOR DOOR HANDLES
Refrigerator Door Handle Style 1
A. 3/32" Setscrew
� Using a 3/32" or 1/8" hex key,
loosen the two setscrews located
on the side of each handle. Pull
the handle straight out from the
drawer. Make sure you keep the
screws for reattaching the
handles.
� To replace the handles, reverse
the directions.
Refrigerator Door Handle Style 2
A. Handle Trim C. Refrigerator Door Handle
B. Flat–Head Handle Screws
� Remove the screw cover.
� Remove the handle assembly. Keep all parts together.
� To replace the handles, reverse the directions.
Refrigerator Door Handle Style 3
A. Flat–Head Handle Screws B. Refrigerator Door Handle
� Using a 3/32" or 1/8" hex key, loosen the two setscrews
located on the side of each handle. Pull the handle straight out
from the drawer. Make sure you keep the screws for
reattaching the handles.
� To replace the handles, reverse the directions.
Refrigerator Door Handle Style 4
A. 3/32" or 1/8" Setscrews