
Owner's Manual


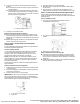

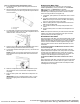


Table Of Contents
- REFRIGERATOR SAFETY
- Refrigerator Safety
- REFRIGERATOR CARE
- Cleaning
- Changing the Light Bulb
- Refrigerator Shelves
- Opening and Closing Doors
- Vacation and Moving Care
- INSTALLATION INSTRUCTIONS
- Unpack the Refrigerator
- Location Requirements
- Electrical Requirements
- Water Supply Requirements
- Connect the Water Supply
- Complete the Installation
- Install Air Filter (on some models)
- Install Produce Preserver (on some models)
- REFRIGERATOR FEATURES
- Crisper Humidity Control (on some models)
- Water and Ice Dispensers (on some models)
- Ice Maker and Storage Bin
- Water Filtration System
- DOOR AND HANDLE INSTRUCTIONS
- Door and Drawers
- Remove and Replace Handles
- Remove Refrigerator Doors and Hinges
- Reset Bottom Refrigerator Door Hinge
- Replace Refrigerator Doors and Hinges
- Remove and Replace Refrigerator Drawer
- Door Closing and Alignment
- PERFORMANCE DATA SHEET
- Performance Data Sheet
- SÉCURITÉ DU RÉFRIGÉRATEUR
- Sécurité du réfrigérateur
- ENTRETIEN DU RÉFRIGÉRATEUR
- Nettoyage
- Remplacer l’ampoule d’éclairage
- Tablettes du réfrigérateur
- Ouverture et fermeture des portes
- Précautions à prendre avant les vacances ou le déménagement
- INSTRUCTIONS D’INSTALLATION
- Déballage du réfrigérateur
- Exigences d’emplacement
- Spécifications électriques
- Spécifications de l’alimentation en eau
- Raccordement à la canalisation d’eau
- Terminer l’installation
- Installer le filtre à air (sur certains modèles)
- Installation du conservateur de produits frais (sur certains modèles)
- CARACTÉRISTIQUES DU RÉFRIGÉRATEUR
- Commande d’humidité dans le bac à légumes (sur certains modèles)
- Distributeur d’eau et de glaçons (sur certains modèles)
- Machine à glaçons et bac d’entreposage
- Système de filtration de l’eau
- INSTRUCTIONS POUR LA PORTE ET LA POIGNÉE
- Porte et tiroirs
- Pour enlever et réinstaller les poignées
- Démontage des portes et charnières du réfrigérateur
- Réinitialiser la charnière inférieure du réfrigérateur
- Réinstallation des portes et charnières
- Retrait et réinstallation du tiroir de congélation
- Fermeture et alignement des portes
- FICHE DE DONNÉES DE PERFORMANCE
- Fiche de données de performance

11
1. Remove the air filter from its packaging.
NOTE: An air filter status indicator is included with the air filter.
The indicator is not needed for models that display the air filter
status on the control panel.
2. Lift open the vented door.
3. Snap the filter into place.
A. Air filter
Style 2–Behind LED Vent Cover
Install the air filter behind the blue LED-lighted vent cover, located
on the rear wall near the middle of the refrigerator.
1. Remove the air filter from its packaging.
2. Firmly grasp plastic cover on the vented cover with both hands
and pull out to remove.
NOTE: When cover is removed for the first time, a small foam
part the size of the filter will need to be discarded.
3. Snap the filter into place.
A. Air filter
Installing the Filter Status Indicator (on some
models)
The air filter icon on the control panel displays the air filter status.
� Blue: Good.
� Yellow: Order a replacement.
� Red: Replace air filter.
� Red and flashing “Replace Filter”: Expired.
After replacing the air filter, press and hold the Air Filter button for
3 seconds. The filter icons will turn off. See “Quick Start Guide.”
When the system is reset, the air filter icon will return to its blue
color and the words “Replace Filter” will disappear from the
control panel.
NOTE: At any filter status, pressing and holding the Air Filter
button for 3 seconds will reset the air filter status to Good and the
air filter icon will turn off.
Replacing the Air Filter
The disposable air filter should be replaced every 6 months, or
when the status indicator air filter icon turns on and starts flashing
when the refrigerator door is opened.
To order a replacement air filter, see ordering information in the
Quick Start Guide.
1. Remove the used air filter by squeezing in on the side tabs.
2. Install the new air filter and status indicator using the
instructions in the previous sections.
Air Filter Status Indicator—Standard Installation
The filter comes with a status indicator, which should be activated
and installed at the same time the air filter is installed.
1. Place the indicator facedown on a firm, flat surface.
2. Apply pressure to the bubble on the back of the indicator, until
the bubble pops to activate the indicator.
3. Lift open the vented air filter door. On some models, there are
notches behind the door.
On models with notches:
� With the indicator screen facing outward, slide the indicator
down into the notches.
NOTE: The indicator will not easily slide into the notches if the
rear bubble has not been popped.
� Close the air filter door, and check that the indicator is visible
through the window in the door.
A. Status indicator window
B. Air filter status indicator
C. Notches
� Place the indicator in a visible place you will easily remember
—either inside the refrigerator or elsewhere in your kitchen or
home.
04-Jan-2021 11:49:29 EST | RELEASED
In some European factories the letter "W" of the part code mentioned herein will be automatically
replaced by the number "4000" (e.g. "W12345678" becomes "400012345678")