
Owner's Manual


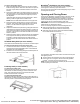


Table Of Contents
- REFRIGERATOR SAFETY
- Refrigerator Safety
- REFRIGERATOR CARE
- Cleaning
- Changing the Light Bulb
- Refrigerator Shelves
- Opening and Closing Doors
- Vacation and Moving Care
- INSTALLATION INSTRUCTIONS
- Unpack the Refrigerator
- Location Requirements
- Electrical Requirements
- Water Supply Requirements
- Connect the Water Supply
- Complete the Installation
- Install Air Filter (on some models)
- Install Produce Preserver (on some models)
- REFRIGERATOR FEATURES
- Crisper Humidity Control (on some models)
- Water and Ice Dispensers (on some models)
- Ice Maker and Storage Bin
- Water Filtration System
- DOOR AND HANDLE INSTRUCTIONS
- Door and Drawers
- Remove and Replace Handles
- Remove Refrigerator Doors and Hinges
- Reset Bottom Refrigerator Door Hinge
- Replace Refrigerator Doors and Hinges
- Remove and Replace Refrigerator Drawer
- Door Closing and Alignment
- PERFORMANCE DATA SHEET
- Performance Data Sheet
- SÉCURITÉ DU RÉFRIGÉRATEUR
- Sécurité du réfrigérateur
- ENTRETIEN DU RÉFRIGÉRATEUR
- Nettoyage
- Remplacer l’ampoule d’éclairage
- Tablettes du réfrigérateur
- Ouverture et fermeture des portes
- Précautions à prendre avant les vacances ou le déménagement
- INSTRUCTIONS D’INSTALLATION
- Déballage du réfrigérateur
- Exigences d’emplacement
- Spécifications électriques
- Spécifications de l’alimentation en eau
- Raccordement à la canalisation d’eau
- Terminer l’installation
- Installer le filtre à air (sur certains modèles)
- Installation du conservateur de produits frais (sur certains modèles)
- CARACTÉRISTIQUES DU RÉFRIGÉRATEUR
- Commande d’humidité dans le bac à légumes (sur certains modèles)
- Distributeur d’eau et de glaçons (sur certains modèles)
- Machine à glaçons et bac d’entreposage
- Système de filtration de l’eau
- INSTRUCTIONS POUR LA PORTE ET LA POIGNÉE
- Porte et tiroirs
- Pour enlever et réinstaller les poignées
- Démontage des portes et charnières du réfrigérateur
- Réinitialiser la charnière inférieure du réfrigérateur
- Réinstallation des portes et charnières
- Retrait et réinstallation du tiroir de congélation
- Fermeture et alignement des portes
- FICHE DE DONNÉES DE PERFORMANCE
- Fiche de données de performance

8
Location Requirements
WARNING
Explosion Hazard
Keep flammable materials and vapors, such as gasoline,
away from appliance.
Use nonflammable cleaner.
Failure to do so can result in death, explosion, or fire.
IMPORTANT: This appliance is intended to be used indoor for
household and similar applications such as:
� Farm houses and by clients in hotels, motels and other
residential type environments.
� Bed and breakfast type environments.
� Catering and similar non-retail applications.
NOTE: If the manufacturer wants to limit the use of the appliance
to less than the above, this has to be clearly stated in the
instructions.
To ensure proper ventilation for your refrigerator, allow for 3/16"
(0.48 cm) of space on each side and 1/4ʺ (0.64) at the top. Allow
for 1" (2.54 cm) of space behind the refrigerator. If your
refrigerator has an ice maker, allow extra space at the back for the
water line connections. When installing your refrigerator next to a
fixed wall, leave a 14" (35.56 cm) minimum space between the
refrigerator and wall to allow for the door to swing open.
NOTE: This refrigerator is intended for use in a location where the
temperature ranges from a minimum of 55°F (13°C) to a
maximum of 110°F (43°C). The preferred room temperature range
for optimum performance, which reduces electricity usage and
provides superior cooling, is between 60°F (15°C) and 90°F
(32°C). It is recommended that you do not install the refrigerator
near a heat source, such as an oven or radiator.
Electrical Requirements
WARNING
Electrical Shock Hazard
Plug into a grounded 3 prong outlet.
Do not remove ground prong.
Do not use an adapter.
Do not use an extension cord.
Failure to follow these instructions can result in death,
fire, or electrical shock.
Before you move your refrigerator into its final location, it is
important to make sure you have the proper electrical connection.
If the supply cord is damaged, it must be replaced by the
manufacturer or its service agent or a similarly qualified person.
Do not use a cord that shows cracks or abrasion damage along its
length or at either the plug or connector end.
Recommended Grounding Method
A 115 V, 60 Hz, AC-only 15 A or 20 A fused, grounded electrical
supply is required. It is recommended that a separate circuit
serving only your refrigerator and approved accessories be
provided. Use an outlet that cannot be turned off by a switch. Do
not use an extension cord.
IMPORTANT: If this product is connected to a GFCI (Ground Fault
Circuit Interrupter) protected outlet, nuisance tripping of the power
supply may occur, resulting in loss of cooling. Food quality and
flavor may be affected. If nuisance tripping has occurred, and if
the condition of the food appears poor, dispose of the food.
NOTE: Before performing any type of installation or cleaning, or
removing a light bulb, turn cooling off or turn the control
(Thermostat, Refrigerator or Freezer Control depending on the
model) to Off. On models with a digital temperature control, press
the minus sign touch pads repeatedly until a dash (-) appears in
both the freezer and refrigerator displays. Disconnect the
refrigerator from the electrical source. When you are finished,
reconnect the refrigerator to the electrical source and turn cooling
on or reset the control (Thermostat, Refrigerator or Freezer
Control depending on the model) to the desired setting. See the
“Quick Start Guide”.
Water Supply Requirements
Gather the required tools and parts before starting installation.
Read and follow the instructions provided with any tools listed
here.
Tools Needed:
� Flat-blade screwdriver
� 7/16" and 1/2" Open-end or two
adjustable wrenches
� 1/4" Nut driver
� 1/4" Drill bit
� Cordless drill
� Connect to potable water supply only
Do not use with water that is microbiologically unsafe or of
unknown quality without adequate disinfection before or after
the system. Systems certified for cyst reduction may be used
on disinfected waters that may contain filterable cysts.
� All installations must meet local plumbing code requirements.
04-Jan-2021 11:49:29 EST | RELEASED
In some European factories the letter "W" of the part code mentioned herein will be automatically
replaced by the number "4000" (e.g. "W12345678" becomes "400012345678")