
Owners Manual

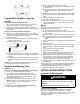
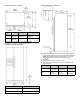
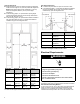
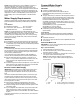
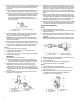
Table Of Contents
- REFRIGERATOR SAFETY
- Refrigerator Safety
- MAINTENANCE AND CARE
- Cleaning
- Lights
- Freezer Shelf (number varies by model)
- Vacation and Moving Care
- INSTALLATION INSTRUCTIONS
- Unpack the Refrigerator
- Location Requirements
- Electrical Requirements
- Water Supply Requirements
- Connect Water Supply
- Complete the Installation
- Install Air Filter (on some models)
- Install Produce Preserver (on some models)
- REFRIGERATOR FEATURES
- Convertible Drawer Temperature Control (on some models)
- Crisper Humidity Control (on some models)
- Dual Evaporator (on some models)
- Water and Ice Dispensers
- Ice Maker and Storage Bin
- Water Filtration System
- DOOR REMOVAL AND LEVELING STYLE 1
- Door Instructions
- Install and Remove Door Handles
- Remove Doors and Hinges
- Replace Doors and Hinges
- Door Closing and Alignment
- DOOR REMOVAL AND LEVELING STYLE 2
- Door Instructions
- Install and Remove Door Handles
- Remove Doors and Hinges
- Door Closing, Leveling, and Alignment
- PERFORMANCE DATA SHEET
- SECURITE DU REFRIGERATEUR
- Sécurité du réfrigérateur
- ENTRETIEN ET REPARATION
- Nettoyage
- Lampes
- Tablettes du congélateur (le nombre varie selon le modèle)
- Précautions à prendre avant les vacances ou le déménagement
- INSTRUCTIONS D'INSTALLATION
- Déballage du réfrigérateur
- Exigences d’emplacement
- Spécifications électriques
- Spécifications de l’alimentation en eau
- Raccordement à la canalisation d’eau
- Terminer l’installation
- Installer le filtre à air (sur certains modèles)
- Installation du conservateur de produits frais (sur certains modèles)
- CARACTERISTIQUES DU REFRIGERATEUR
- Commande de température dans le tiroir convertible (sur certains modèles)
- Commande d’humidité dans le bac à légumes (sur certains modèles)
- Évaporateur double (sur certains modèles)
- Distributeurs d’eau et de glaçons
- Machine à glaçons et bac d’entreposage
- Système de filtration de l’eau
- RETRAIT DE LA PORTE ET AJUSTEMENT DU NIVEAU, STYLE 1
- Instructions pour la porte
- Installation et retrait des poignées de la porte
- Démontage des portes et charnières
- Réinstallation des portes et charnières
- Fermeture et alignement des portes
- RETRAIT DE LA PORTE ET AJUSTEMENT DU NIVEAU, STYLE 2
- Instructions pour la porte
- Installation et retrait des poignées de la porte
- Démontage des portes et charnières
- Fermeture, mise à niveau et alignement des portes
- FICHE DE DONNEES RELATIVES AU RENDEMENT

10
4. Now you are ready to connect the copper or PEX tubing to the
shutoff valve. Use 1/4" (6.35 mm) O.D. (outside diameter) soft
copper or PEX tubing to connect the shutoff valve and the
refrigerator.
� Ensure that you have the proper length needed for the job.
Be sure both ends of the copper tubing are cut square.
� Slip compression sleeve and compression nut onto copper
tubing as shown. (PEX tubing has compression sleeves
and compression nuts preinstalled.) Insert end of tubing
into outlet end squarely as far as it will go. Screw
compression nut onto outlet end with adjustable wrench.
Do not overtighten.
A. Compression sleeve
B. Compression nut
C. Copper or PEX tubing
5. Place the free end of the tubing into a container or sink, and
turn on main water supply to flush out tubing until water is
clear. Turn off shutoff valve on the water pipe.
NOTE: Always drain the water line before making the final
connection to the inlet of the water valve, to avoid possible
water valve malfunction.
6. Bend the copper or PEX tubing to meet the water line inlet,
which is located on the back of the refrigerator cabinet. Leave
a coil of copper or PEX tubing to allow the refrigerator to be
pulled out of the cabinet or away from the wall for service.
Style 2
1. Unplug refrigerator or disconnect power.
2. Turn off main water supply. Turn on nearest faucet long
enough to clear line of water.
3. Locate a 1/2" (1.27 cm) to 1 1/4" (3.18 cm) vertical cold water
pipe near the refrigerator.
IMPORTANT:
� Make sure it is a cold water pipe.
� Horizontal pipe will work, but drill on the top side of the
pipe, not the bottom. This will help keep water away from
the drill and normal sediment from collecting in the valve.
4. Determine the length of copper or PEX tubing you need.
Measure from the connection on the lower rear corner of
refrigerator to the water pipe. Add 7 ft. (2.1 m) to allow for
cleaning. Use 1/4" (6.35 mm) O.D. (outside diameter) copper
or PEX tubing. Be sure both ends of copper or PEX tubing are
cut square.
5. Using a cordless drill, drill a 1/4" (6.35 mm) hole in the cold
water pipe you have selected.
A. Cold water pipe
B. Pipe clamp
C. Copper or PEX tubing
D. Compression nut
E. Compression sleeve
F. Shutoff valve
G. Packing nut
6. Fasten the shutoff valve to the cold water pipe with the pipe
clamp. Be sure the outlet end is solidly in the 1/4" (6.35 mm)
drilled hole in the water pipe and that the washer is under the
pipe clamp. Tighten the packing nut. Tighten the pipe clamp
screws slowly and evenly so the washer makes a watertight
seal. Do not overtighten, or you may crush the copper or PEX
tubing.
7. Slip compression sleeve and compression nut onto copper
tubing as shown. (PEX tubing has compression sleeves and
compression nuts preinstalled.) Insert end of tubing into outlet
end squarely as far as it will go. Screw compression nut onto
outlet end with adjustable wrench. Do not overtighten.
8. Place the free end of the tubing in a container or sink, and turn
on the main water supply. Flush the tubing until water is clear.
Turn off the shutoff valve on the water pipe. Coil the tubing.
Connect to Refrigerator
Style 1
1. Unplug refrigerator or disconnect power.
2. Remove and discard the short, black plastic part from the end
of the water line inlet.
3. Thread the nut onto the end of the tubing. Tighten the nut by
hand. Then tighten it with a wrench two more turns. Do not
overtighten.
NOTE: To avoid rattling, be sure the copper tubing does not
touch the cabinet’s side wall or other parts inside the cabinet.
A. Household water line
B. Nut (purchased)
C. Ferrule (purchased)
D. Refrigerator water tubing
4. Install the water supply tube clamp around the water supply
line to reduce strain on the coupling.
5. Turn shutoff valve on.
6. Check for leaks. Tighten any connections (including
connections at the valve) or nuts that leak.
Style 2
1. Unplug refrigerator or disconnect power.
2. Remove and discard the plastic part that is attached to the
inlet of the water valve.
3. Attach the copper or PEX tube to the valve inlet using a
compression nut and sleeve as shown. Tighten the
compression nut. Do not overtighten.
A. Tube clamp
B. Tube clamp screw
C. Copper tubing
D. Compression nut
E. Valve inlet