
Owners Manual

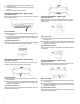
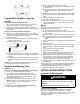
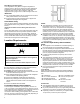
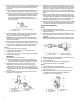
Table Of Contents
- REFRIGERATOR SAFETY
- Refrigerator Safety
- MAINTENANCE AND CARE
- Cleaning
- Lights
- Freezer Shelf (number varies by model)
- Vacation and Moving Care
- INSTALLATION INSTRUCTIONS
- Unpack the Refrigerator
- Location Requirements
- Electrical Requirements
- Water Supply Requirements
- Connect Water Supply
- Complete the Installation
- Install Air Filter (on some models)
- Install Produce Preserver (on some models)
- REFRIGERATOR FEATURES
- Convertible Drawer Temperature Control (on some models)
- Crisper Humidity Control (on some models)
- Dual Evaporator (on some models)
- Water and Ice Dispensers
- Ice Maker and Storage Bin
- Water Filtration System
- DOOR REMOVAL AND LEVELING STYLE 1
- Door Instructions
- Install and Remove Door Handles
- Remove Doors and Hinges
- Replace Doors and Hinges
- Door Closing and Alignment
- DOOR REMOVAL AND LEVELING STYLE 2
- Door Instructions
- Install and Remove Door Handles
- Remove Doors and Hinges
- Door Closing, Leveling, and Alignment
- PERFORMANCE DATA SHEET
- SECURITE DU REFRIGERATEUR
- Sécurité du réfrigérateur
- ENTRETIEN ET REPARATION
- Nettoyage
- Lampes
- Tablettes du congélateur (le nombre varie selon le modèle)
- Précautions à prendre avant les vacances ou le déménagement
- INSTRUCTIONS D'INSTALLATION
- Déballage du réfrigérateur
- Exigences d’emplacement
- Spécifications électriques
- Spécifications de l’alimentation en eau
- Raccordement à la canalisation d’eau
- Terminer l’installation
- Installer le filtre à air (sur certains modèles)
- Installation du conservateur de produits frais (sur certains modèles)
- CARACTERISTIQUES DU REFRIGERATEUR
- Commande de température dans le tiroir convertible (sur certains modèles)
- Commande d’humidité dans le bac à légumes (sur certains modèles)
- Évaporateur double (sur certains modèles)
- Distributeurs d’eau et de glaçons
- Machine à glaçons et bac d’entreposage
- Système de filtration de l’eau
- RETRAIT DE LA PORTE ET AJUSTEMENT DU NIVEAU, STYLE 1
- Instructions pour la porte
- Installation et retrait des poignées de la porte
- Démontage des portes et charnières
- Réinstallation des portes et charnières
- Fermeture et alignement des portes
- RETRAIT DE LA PORTE ET AJUSTEMENT DU NIVEAU, STYLE 2
- Instructions pour la porte
- Installation et retrait des poignées de la porte
- Démontage des portes et charnières
- Fermeture, mise à niveau et alignement des portes
- FICHE DE DONNEES RELATIVES AU RENDEMENT

4
3. Replace the burned-out light bulb, as explained in the
following sections.
4. Reinstall the light shield, as explained in the following
sections.
5. Plug in refrigerator or reconnect power.
Refrigerator Compartment – Upper Lights
Light Shield Removal:
Slide the light shield toward the rear of the refrigerator and remove
it from the light housing.
Replacement Bulb:
� If the burned-out light is a full-size LED bulb, replace it with a
2.0 W LED bulb.
� If the burned-out light is an incandescent bulb, replace it with
an incandescent appliance bulb of the same size, shape, and
wattage (40 W maximum).
Light Shield Reinstallation:
Align the light shield in the grooves at the bottom edge of the light
housing; then slide it forward until it snaps into place.
Refrigerator Compartment – Lower Lights
Light Shield Removal:
Slide the light shield to the right to remove the left end from the
wall slots; then pull the right end out of its wall slots.
Replacement Bulb:
� If the burned-out light is a full-size LED bulb, replace it with a
3.6 W LED bulb.
� If the burned-out light is an incandescent bulb, replace it with
an incandescent appliance bulb of the same size, shape, and
wattage (40 W maximum).
Light Shield Reinstallation:
Place the right end of the light shield into the wall slots; then snap
the left end into its wall slots.
Freezer Compartment – Upper Light
Light Shield Removal:
Gently squeeze the front and the bottom-rear edge of the light
shield to release the tabs from the wall slots; then pull the light
shield forward.
Replacement Bulb:
� If the burned-out light is a full-size LED bulb, replace it with a
3.6 W LED bulb.
� If the burned-out light is an incandescent bulb, replace it with
an incandescent appliance bulb of the same size, shape, and
wattage (40 W maximum).
Light Shield Reinstallation:
Align the light shield in its proper position, and snap the tabs into
the wall slots.
Freezer Compartment – Lower Light
Light Shield Removal:
Slide the light shield to the left to remove the right end from the
wall slots; then pull the left end out of its wall slots.
Replacement Bulb:
� If the burned-out light is a full-size LED bulb, replace it with a
3.6 W LED bulb.
� If the burned-out light is an incandescent bulb, replace it with
an incandescent appliance bulb of the same size, shape, and
wattage (40 W maximum).
Light Shield Reinstallation:
Place the left end of the light shield into the wall slots; then snap
the right end into its wall slots.