
Owner's Manual


13
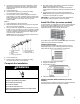
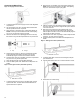
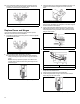
Replacing the Produce Preserver Pouches
The disposable pouches should be replaced every 6 months,
when the status indicator has completely changed from white to
red.
To order replacements, see the contact information in the Quick
Start Guide. Order part number W10346771A or FRESH1.
1. Remove the used pouches from the produce preserver
housing.
2. Remove the old status indicator.
3. Install the new pouches and status indicator using the
instructions in the previous sections.
REFRIGERATOR FEATURES
Convertible Drawer Temperature
Control (on some models)
The control can be adjusted to properly chill meats or vegetables.
The air inside the pan is cooled to avoid “spot” freezing and can
be set to keep meats at the National Livestock and Meat Board
recommended storage temperatures of 28° to 32°F (–2° to 0°C).
To store meat:
Set the control to one of the three Meat settings to store meat at
its optimal storage temperature.
To store vegetables:
Set the control to Veg to store vegetables at their optimal storage
temperatures.
NOTE: If food starts to freeze, move the control to the right (less
cold), toward the Veg setting. Remember to wait 24 hours
between adjustments.
Crisper Humidity Control (on some
models)
You can control the amount of humidity in the moisture-sealed
crisper. Adjust the control to any setting between Low and High.
LOW (open) for best storage of fruits and vegetables with skins.
HIGH (closed) for best storage of fresh, leafy vegetables.
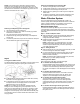
Dual Evaporator (on some models)
Some models come equipped with a dual sequential evaporation
system which includes two separate evaporators for the
refrigerator and freezer compartments.
Dual evaporation results in higher humidity, which helps keep
foods in the refrigerator from spoiling as quickly and improves
food quality and freshness in the freezer due to decreased freezer
burn. In addition, the dual evaporation system helps keep food
smells in the refrigerator from transferring to ice in the freezer.
NOTE: The dual evaporation system is always activated when
your refrigerator is operating. You do not need to press any
buttons to turn it on.
Water and Ice Dispensers
On how to use your water and ice dispensers, see the online
“Side-by-Side Refrigerator Dispensers” Feature Guide.
NOTES:
� Connect to potable water supply only.
� The dispensing system will not operate when either door
(refrigerator or freezer) is open.
� Allow 24 hours for the refrigerator to cool down and chill water.
� Allow 24 hours to produce the first batch of ice. Discard the
first three batches of ice produced. Wait 72 hours for full ice
production.
� On some models, the display screen on the dispenser control
panel will turn off automatically and enter “sleep” mode when
the control buttons and dispenser pads have not been used for
2 minutes or more. While in “sleep” mode, the first press of a
control button will only reactivate the display screen, without
changing any settings.
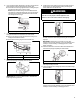
Flush the Water System
Air in the water dispensing system can cause the water dispenser
to drip. After connecting the refrigerator to a water source or
replacing the water filter, flush the water system. Flushing the
water dispensing system forces air from the water line and filter
and prepares the water filter for use.
NOTE: As air is cleared from the system, water may spurt out of
the dispenser.
1. Using a sturdy container, depress and hold the water
dispenser pad for 5 seconds; then release it for 5 seconds.
2. Repeat step 1 until water begins to flow.
3. Once water begins to flow, continue depressing and releasing
the dispenser pad (5 seconds on, 5 seconds off) until a total of
3 gal. (12 L) has been dispensed.
Additional flushing may be required in some households.
The Water Dispenser
IMPORTANT:
Dispense at least 1 qt. (1 L) of water every week to maintain a
fresh supply.
If the flow of water from the dispenser decreases, it could be
caused by low water pressure.
� With the water filter removed, dispense 1 cup (237 mL) of
water. If 1 cup of water is dispensed in 8 seconds or less, the
water pressure to the refrigerator meets the minimum
requirement.
� If it takes longer than 8 seconds to dispense 1 cup of water, the
water pressure to the refrigerator is lower than recommended.
See “Water Supply Requirements” or online “Troubleshooting”
for suggestions.
Ice Maker and Storage Bin
� Allow 24 hours to produce the first batch of ice. Discard the
first three batches of ice produced.
� The quality of your ice will be only as good as the quality of the
water supplied to your ice maker. Avoid connecting the ice
maker to a softened water supply. Water softener chemicals
(such as salt) can damage parts of the ice maker and lead to
poor quality ice. If a softened water supply cannot be avoided,
make sure the water softener is operating properly and is well
maintained.
� Do not use anything sharp to break up the ice in the storage
bin. This can cause damage to the ice container and the
dispenser mechanism.
� Do not store anything on top of or in the ice maker or storage
bin.