
Use and Care


5
Water Filtration System
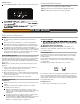
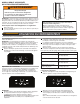
Water Filter Status Light
The filter status light will help you know when to change your
water filter.
It is recommended that you replace the filter when the status light
changes to red
water ow to your water dispenser or ice
s noticeably.
The lter should be replaced at least
y months
depending on your water
ity and usage.
Resetting the Filter Status
After changing the lter, reset the lter status light by
pressing and hold “Light & Ice Type” button for 3 seconds.
The status light will turn off when the system is reset.
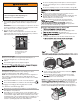
Changing the Water Filter
1. Locate the water filter cover door in the base grille, and pull open
the filter door. The filter will be released and then be ejected as the
door is opened.
2. When the door is completely open, pull the filter straight out.
NOTE: There may be some water in the filter. Some spilling may
occur. Use a towel to wipe up any spills.
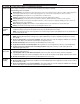
3. Take the new filter out of its packaging and remove the covers from
the O-rings. Be sure the O-rings are still in place after the covers
are removed.
4. With the arrow pointing to the left
(toward the filter cover door’s
hinge), align the new filter with the filter housing and slide it into
place. The filter cover door will automatically begin to close as the
new filter is inserted.
5. Close the filter cover door completely in order to snap the filter into
place. You may need to press hard.
6. Flush the water system. See “Water and Ice Dispensers.”
Do not use with water that is microbiologically unsafe or
of unkn
own quality without adequate disinfection before
or after the system. Systems certified for cyst reduction
may be used on disinfected waters that may contain
filterable cysts.
A. Water filter cover door
Style 2
1.
A
2.
3.
4.
5.
6.
A
NOTE:
Style 2
1.
Locate the water lter cover door in the base grille, and pull
open the lter door.
A
A. Water lter cover door.
2. Twist the water lter and turn 90° counterclockwise to unlock.
3. Pull the lter out of the housing.
4. Remove the water lter cap from the water lter.
5. Install the water lter cap onto the new lter. Be sure to align
the arrows so the grooves in lter align with ribs in lter cap.
6. Insert the lter into the housing.
5
Réinitialisation de l’état du filtre
Après avoir changé le filtre, réinitialiser le témoin lumineux de l’état du
filtre en appuyant sur FILTER RESET (réinitialisation du filtre).
Le témoin lumineux s’éteint lorsque le système est réinitialisé.
Changer le filtre à eau
1.
Repérer le clapet du logement du filtre à eau dans la grille de la base et
l’ouvrir en le tirant. Le filtre doit être libéré puis éjecté lorsqu’on ouvre le
clapet.
2.
Une fois le clapet complètement ouvert, retirer le filtre en le tirant en
ligne droite.
REMARQUE :
Il y aura peut-être de l’eau dans le filtre. Il est
possible que de l’eau se renverse. Utiliser une serviette pour
essuyer tout renversement.
3.
Retirer le filtre neuf de son emballage, puis retirer les protections
des anneaux d’étanchéité. S’assurer que les anneaux d’étanchéité
sont toujours en place une fois que les protections sont retirées.
4.
Avec la flèche orientée vers la gauche (vers la charnière du clapet
du logement du filtre), aligner le filtre neuf avec le logement du
filtre et l’in sérer en le faisant glisser. Le clapet du logement du
filtre entame un mouvement automatique de fermeture à mesure
que l’on insère le filtre neuf.
5.
Fermer complètement le clapet du logement du filtre pour emboîter
le filtre et le mettre en place. Il faudra peut-être appuyer fortement.
6.
Purger le circuit d’eau. Voir “Distributeurs d’eau et de glaçons”.
A. Clapet du logement du filtre à eau
Système de filtration de l’eau
Ne pas utiliser pour le filtrage d'une eau
microbiologiquement polluée ou de qualité inconnue en
l'absence d'un dispositif de désinfection adéquat avant ou
après le système. Les systèmes certifiés pour la réduction
de kyste peuvent être utilisés pour l'eau désinfectée qui
peut contenir des kystes filtrables.
Témoin lumineux de l’état du filtre à eau
Le témoin lumineux de l’état du filtre à eau vous aidera à savoir
quand changer le filtre à eau.
Le témoin s’allume en jaune sur l’écran d’affichage du
distributeur lorsque le moment de changer le filtre est proche.
Il est recommandé de remplacer le filtre à eau lorsque le témoin
lumineux de l’état du filtre à eau passe au ro
uge OU lorsque le débit
d'eau à votre distributeur ou à la machine à glaçons diminue de façon
marquée.
REMARQUE :
Le filtre doit être remplacé au moins tous les 6 mois
selon la qualité de l’eau et la fréquence d’utilisation.
REMARQUE : La machine à glaçons comporte un système d’arrêt
automatique pour éviter le sur-remplissage du bac d’entreposage
pendant un fonctionnement normal. Au fur et à mesure de la production
de glace, les glaçons remplissent le bac d’entreposage à glaçons. Les
glaçons soulèvent le bras de commande métallique jusqu’à ce qu’il
atteigne la position ARRÊT (bras vers le haut). Lorsque le bac
d’entreposage est plein, la machine à glaçons arrête automatiquement
la production de glaçons, mais le commutateur (marche/arrêt) reste à
la position | (droite).
A
Style 2
1.
inférieur gauche du réfrigérateur pour l’ouvrir.
A
2.
pour le déverrouiller.
3.
4.