
Owners Manual


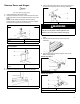

Table Of Contents
- REFRIGERATOR SAFETY
- Refrigerator Safety
- MAINTENANCE AND CARE
- Cleaning
- Changing the Light Bulbs
- Vacations
- Moving
- INSTALLATION INSTRUCTIONS
- Unpack the Refrigerator
- Location Requirements
- Electrical Requirements
- Water Supply Requirements
- Connect the Water Supply
- Install Air Filter
- REFRIGERATOR DOORS
- Door and Handle Instructions
- Remove Doors and Hinges
- Reverse Doors and Hinges (optional)
- Replace Doors and Hinges
- Final Steps
- Reversibility Kit Instructions
- Adjust the Doors
- REFRIGERATOR AND FREEZER FEATURES
- Refrigerator Shelves
- Freezer Shelf
- Door Rails or Trivets
- Can Racks and Bins (on some models)
- Deli or Meat Drawer
- Crisper
- Utility Compartment
- Ice Maker
- SÉCURITÉ DU RÉFRIGÉRATEUR
- Sécurité du réfrigérateur
- ENTRETIEN ET RÉPARATION
- Nettoyage
- Remplacement des ampoules d’éclairage
- Vacances
- Déménagement
- INSTRUCTIONS D’INSTALLATION
- Déballage du réfrigérateur
- Exigences d’emplacement
- Spécifications électriques
- Spécifications de l’alimentation en eau
- Raccordement à la canalisation d’eau
- Installation du filtre à air
- PORTES DU RÉFRIGÉRATEUR
- Instructions pour la porte et la poignée
- Démontage des portes et charnières
- Inversion du sens d’ouverture des portes et d’installation des charnières (facultatif)
- Réinstallation des portes et charnières
- Étapes finales
- Instructions pour l’ensemble d’inversion du sens d’ouverture
- Ajustement des portes
- CARACTÉRISTIQUES DU RÉFRIGÉRATEUR ET DU CONGÉLATEUR
- Tablettes du réfrigérateur
- Tablette de congélateur
- Tringles de la porte ou balconnets
- Cannettes et balconnets de porte (sur certains modèles)
- Tiroir à viande ou à charcuterie
- Bac à légumes
- Compartiment utilitaire
- Machine à glaçons

9
Remove Doors and Hinges
1. Unplug refrigerator or disconnect power.
2. Using a hex-head socket wrench, remove the three 5/16" hex-
head hinge screws from the top hinge and lift up to remove the
hinge.
NOTE: Provide additional support for the door while the
hinges are being moved. Do not depend on the door magnets
to hold the door in place while you are working.
Top Hinge Style 1
A. 5/16" Hex-head hinge
screws
C. Hinge pin
B. Top hinge D. Spacer
Top Hinge Style 2
A. 5/16" Hex-head hinge
screws
B. Top hinge
3. Lift the freezer door off of the center hinge and set it aside
4. Remove the washer from the top of the Center Hinge pin.
A. Washer
5. Using a hex-head socket wrench, remove the three screws
from the center hinge and remove the hinge. Set aside.
A. Center hinge B. 5⁄16" hex-head hinge screws
WARNING
Excessive Weight Hazard
Use two or more people to lift the appliance door.
Failure to do so can result in back or other injury.
6. Lift the refrigerator door off of the bottom hinge and set it
aside.
7. Remove the base grille from the bottom front of the
refrigerator.
8. Remove the parts for the bottom hinge as shown in the
Bottom Hinge graphics.
Bottom Hinge Style 1
A. Bottom hinge
Bottom Hinge Style 2
A Spacer C. 5⁄16" hex-head hinge screws
B. Bottom Hinge