REFRIGERATOR SAFETY Your safety and the safety of others are very important. We have provided many important safety messages in this manual and on your appliance. Always read and obey all safety messages. This is the safety alert symbol, This symbol alerts you to potential hazards that can kill or hurt you and others.
INSTALLATION INSTRUCTIONS Unpack the Refrigerator Location Requirements WARNING Excessive Weight Hazard Use two or more people to move and install refrigerator. Failure to do so can result in back or other injury. Remove the Packaging IMPORTANT: Do not remove the white foam air return insert from behind the control panel on the ceiling of the refrigerator. if the insert is removed, ice may migrate down from the freezer and cause icicles to form. 1.
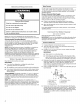
Electrical Requirements 2 Electrical Shock Hazard Plug into a grounded 3 prong outlet. Do not remove ground prong. Do not use an adapter. Do not use an extension cord. Failure to follow these instructions can result in death, fire, or electrical shock. Before you move your refrigerator into its final location, it is important to make sure you have the proper electrical connection. Recommended Grounding Method A115 volt, 80 Mz, AC only, 15or 20-amp fused, grounded electrical supply is required.
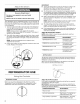
7. Slip the compression sleeve and compression nut on the copper tubing as shown. Insert the end of the tubing into the outlet end squarely as far as it will go. Screw compression nut onto outlet end with adjustable wrench. Do not over tighten. 8. Place the free end of the tubing in a container or sink, and turn ON the main water supply. Flush the tubing until water is clear. Turn OFF the shutoff valve on the water pipe. Coll the copper tubing.
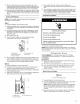
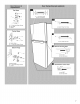
4. Remove the parts for the center hinge as shown in the Center Hinge graphic. NOTE: Provide support between the refrigerator door and the floor while the hinges are being moved. Do not depend on the door magnets to hold the door in place while you are working. 5. Lift the refrigerator door free from the cabinet. 6. Remove the four screws {two on the bottom and two on the front} attaching the Bottom hinge to the cabinet. See Bottom Hinge graphic.
Villarreal 0 ide Swing Variable ordination _ Replacement Ho-Head Hinge Screws and Washers A. 5s" Hex-Head Hinge Screws B. Top Hinge C spacer A. Cabinet Hinge Hole Plugs A. Door Hinge Hole Pug enter Hinge a" Hex-Head Hinge Screws Removal of Door Stops A A. Door Stop B. Door Stop Screw A. Bottom Hinge Hex-Head Hinge Screws . . Re installation of Door Stops G. Leveler 2 8 A. Door Stop 8.
Adjust the Doors Excessive Weight Hazard Use two or more people to move and install refrigerator. Failure to do so can result in back or other injury. Your refrigerator has two adjustable levelers, one on each side, at the base of the refrigerator. If your refrigerator seems unsteady or if you want the doors to close more easily, adjust the level and tilt of the refrigerator. 1. Turn the leveler to the left to raise that side of the refrigerator or 10 the right to lower that side.
Crisper Humidity Control {on some models) Remember You control the amount of humidity in the moisture-sealed crisper. Depending on the produce you are storing, select the desired Humidity Level. Humidity Level Min Setting MIN {pore lets moist air out of the crisper for best storage of fruits and vegetables with skins m Fruit: Wash, let dry and store in refrigerator in plastic bag or crisper. Do not wash or hull berries until they are ready to use.
Meat Drawer {on some models) To remove and replace the meat drawer: 1. Slide meat drawer out fo the stop. 2. Lift front of meat drawer with one hand while supporting bottom of drawer with other hand. Slide drawer out the rest of the way. 3. Replace the drawer by sliding it back in fully past the drawer stop. Meat Drawer Cover {on some models) To remove and replace the meat drawer cover: 1. Remove the meat drawer. 2. Push the cover back to release the rear clips from the shelf.
FREEZER FEATURES Your model may have some or all of these features. Important information to know about glass shelves and covers: Do not clean glass shelves or covers with warm water when they are cold. Shelves and covers may break if exposed to sudden temperature changes or impact, such as bumping. Tempered glass is designed to shatter into many small, pebble-size pieces. This is normal. Glass shelves and covers are heavy. Use both hands when removing them to avoid dropping.
REFRIGERATOR CARE Cleaning Explosion Hazard Use nonflammable cleaner. Failure to do so can result in death, explosion, or fire. Both the refrigerator and freezer sections defrost automatically. However, clean both sections about once a month to avid buildup of odors. Wipe up spills immediately. IMPORTANT: Because air circulates between both sections, any odors formed in one section will transfer to the other. You must thoroughly clean both sections to eliminate odors.
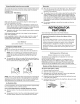
PROBLEM SOLVER First try the solutions suggested here or visit our website and reference FAQs (Frequently Asked Questions} WARNING SE He] to possibly avoid the cost of a service call. in the U.S.A, www.whirlpool.com In Canada, www.whirlpool.ca Xr Electrical Shock Hazard Explosion Hazard Plug into a grounded 3 prong outlet. Use nonflammable cleaner. Do not remove ground prong. Failure to do so can result in death, explosion, of fire, Do not use an adapter, Do not use an extension cord.
i you experience Possible Causes and/or Recommended Solutions Temperature is too warm New installation Allow 24 hours following installation for the refrigerator to cool completely. Door{s} opened often or not closed completely Allows warm air to enter refrigerator. Minimize road openings and keep doors fully closed. A large amount of warm food has been recently added Allow several hours for refrigerator to return to normal temperature.
WHIRLPOOL CORPORATION MAJOR APPLIANCE WARRANTY LIMITED WARRANTY For one year from the date of purchase, when this major appliance is operated and maintained according fo instructions attached to or furnished with the product, Whirlpool Corporation or Whirlpool Canada LP (hereafter “Whirlpool” will pay for Factory Specified Parts and repair labor to correct defects in materials or workmanship that existed when this major appliance was purchased, Service must be provided by a Whirlpool designated service comp
Virolento INSTRUCCIONES PARA EL USUARIO DEL REFRIGERADOR LE AGRADECEMOS la compra de este producto de alta calidad. Si usted experimenta un problema que no se haya cubierto en SOLUCIÓN DE PROBLEMAS, visite nuestro sitio de Internet en www.whirlpool.com para obtener información adicional. Si considera que ain necesita ayuda, lamemos al 1-800-253-1301. En Canadá, visite nuestro sitio de Internet en www.whirlpool.ca o llámenos al 1-800-807-6777.
Como deshacerse adecuadamente de su refrigerador viejo Pre {eT gga ed] Peligro de Asfixia Remueva las puertas de su refrigerador viejo. Mo seguir esta instrucción puede ocasionar la muerte © dacio al cerebro. IMPORTANTE: El abrasamiento v asfixia de nidios no es un problema del pasado. Los refrigeradores tirados y abandonados son un peligro, adn si van a quedar ahi “por unos pocos diastasa, Si Ud.
Requisitos de ubicación Requisitos eléctricos Peligre de Explosión Mantenga los materiales y vapores inflamables, tales como gasolina, alejados del refrigerada, No seguir esta instrucción puede ocasionar la muerte, explosión, o incendio. IMPORTANTE: Este refrigerador ha sido diseñado armónicamente para usarse dentro del hogar. Para asegurar la adecuada ventilación de su refrigerador, deje un espacio de 2" {1,25 cm) entre la parte superior del refrigerada y los armarios superiores. detrás del refrigerador.
Requisitos del suministro de agua Lea todas las instrucciones antes de comenzar IMPORTANTE: wi enciende el refrigerador antes de conectar la tubería de agua, APAGUE la fabrica de hielo. w Todas las instalaciones deben hacerse de acuerdo a los requerimientos del código de plome ria local. wm Use tubería de cobre y revise si hay fugas. Instale Ja tubería de cobre solo eh reas donde la temperatura vaya a permanecer por encima del punto de congelación.
3. Use la abrazadera para tubería en la parte trasera del refrigerador para afianzar la tubería al refrigerador según se muestra. Esto ayudar a evitar dacios a la tubería cuando el refrigerador se empuje nuevamente contra la pared, 4. ABRA la vuélvala de cierre. 5. Revise si hay fugas. Ajuste las conexiones (incluso las de la válvula) o tuercas que tienen fugas. A. Abrazadera para iberia 8. Tornillo de la abrazadera para funeraria C. Substituta de cobre D. Tuerca de compresión E.
4. Quite los componentes de la bisagra central como se muestra en la racionista Bisagra central. NOTA: Mientras quita las bisagras, siempre disponga de un soporte adicional entre la puerta del refrigerador y el piso. No se confié en que los imanes de las puertas van a sostener la puerta en su lugar mientras trabaja. 5. Levante y quite la puerta del refrigerador de la carcasa. 8. Saque los 4 tornillos {dos en 1a parte inferior y dos en el frente} que sujetan la bisagra inferior a la carcasa.
Come quina v volver a poner | picapuerco su lugar Calina del satinado de Amberino de Tas punas opine Bisagra superior A. Tomillos de cabeza hexagonal de ia bisagra arandelas tie Dormitorios de cabeza hexagonal de 18 bisagra do Fie 8 Bisagra superior C. Espaciador A. Taponas ds los oficios de Jas bisagras de la carcasa Bisagra central A A Bisagra central B. Tomillos dle cabeza hexagonal de la bisagra de “is” A. Retén de la pumita 8. Motilo def retén ds fa puerta A. Bisagra inferior B.
Ajuste las puertas USO DE SU ADVERTENCIA REFRIGERADOR Peligro de Peso Excesivo Uso de los controles Use dos o mds personas para mover e instalar el refrigerador. Control de temperatura No seguir esta instrucción puede ocasionar una lesioné en la espalda u oto tipo de lesiones. Cuando usted enchufe el refrigerador por primera vez, fije el control de temperatura en el punto medio. Los ajustes del control de temperatura varían entre MIN (Mínimo ~ el menos frica) y MAX {Máxime ol mas ripio.
Control del flujo de aire El control del flujo de aire esta ubicado en la pared posterior del congelador. El mismo regula la cantidad de aire qua fluye entre los compartimientos del congelador v del refrigerador. Cuando enchufe por primera vez el refrigerador, gire el control del flujo de aire hacia el ajuste recomendado.
CARACTERÍSTICAS DEL REFRIGERADOR El modelo de su refrigerador podrá contar con algunas o todas estas características información importante para saber acerca de los estantes ¥ tapas de vidrio: Ne limpia los estantes y tapas de vidria con agua caliente mientras están fríos. Los estantes y tapas pueden romperse si se exponen a cambios bruscos de temperatura o impacto, como seria un golpe brusco. BE vidrio templado se ha disociado para hacerse chicos.
2. Levante el frente de la tapa para quitar el soporte de la misma. Luego levante la tapa y deslícela hacia afuera. 3. Vuelva a colocar la tapa encajando Jas lengüetas de la misma dentro de las ranuras mas bajas del armario y empujándolas hacia adentro. Baje los retenedores delanteros hacia su lugar. 4. Inserte el posarte de la tapa {con la lengüeta larga hacia el frente} en la ranura que esta en la parte inferior de la tapa.
CARACTERÍSTICAS DE LA PUERTA El modelo de su refrigerador podré contar con algunas o todas estas características Figles a anaqueles de la puerta Se pueden quitar los Eles o los anaqueles de la puerta para facilitar la limpieza Rieles a presión o anaqueles de la puerta {en algunos modelos) Para quitar y volver a colocar los rieles o anaqueles: 1. Según su modelo, quite los rieles © anaqueles empujando hacia dentro ligeramente en la parte frontal del soporte mientras jala hacia afuera la lengüeta interior.
Como cambiar los focos NOTA: No todos los focos son adecuados para su refrigerador, Asegúrese de reemplazar el foco con otro foco para electrodomésticos del mismo amatista, forma y vaticine. 1. Desenchufe af refrigerador 0 desconecte el suministro de energía. 2. Quite el estante superior para obtener acceso a la pantalla de uz, 3. Presione el lado de la pantalla de luz para liberarla del seguro, y jalea para quitarla del ensamblaje de la luz. 4.
SOLUCIÓN DE PROBLEMAS Pruebe primero las soluciones sugeridas aquí o visite nuestro sitio de Internet y consulte “Preguntas que se hacen con frecuencia”, para evitar posiblemente el costo de una visita de servicio técnico. En EE.UU., www.whirlpool.com En Canadá, www.whirlpool.ca IY. gg [AT ADVERTENCIA 3 terminales. Peligro de Choque Eléctrica Conecte a un contacto de pared de conexión a tierra de No quite ta terminal de conexión a tierra, No use un adaptada, No use un cable eléctrico de extensión.
Si experimenta Causas posibles y/o soluciones recomendadas lo siguiente La puerta no = La puerta queda abierta debido a un bloqueo Aleje los paquetes de alimentos de la puerta. Empuje el cierra recipiente © el estante nuevamente a la posición correcta. Aseglares de empujar bien 1a tapa del completamente compartimiento para verduras, de manera que la parte posterior descanse sobre los soportes.
ACCESORIOS Los siguientes accesorios están disponibles para su refrigerador. Fabrica de hielo automática (opcional): Para hacer un pedido, contáctenos y pida los números de plaza. Pida la pieza N° 24ECKMF En EE.UU.. visite nuestra pagina de Internet, Limpiador para cocina y electrodomésticos anafres o lame al 1-800-901-2042. Pida la plaza N° W10355010 GARANTÍA DE LOS ELECTRODOMÉSTICOS PRINCIPALES DE WHIRLPOOL CORPORATIVO GARANTÍA LIMITADA Durante un afino a partir de la fecha de compra.