
Installation Instructions
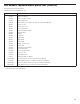


21
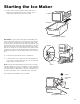
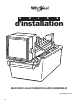
Starting the Ice Maker
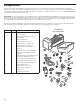
1. Wash out the ice bucket, and then slide it under the ice
maker (see the side diagram) as far as it will go. The ice
bucket will be sitting on top of the freezer shelf.
IMPORTANT: On top-mount models without a full-width freezer
shelf, you will need to place the ice bucket on top of the inverted
ice tray shelf. First, position the ice tray shelf face down so that
the shorter side is alongside the freezer wall (see DETAIL A). Then
insert the tabs on the shorter side of the shelf into the slots on the
edge of the freezer oor. This will hold the shelf in position. Next,
place the ice bucket on top of the inverted ice tray shelf and slide
it under the ice maker (see side diagram). The ice maker will not
function properly if the ice bucket is placed directly on the freezer
oor.
2. Place the items back into the freezer compartment.
3. Lower the arm on the ice maker (see the side diagram) to its
“on” position, and close the freezer door. The ice maker will
begin to make ice within 24 hours.
NOTE: It usually takes approximately 24 hours for the ice maker
to begin producing ice. Once ice is available, you may notice that
it has an “off taste.” If this happens, make two or three batches of
ice and discard them. After that, the “off-taste” should be gone. If
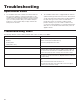
you have any problems, refer to “Troubleshooting” on page 22.
This completes the installation of your Ice Maker.
Ice maker
Ice bucket
Installing the ice bucket
DETAIL A
Slots
Tabs
Off
On
Raise arm to
stop ice
Lower arm to
start it
Turning the ice maker on