
Owner's Manual
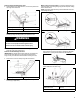
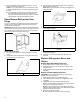
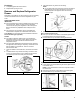
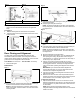
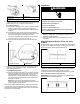
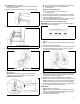
Table Of Contents
- REFRIGERATOR SAFETY
- Refrigerator Safety
- REFRIGERATOR CARE
- Cleaning
- Changing the LED Module
- Refrigerator Shelves
- Opening and Closing Doors
- Vacation and Moving Care
- INSTALLATION INSTRUCTIONS
- Unpack the Refrigerator
- Location Requirements
- Electrical Requirements
- Water Supply Requirements
- Connect the Water Supply
- Complete the Installation
- Install Air Filter (on some models)
- Install Produce Preserver (on some models)
- REFRIGERATOR FEATURES
- Crisper Humidity Control (on some models)
- Water and Ice Dispensers (on some models)
- Ice Maker and Storage Bin
- Water Filtration System
- DOOR AND HANDLE INSTRUCTIONS
- Door and Drawers
- Remove and Replace Handles
- Remove Doors and Hinges
- Reset Bottom Refrigerator Door Hinge
- Replace Refrigerator Doors and Hinges
- Remove and Replace Refrigerator Drawer
- Door Closing and Alignment
- PERFORMANCE DATA SHEET
- Performance Data Sheet
- SÉCURITÉ DU RÉFRIGÉRATEUR
- Sécurité du réfrigérateur
- ENTRETIEN DU RÉFRIGÉRATEUR
- Nettoyage
- Remplacer le module à DEL
- Tablettes du réfrigérateur
- Ouverture et fermeture des portes
- Précautions à prendre avant les vacances ou le déménagement
- INSTRUCTIONS D’INSTALLATION
- Déballage du réfrigérateur
- Exigences d’emplacement
- Spécifications électriques
- Spécifications de l’alimentation en eau
- Raccordement à la canalisation d’eau
- Terminer l’installation
- Installer le filtre à air (sur certains modèles)
- Installation du conservateur de produits frais (sur certains modèles)
- CARACTÉRISTIQUES DU RÉFRIGÉRATEUR
- Commande d’humidité dans le bac à légumes (sur certains modèles)
- Distributeur d’eau et de glaçons (sur certains modèles)
- Machine à glaçons et bac d’entreposage
- Système de filtration de l’eau
- INSTRUCTIONS POUR LA PORTE ET LA POIGNÉE
- Porte et tiroirs
- Pour enlever et réinstaller les poignées
- Démontage des portes et charnières du réfrigérateur
- Réinitialiser la charnière inférieure du réfrigérateur
- Réinstallation des portes et charnières
- Retrait et réinstallation du tiroir de congélation
- Fermeture et alignement des portes
- Fiche de données de performance
- Blank Page
- Blank Page
- Blank Page

21
Remove Right-Hand Refrigerator Door
3. Starting with the right-hand side door, remove the parts for the
top hinge as shown below.
A. Top hinge cover screw D. Top Hinge
B. Top hinge cover E. Locator Screws
C. 3/16" Internal hex-head screws
NOTE: Do not remove the two locator screws. These screws
will help you align the hinge when you replace the door.
WARNING
Excessive Weight Hazard
Use two or more people to lift the appliance door.
Failure to do so can result in back or other injury.
4. Lift the refrigerator door from the bottom hinge pin. The top
hinge will come away with the door.
Remove Left-Hand Refrigerator Door
IMPORTANT: On models with a water dispenser, the tubing and
wiring for the water dispenser run through the left-hand door
hinge, so they must be disconnected before removing the door.
1. Remove the cover from the top hinge as shown below.
A. Top hinge cover screw B. Top hinge cover
2. Disconnect the water dispenser tubing located on top of the
door hinge (if applicable).
Water Tubing Connection Style 1: Press the colored outer ring
against the face of the fitting and gently pull the dispenser tubing
free as shown below.
NOTE: The water dispenser tubing remains attached to the left-
hand refrigerator door.
A. Outer ring B. Face of fitting
3. Before removing the left-hand side door, disconnect the wiring
plug located on top of the top hinge by wedging a flat-blade
screwdriver or your fingernail between the two sections.
NOTE: Do not remove the green, ground wire. It should
remain attached to the door hinge.
A. 3/4" Internal hex-head or
TORX T25 screws
C. Locator screws (do not
remove)
B. Ground wire (Do not remove)