REFRIGERATOR USER INSTRUCTIONS THANK YOU for purchasing this high-quality product. If you should experience a problem not covered in TROUBLESHOOTING, please visit our website at www.whirlpool.com for additional information. If you still need assistance, call us at 1-800-253-1301. In Canada, visit our website at www.whirlpool.ca or call us at 1-800-807-6777. You will need your model and serial number, located on the inside wall of the refrigerator compartment.
REFRIGERATOR SAFETY Your safety and the safety of others are very important. We have provided many important safety messages in this manual and on your appliance. Always read and obey all safety messages. This is the safety alert symbol. This symbol alerts you to potential hazards that can kill or hurt you and others. All safety messages will follow the safety alert symbol and either the word “DANGER” or “WARNING.
Proper Disposal of Your Old Refrigerator INSTALLATION INSTRUCTIONS WARNING Unpack the Refrigerator Suffocation Hazard WARNING Remove doors from your old refrigerator. Failure to do so can result in death or brain damage. Excessive Weight Hazard Use two or more people to move and install refrigerator. IMPORTANT: Child entrapment and suffocation are not problems of the past. Junked or abandoned refrigerators are still dangerous –even if they will sit for “just a few days.
Location Requirements Electrical Requirements WARNING WARNING Explosion Hazard Electrical Shock Hazard Keep flammable materials and vapors, such as gasoline, away from refrigerator. Plug into a grounded 3 prong outlet. Failure to do so can result in death, explosion, or fire. Do not remove ground prong. Do not use an adapter. IMPORTANT: This appliance is designed for indoor, household use only.
■■ Use copper tubing and check for leaks. Install copper tubing only in areas where the household temperatures will remain above freezing. ■■ For models with water filters, the disposable water filter should be replaced at least every 6 months. 5. Using a cordless drill, drill a 1/4" hole in the cold water pipe you have selected. A B C Water Pressure D E F G A cold water supply with water pressure of between 35 and 120 psi (241 and 827 kPa) is required to operate the water dispenser and ice maker.
5. Fasten the plastic water line to the refrigerator with a “P” clamp. Slide the plastic water line into the retainer. Complete the Installation WARNING A B C Electrical Shock Hazard Plug into a grounded 3 prong outlet. Do not remove ground prong. Do not use an adapter. A. Brass nut B. Compression sleeve Do not use an extension cord. C. “P” clamp Failure to follow these instructions can result in death, fire, or electrical shock. 6. Turn on water supply to refrigerator and check for leaks.
NOTE: Provide additional support for the refrigerator door while the hinges are being removed. Do not depend on the door gasket magnets to hold the door in place while you are working. TOOLS NEEDED: 5/16", 3/8", 1/4" hex head socket wrench, Torx† T20 screwdriver, #2 Phillips screwdriver, and a flat-blade screwdriver. 1. Unplug refrigerator or disconnect power. 2. Remove the base grille. Grasp the grille firmly and pull it toward you.
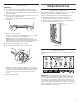
WARNING Electrical Shock Hazard Disconnect power before removing doors. Failure to do so can result in death or electrical shock. Door Removal and Replacement Top Hinges A B C 1 D A. Hinge Cover Screw B. Top Hinge Cover C. 5/16" Hex Head Hinge Screws D. Top Hinge Bottom Hinges A B C A. Hinge Pin Cover B. Bottom Hinge C. Hinge Screws Connections 2 A B A. Wiring Plug B. Water Line Connection Drawer Front Removal A B A. Loosen 2 Drawer Glide Bracket Screws B.
Adjust the Doors REFRIGERATOR USE IMPORTANT: ■■ Your refrigerator has two adjustable, front leveling screws – one on each side of the refrigerator base. If your refrigerator seems unsteady or you want the door to close easier, use the instructions below. Before moving the refrigerator, raise the leveling screws so the front rollers are touching the floor. 1. Remove the base grille. Grasp the grille firmly and pull it toward you. ■■ Opening and Closing Doors There are two refrigerator compartment doors.
Touch any control button on the dispenser panel to activate the display screen. The home screen will appear as shown. ■■ ■■ Press LOCK to raise the set point, or press OPTIONS to lower the set point. When you have finished viewing (and adjusting if desired) both the refrigerator and freezer set points, press MEASURED FILL to save the settings.
Options Fast Cool The Fast Cool feature assists with periods of high refrigerator use, full grocery loads, or temporarily warm room temperatures. ■■ To turn on the Fast Cool feature, press the OPTIONS button to enter Options mode, then press OPTIONS again to activate the feature. When the feature is on, “Fast Cool” will appear on the dispenser display screen. The Fast Cool feature will remain on for 24 hours unless manually turned off.
1. Slide the ice bin into the guide rails located on either side of the enclosure. 2. Push the ice bin in until resistance is felt. Raise the front slightly and push the ice bin in until an audible “click” is heard. Calibrate Measured Fill Household water pressure may affect the accuracy of the Measured Fill feature. So, for optimum performance of your water dispenser, you must first calibrate Measured Fill. IMPORTANT: Flush the water system before calibrating Measured Fill. 1.
3. Press and release the water dispenser paddle, as needed, to dispense water to the 1 cup fill line. NOTE: If overfilling or spilling occurs, discard the water and press “Back” to restart the calibration process. 4. When 1 cup of water has been correctly dispensed into the measuring cup, press the MEASURED FILL button under the word “Confirm” to confirm the calibration. A A. 1 cup of water 5.
Rotating Faucet and Pull-out Tray (on some models) On some models, the dispenser has a rotating water faucet and a pull-out tray at the bottom. To Dispense Ice: 1. Make sure the desired type of ice is selected. To switch between cubed and crushed, press ICE TYPE. WARNING A B Cut Hazard Use a sturdy glass when dispensing ice. A. Faucet rotated B. Pull-out tray Failure to do so can result in cuts. The faucet rotates to the center to allow for easy dispensing into large containers.
■■ The display screen indicates when the dispenser is locked. REFRIGERATOR CARE Cleaning LOCKED WARNING UNLOCKED Water Filtration System The water filter is located in the upper right-hand corner of the refrigerator compartment. Do not use with water that is microbiologically unsafe or of unknown quality without adequate disinfection before or after the system. Systems certified for cyst reduction may be used on disinfected waters that may contain filterable cysts.
IMPORTANT: This cleaner is for stainless steel parts only! Do not allow the Stainless Steel Cleaner and Polish to come into contact with any plastic parts such as the trim pieces, dispenser covers or door gaskets. If unintentional contact does occur, clean plastic part with a sponge and mild detergent in warm water. Dry thoroughly with a soft cloth. 3. Plug in refrigerator or reconnect power. Clean the Condenser There is no need for routine condenser cleaning in normal home operating environments.
TROUBLESHOOTING First try the solutions suggested here or visit our website and reference FAQs (Frequently Asked Questions) to possibly avoid the cost of a service call. In the U.S.A., www.kitchenaid.com In Canada, www.kitchenaid.ca Refrigerator Operation The refrigerator will not operate WARNING Electrical Shock Hazard Plug into a grounded 3 prong outlet. Do not remove ground prong. Do not use an adapter. The refrigerator seems noisy Refrigerator noise has been reduced over the years.
Temperature and Moisture ■■ Temperature is too warm ■■ New installation? Allow 24 hours following installation for the refrigerator to cool completely. ■■ Door(s) opened often or left open? Allows warm air to enter refrigerator. Minimize door openings and keep doors fully closed. ■■ Large load of food added? Allow several hours for refrigerator to return to normal temperature. ■■ Controls set correctly for the surrounding conditions? Adjust the controls a setting colder.
■■ Reverse osmosis water filtration system connected to your cold water supply? This can decrease water pressure. See “Water Supply Requirements.” Water is leaking from the dispenser system NOTE: One or two drops of water after dispensing is normal. ■■ Glass not being held under the dispenser long enough? Hold the glass under the dispenser 2 to 3 seconds after releasing the dispenser lever. ■■ New installation? Flush the water system. See “Water and Ice Dispenser.
PERFORMANCE DATA SHEETS Interior Water Filtration System Model UKF8001AXX-750 Capacity 750 Gallons (2839 Liters) System tested and certified by NSF International against NSF/ANSI Standard 42 for the reduction of Chlorine Taste and Odor, Particulate Class I*; and against NSF/ANSI Standard 53 for the reduction of Lead, Mercury, Atrazine, Benzene, p-Dichlorobenzene, Carbofuran, Toxaphene, Cysts, Turbidity, Asbestos, Tetrachloroethylene and Lindane.
Interior Water Filtration System Model UKF8001AXX-200 Capacity 200 Gallons (757 Liters) System tested and certified by NSF International against NSF/ANSI Standard 42 for the reduction of Chlorine Taste and Odor, Particulate Class I*; and against NSF/ANSI Standard 53 for the reduction of Lead, Mercury, Atrazine, Benzene, p-Dichlorobenzene, Carbofuran, Toxaphene, Cysts, Turbidity, Asbestos, O-Dichlorobenzene, Ethylbenzene, Chlorobenzene, Endrin, Tetrachloroethylene and Lindane.
WHIRLPOOL® REFRIGERATION LIMITED WARRANTY ATTACH YOUR RECEIPT HERE. PROOF OF PURCHASE IS REQUIRED TO OBTAIN WARRANTY SERVICE. Please have the following information available when you call the Customer eXperience Center: ■ Name, address, and telephone number ■ Model number and serial number ■ A clear, detailed description of the problem ■ Proof of purchase, including dealer or retailer name and address IF YOU NEED SERVICE: 1.
For additional product information, in the U.S.A., visit www.whirlpool.com In Canada, visit www.whirlpool.ca If you do not have access to the Internet and you need assistance using your product or you would like to schedule service, you may contact Whirlpool at the number below. Have your complete model number ready. You can find your model number and serial number on the label, located on the inside wall of the refrigerator compartment. For assistance or service in the U.S.A., call 1-800-253-1301.
INSTRUCTIONS D’UTILISATION DU RÉFRIGÉRATEUR Nous vous REMERCIONS d’avoir acheté ce produit de grande qualité. Si vous rencontrez un problème non couvert dans la section DÉPANNAGE, veuillez visiter notre site Web au www.whirlpool.com pour de plus amples renseignements. Si vous avez toujours besoin d’assistance, appelez-nous au 1 800 253-1301. Au Canada, visiter notre site Web au www.whirlpool.caou composer le 1 800 807-6777.
IMPORTANTES INSTRUCTIONS DE SÉCURITÉ AVERTISSEMENT : Pour réduire le risque d’incendie, de choc électrique ou de blessure dans le cadre de l’utilisation du réfrigérateur, suivre les consignes de base suivantes : ■ Brancher sur une prise de terre (reliée à la masse). ■ Ne pas retirer la broche de terre. ■ Ne pas utiliser d’adaptateur. Ne pas utiliser de rallonge. ■ Débrancher la source de courant électrique avant l'entretien. ■ Replacer pièces et panneaux avant de faire la remise en marche.
Mise au rebut du vieux réfrigérateur AVERTISSEMENT INSTRUCTIONS D’INSTALLATION Déballage du réfrigérateur Risque de suffoquer AVERTISSEMENT Enlever les portes de votre vieux réfrigérateur. Le non-respect de cette instruction peut causer un décès ou des lésions cérébrales. Risque du poids excessif Utiliser deux ou plus de personnes pour déplacer et installer le réfrigérateur. IMPORTANT : Le risque qu’un enfant puisse se retrouver coincé et suffoquer n’est pas chose du passé.
Exigences d’emplacement Spécifications électriques AVERTISSEMENT AVERTISSEMENT Risque d'explosion Risque de choc électrique Garder les matériaux et les vapeurs inflammables, telle que l'essence, loin du réfrigérateur. Brancher sur une prise à 3 alvéoles reliée à la terre. Le non-respect de cette instruction peut causer un décès, une explosion ou un incendie. Ne pas utiliser un adaptateur. Ne pas enlever la broche de liaison à la terre. Ne pas utiliser un câble de rallonge.
■■ Ne pas employer de robinet d’arrêt à étrier de 3/16 po (4,76 mm) ou de type à percer – ils réduisent le débit d’eau et s’obstruent plus facilement. ■■ Utiliser un tuyau en cuivre et vérifier qu’il n’y a pas de fuite. Installer seulement des tuyaux en cuivre là où les températures resteront au-dessus du point de congélation. ■■ Pour les modèles avec filtre à eau, le filtre à eau jetable doit être remplacé au moins tous les 6 mois. 5.
5. Fixer la canalisation d’eau en plastique au réfrigérateur à l’aide d’une bride en “P”. Faire glisser la canalisation d’eau en plastique dans le dispositif de retenue. Achever l’installation AVERTISSEMENT A B Risque de choc électrique C Brancher sur une prise à 3 alvéoles reliée à la terre. Ne pas enlever la broche de liaison à la terre. Ne pas utiliser un adaptateur. Ne pas utiliser un câble de rallonge. A. Écrou en laiton B.
Laisser les portes du réfrigérateur fermées jusqu’au moment de les détacher de la caisse. REMARQUE : Prévoir un support supplémentaire pour la porte du réfrigérateur pendant le retrait des charnières. La force d’attraction des aimants de la porte ne suffit pas à la maintenir en place pendant la manutention. OUTILS REQUIS : Une clé à douille à tête hexagonale de 5/16 po, 3/8 po et 1/4 po, un tournevis Torx† T20, un tournevis à tête cruciforme no 2 et un tournevis à tête plate. 1.
AVERTISSEMENT Risque de choc électrique Déconnecter la source de courant électrique avant d'enlever les portes. Le non-respect de cette instruction peut causer un décès ou un choc électrique. Retrait et réinstallation des portes Charnières supérieures A B C 1 D A. Vis du couvre-charnière B. Couvre-charnière supérieur C. Vis de charnière à tête hexagonale de 5/16 po D. Charnière supérieure Charnières inférieures A B C A. Couvercle d’axe de charnière B. Charnière inférieure C.
Ajuster les portes UTILISATION DU RÉFRIGÉRATEUR IMPORTANT : ■■ Ce réfrigérateur est équipé de deux vis de nivellement avant ajustables – une de chaque côté de la base du réfrigérateur. Si le réfrigérateur semble instable ou qu’on souhaite pouvoir fermer la porte plus facilement, utiliser les instructions cidessous. Avant de déplacer le réfrigérateur, relever les vis de nivellement de façon à ce que les roulettes avant touchent le plancher. 1. Retirer le casier de la base.
■■ Appuyer sur n’importe quel bouton de commande sur le tableau de distribution pour activer l’écran d’affichage. L’écran d’accueil apparaît comme indiqué. ■■ Appuyer sur LOCK (verrouillage) pour augmenter le point de réglage ou sur OPTIONS pour le réduire. ■■ Après avoir fini de visualiser (et de modifier, si désiré) le point de réglage du réfrigérateur, appuyer sur TEMPERATURE (température) pour modifier l’affichage et faire apparaître le point de réglage du congélateur.
Options Refroidissement rapide La caractéristique de refroidissement rapide est utile lors de périodes d’utilisation intense du réfrigérateur, de l’ajout d’une grande quantité d’aliments ou de l’élévation temporaire de la température de la pièce. Pour activer la caractéristique Fast Cool (refroidissement rapide), appuyer sur le bouton OPTIONS pour accéder au mode Options puis appuyer de nouveau sur OPTIONS pour activer la caractéristique.
Mise en marche/arrêt de la machine à glaçons La machine à glaçons comporte un système d’arrêt automatique. Lorsque la machine à glaçons est en marche, les capteurs interrompent automatiquement la production de glaçons lorsque le bac à glaçons est plein. La machine à glaçons reste réglée à ON et la production de glaçons reprend lorsque le bac est vide. Ne pas oublier ■■ La qualité des glaçons dépend de la qualité de l’eau fournie à la machine à glaçons.
2. Appuyer simultanément et sans relâcher sur les boutons OPTIONS et LOCK (verrouillage) pendant 3 secondes. Les mots “Back” (retour) et “1 Cup” (1 tasse) apparaissent sur l’écran d’affichage. L’icône de calibration du remplissage mesuré s’allume également – elle reste allumée pendant le calibrage de la fonction de remplissage mesuré. 4.
REMARQUE : Le distributeur désactive automatiquement la fonction de remplissage mesuré après 1 minute d’inactivité. Lorsque la fonction Remplissage mesuré est désactivée, toute modification effectuée est perdue et les réglages par défauts sont réactivés. 2. Il est possible de puiser l’eau par once, par tasse ou par litre. L’unité utilisée par défaut est l’once. Pour passer aux tasses ou aux litres, appuyer sur le bouton LIGHT (éclairage). Les volumes par défaut, minimum et maximum sont indiqués ci-dessous.
Distributeur à glaçons Lumière du distributeur Les glaçons tombent du bac d’entreposage de la machine à glaçons dans le congélateur lorsqu’on appuie sur le levier du distributeur. Pour éteindre la machine à glaçons, voir la section “Machine à glaçons et bac d’entreposage”. La machine à glaçons peut produire à la fois de la glace concassée et des glaçons. Avant toute distribution de glace, sélectionner le type de glaçons souhaité en appuyant sur le bouton ICE TYPE (type de glaçons).
Système de filtration d’eau Le filtre à eau se trouve dans l’angle supérieur droit du compartiment de réfrigération. Ne pas utiliser pour le filtrage d'une eau microbiologiquement polluée ou de qualité inconnue en l'absence d'un dispositif de désinfection adéquat avant ou après le système. Les systèmes certifiés pour la réduction de kyste peuvent être utilisés pour l'eau désinfectée qui peut contenir des kystes filtrables.
Nettoyage des surfaces extérieures 1. Débrancher le réfrigérateur ou déconnecter la source de courant électrique. 2. À l’aide d’une éponge propre ou d’un chiffon doux et d’un détergent doux dans de l’eau tiède, laver, rincer et sécher soigneusement les pièces extérieures en acier inoxydable et surfaces métalliques peintes.
DÉPANNAGE Essayez d’abord les solutions suggérées ici ou consulter notre site Web et la FAQ (Foire aux questions) pour tenter d’éviter le coût d’une visite de service. Aux États-Unis, www.kitchenaid.com Au Canada, www.kitchenaid.ca Fonctionnement du réfrigérateur Le réfrigérateur ne fonctionne pas AVERTISSEMENT Le réfrigérateur semble bruyant Le bruit émis par les réfrigérateurs a été réduit au cours des années.
Température et humidité La température est trop élevée S’agit-il d’une nouvelle installation? Accorder 24 heures après l’installation pour que le réfrigérateur se refroidisse complètement. ■■ Porte(s) ouverte(s) souvent ou laissée(s) ouverte(s)? Ceci permet à l’air chaud de pénétrer dans le réfrigérateur. Réduire les ouvertures de porte et garder les portes complètement fermées.
Le distributeur d’eau et de glaçons ne fonctionne pas correctement ■■ Le réfrigérateur est-il connecté à l’alimentation en eau et le robinet d’arrêt d’eau est-il ouvert? Brancher le réfrigérateur à l’alimentation en eau et ouvrir le robinet d’arrêt d’eau complètement. ■■ La canalisation de la source d’eau du domicile comportet-elle une déformation? Redresser la canalisation d’eau. ■■ S’agit-il d’une nouvelle installation? Rincer et remplir le système de distribution d’eau.
FEUILLES DE DONNÉES SUR LA PERFORMANCE Système de filtration d’eau intérieur Modèle UKF8001AXX-750 d’une capacité de 750 gallons (2 839 litres) Système testé et certifié par NSF International en vertu de la norme NSF/ANSI 42 (réduction du goût et de l'odeur du chlore, et particules (classe I*)); et en vertu de la norme NSF/ANSI 53 (réduction de plomb, mercure, atrazine, benzène, p-dichlorobenzène, carbofuran, toxaphène, kystes, turbidité, amiante, tétrachloroéthylène et lindane).
Système de filtration d’eau intérieur Modèle UKF8001AXX-200 d’une capacité de 200 gallons (757 litres) Système testé et certifié par NSF International en vertu de la norme NSF/ANSI 42 (réduction du goût et de l'odeur du chlore, et particules (classe I*)); et en vertu de la norme NSF/ANSI 53 (réduction de plomb, mercure, atrazine, benzène, p-dichlorobenzène, carbofuran, toxaphène, kystes, turbidité, amiante, O-dichlorobenzène, éthylbenzène, chlorobenzène, endrine, tétrachloroéthylène et lindane).
GARANTIE LIMITÉE DES APPAREILS DE RÉFRIGÉRATION WHIRLPOOL® ATTACHEZ ICI VOTRE REÇU DE VENTE. UNE PREUVE D’ACHAT EST OBLIGATOIRE POUR OBTENIR L’APPLICATION DE LA GARANTIE.
CLAUSE D’EXONÉRATION DE RESPONSABILITÉ AU TITRE DES GARANTIES IMPLICITES LES GARANTIES IMPLICITES, Y COMPRIS LES GARANTIES APPLICABLES DE QUALITÉ MARCHANDE OU D’APTITUDE À UN USAGE PARTICULIER, SONT LIMITÉES À CINQ ANS OU À LA PLUS COURTE PÉRIODE AUTORISÉE PAR LA LOI.