
Owner's Manual


9
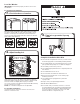
Level the Washer
IMPORTANT: Level washer properly to reduce excess noise
and vibration.
For Permanent Installations:
11. Check levelness of washer
Move the washer to its nal location. Place a level even with
top edges of washer (B). Use side seam as a guide to check
levelness of sides (A). Check levelness of front using lid, as
shown (C). Rock washer back and forth to make sure all 4 feet
make solid contact with oor.
Not Level LEVEL Not Level
12. Adjust leveling foot
If the washer is not level, lay washer on its back to adjust the
large black rubber leveling foot. If the washer is against a wall,
move the washer out slightly before laying on its back.
Use a crescent wrench to adjust the large black rubber leveling
foot up or down as necessary.
NOTE: The 3 smaller leveling feet are not adjustable.
For Portable Installations:
Check the levelness of the oor. If oor is not level, move
washer to a level oor area.
13. Plug into a grounded 3 prong
outlet
Complete Installation Checklist
❑ Check electrical requirements. Be sure you have correct
electrical supply and recommended grounding method.
❑ Check that all parts are now installed. If there is an extra
part, go back through steps to see what was skipped.
❑ Check that you have all of your tools.
❑ Check that shipping materials were completely removed
from washer.
❑ Check that water faucets are on.
❑ Check for leaks around faucets and inlet hoses.
❑ Remove protective lm from console and any tape
remaining on washer.
❑ Check that washer is plugged into a grounded
3 prong outlet.
❑ Dispose of/recycle all packaging materials.
❑ Read “Washer Maintenance.”
❑ To test and clean your washer, measure ½ of normal
recommended amount of powdered or liquid detergent
and pour it into washer basket or detergent dispenser
(on some models). Close lid. Select any cycle. Start
washer and allow to complete full cycle.
A
B C