
Owners Manual


11
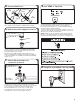
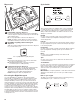
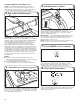
5. Secure drain hose
¼"
(6 mm)
¼"
(6 mm)
Drain hose
Clamp
Cabinet
Place clamp over area marked “CLAMP.” Release clamp.
6. Attach faucet kit adapter to faucet
Washer
Adapter
Proper connection of your faucet adapter kit will allow hot
and cold water to enter your washer properly. It also helps
avoid water damage due to leaks.
Attach the faucet adapter kit from the parts bag to your
faucet. A standard faucet adapter and washer are supplied.
Customized adapters are available from traditional plumbing
supply sources.
7. Attach ll-and-drain hose
connector to faucet
Red water-
ow button
Roll washer to sink area. It rolls and operates on wheels.
The wheels do not roll from side to side. Be sure your washer
is on a level oor to help avoid movement during spin.
Attach ll-and-drain hose connector to a single-spout
hot/cold water faucet. Move the locking collar down
while lifting the connector until it snaps into place.
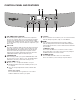
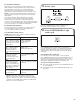
8. Set TEMP to Tap Cold
Set the temperature setting on your washer to Tap Cold. Set
the water temperature for the Wash cycle by adjusting
the Hot and Cold water faucets. The Hot and Warm settings
are inactive with Portable Installation.
To test the water, press the red water-ow button on the hose
connector. Water will be released when the button is pressed,
allowing you to sample the temperature.
NOTE: If desired, you can change the water temperature for
the Rinse cycle by adjusting the Hot and Cold water faucets.
Keep the temperature setting on your washer set at Tap Cold.
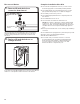
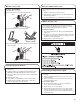
9. Plug into a grounded 3 prong outlet
1
⁄4"
(6 mm)
1
⁄4"
(6 mm)