
Owners Manual


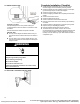
Table Of Contents
- Washer Safety
- Washer Maintenance and Care
- Water Inlet Hoses
- Washer Care
- Nonuse and Vacation Care
- Winter Storage Care
- Transporting Your Washer
- Reinstalling/Using Washer Again
- Installation Instructions
- Requirements
- Tools and Parts
- Location Requirements
- Drain System
- Electrical Requirements
- Installation
- Unpacking
- Connect Drain Hose
- Connect Inlet Hoses
- Level Washer
- Complete Installation Checklist
- Sécurité de la laveuse
- Entretien et réparation de la laveuse
- Tuyaux d’arrivée d’eau
- Entretien de la laveuse
- Non utilisation et entretien avant les vacances
- Entretien pour entreposage hivernal
- Transport de la laveuse
- Réinstallation/réutilisation de la laveuse
- Instructions d'installation
- Spécifications
- Outillage et pièces
- Exigences d’emplacement
- Système de vidange
- Spécifications électriques
- Installation
- Déballage
- Raccordement du tuyau de vidange
- Raccordement des tuyaux d’alimentation
- Établissement de l'aplomb de la laveuse
- Liste de vérification pour l’achèvement de l’installation

8
Connect Drain Hose
5. Attach drain hose to drain port
If applicable, remove the red plastic plug from the black drain
port on the back of the washer.
If clamp is not already in place on elbow end of drain hose,
slide it over end as shown. Squeeze clamp with pliers and
slide black elbow end of drain hose onto black drain port and
secure with clamp.
For a laundry tub or standpipe drain, go to step 6.
For a floor drain, remove the pre-installed drain hose form as
shown in step 7. You may need additional parts with separate
directions. See the “Alternate Parts” section.
6. Place drain hose in standpipe
IMPORTANT: 4.5″ (114 mm) of drain hose should be inside
standpipe; do not force excess hose into standpipe or lay on
bottom of laundry tub. Drain hose form must be used.
Place hose into standpipe (shown in picture) or over side of
laundry tub.
7. Remove drain hose form (floor drain
installations only)
For floor drain installations, you will need to remove the drain
hose form from the end of the drain hose. You may need
additional parts with separate directions. See “Tools and
Parts.”
It is the responsibility of the installer to install and secure the
drain hose into the provided plumbing/drain in a manner that
will avoid the drain hose coming out of and leaking from the
plumbing/drain.
Connect Inlet Hoses
Washer must be connected to water faucets with new inlet hoses
with flat washers (not provided). Do not use old hoses.
NOTE: Both hoses must be attached and have water flowing to
inlet valves. If you are only connecting to a cold water faucet, you
must use a Y-adapter (not provided).
8. Connect inlet hoses to water faucets
IMPORTANT: Do not overtighten hose or use tape or
sealants on valve. Damage to the valves can result.
Attach hose to hot water faucet. Screw on coupling by hand
until it is seated on washer. Use adjustable pliers to tighten
couplings an additional two-thirds turn. Repeat this step with
second hose for cold water faucet.
05-Aug-2019 13:05:14 EDT | RELEASED
In some European factories the letter "W" of the part code mentioned herein will be automatically
replaced by the number "4000" (e.g. "W12345678" becomes "400012345678")