
Owner's Manual


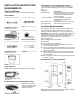
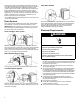
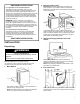


Table Of Contents
- WASHER SAFETY
- CHOOSING THE RIGHT DETERGENT
- WASHER MAINTENANCE AND CARE
- Water Inlet Hoses
- Washer Care
- Nonuse and Vacation Care
- Winter Storage Care
- Transporting Your Washer
- Reinstalling/Using Washer Again
- INSTALLATION INSTRUCTIONS
- REQUIREMENTS
- Tools and Parts
- Location Requirements
- Drain System
- Electrical Requirements
- INSTALLATION
- Unpacking
- Connect Drain Hose
- Connect Inlet Hoses
- Level Washer
- Complete Installation Checklist
- SECURITE DE LA LAVEUSE
- CHOIX DU DETERGENT APPROPRIE
- ENTRETIEN ET REPARATION DE LA LAVEUSE
- Tuyaux d’arrivée d’eau
- Entretien de la laveuse
- Non utilisation et entretien avant les vacances
- Entretien pour entreposage hivernal
- Transport de la laveuse
- Réinstallation/réutilisation de la laveuse
- INSTRUCTIONS D'INSTALLATION
- EXIGENCE
- Outillage et pièces
- Exigences d’emplacement
- Système de vidange
- Spécifications électriques
- INSTALLATION
- Déballage
- Raccordement du tuyau de vidange
- Raccordement des tuyaux d’alimentation
- Établissement de l'aplomb de la laveuse
- Liste de vérification pour l’achèvement de l’installation

10
14. Adjust leveling feet
If washer is not level:
Use adjustable pliers to turn the plastic leveling foot
counterclockwise to lower the washer or clockwise to raise
the washer.
Recheck levelness of washer and repeat as needed.
HELPFUL TIPS:
n You may need to adjust two different feet to level your
unit. Ensure each foot remains secured to the washer’s
base.
n You may want to prop up front of washer about 4” (102
mm) with a wood block or similar object that will support
weight of washer.
WARNING
Electrical Shock Hazard
Plug into a grounded 3 prong outlet.
Do not remove ground prong.
Do not use an adapter.
Do not use an extension cord.
Failure to follow these instructions can result in death,
fire, or electrical shock.
15. Plug into a grounded 3-prong outlet
Complete Installation Checklist
q Check electrical requirements. Be sure you have correct
electrical supply and recommended grounding method.
q Check that all parts are now installed. If there is an extra part,
go back through steps to see what was skipped.
q Check that you have all of your tools.
q Check that shipping materials were completely removed from
washer.
q Check that the washer is level.
q Check that water faucets are on.
q Check for leaks around faucets and inlet hoses.
q Remove protective film from console and any tape remaining
on washer.
q Check that washer is plugged into a grounded 3-prong outlet.
q Dispose of/recycle all packaging materials.
q Read the “Washer Maintenance and Care” section.
q To test and clean your washer, measure 1/2 of normal
recommended amount of powdered or liquid HE detergent and
pour it into washer basket or detergent dispenser (on some
models). Close lid. Select any cycle. Start washer and allow to
complete full cycle.