
Use And Care Manual


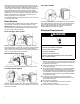
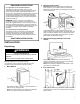

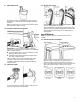

Table Of Contents
- WASHER SAFETY
- CHOOSING THE RIGHT DETERGENT
- WASHER MAINTENANCE AND CARE
- Water Inlet Hoses
- Washer Care
- Nonuse and Vacation Care
- Winter Storage Care
- Transporting Your Washer
- Reinstalling/Using Washer Again
- INSTALLATION INSTRUCTIONS
- REQUIREMENTS
- Tools and Parts
- Location Requirements
- Drain System
- Electrical Requirements
- INSTALLATION
- Unpacking
- Connect Drain Hose
- Connect Inlet Hoses
- Level Washer
- Complete Installation Checklist
- SECURITE DE LA LAVEUSE
- CHOIX DU DETERGENT APPROPRIE
- ENTRETIEN ET REPARATION DE LA LAVEUSE
- Tuyaux d’arrivée d’eau
- Entretien de la laveuse
- Non utilisation et entretien avant les vacances
- Entretien pour entreposage hivernal
- Transport de la laveuse
- Réinstallation/réutilisation de la laveuse
- INSTRUCTIONS D'INSTALLATION
- EXIGENCE
- Outillage et pièces
- Exigences d’emplacement
- Système de vidange
- Spécifications électriques
- INSTALLATION
- Déballage
- Raccordement du tuyau de vidange
- Raccordement des tuyaux d’alimentation
- Établissement de l'aplomb de la laveuse
- Liste de vérification pour l’achèvement de l’installation

7
GROUNDING INSTRUCTIONS
For a grounded, cord-connected appliance:
This appliance must be grounded. In the event of a
malfunction or breakdown, grounding will reduce the risk of
electric shock by providing a path of least resistance for
electric current. This appliance is equipped with a cord having
an equipment-grounding conductor and a grounding plug.
The plug must be plugged into an appropriate outlet that is
properly installed and grounded in accordance with all local
codes and ordinances.
WARNING: Improper connection of the equipment-
grounding conductor can result in a risk of electric shock.
Check with a qualified electrician or serviceman if you are in
doubt as to whether the appliance is properly grounded. Do
not modify the plug provided with the appliance: If it will not fit
the outlet, have a proper outlet installed by a qualified
electrician.
For a permanently connected appliance:
This appliance must be connected to a grounded metal,
permanent wiring system, or an equipment-grounding
conductor must be run with the circuit conductors and
connected to the equipment-grounding terminal or lead on
the appliance.
SAVE THESE INSTRUCTIONS
INSTALLATION
Unpacking
WARNING
Excessive Weight Hazard
Use two or more people to move and install or uninstall
appliance.
Failure to do so can result in back or other injury.
Before you start: Remove shipping materials.
It is necessary to remove all shipping materials for proper
operation and to avoid excessive noise from washer.
1. Move Washer
Move washer to within 4 feet (1.2 m) of its final location; it
must be in a fully upright position.
NOTE: To avoid floor damage, set washer onto cardboard
before moving it and make sure lid is taped shut.
2. Remove shipping base
IMPORTANT: Removing shipping base is necessary for
proper operation. If your washer includes a sound shield,
please refer to the instructions included with the sound shield
to install it at this time.
To avoid damaging floor, place cardboard supports from
shipping carton on floor behind washer. Tip washer back and
place on cardboard supports. Remove shipping base (some
models require shipping base to be rotated 90° to the right
before pulling off). Set washer upright.
3. Remove packaging material from inside
washer
Remove tape from washer lid, open lid, and remove
packaging material from washer tub. Be sure that all parts
have been removed from inside washer.
NOTE: Keep packaging material for inside washer in case
you need to move washer later.
4. Free power cord
Firmly grasp power cord plug and pull to free from rear panel.
Gently place power cord over console to allow free access to
back of washer.