
Owner's Manual


6
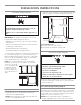
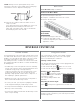
8. Pull out the kickplate and set aside.
9. With the wrench, remove the screws (A) fastening the
bottom hinge (B) to the Beverage Center cabinet and set
aside. There are four screws total.
10. Using the screwdriver, remove the screw (C) fastening
the plastic hinge door latch (E). Set screw aside.
Then, unscrew the bottom hinge shaft (D) and plastic
hinge door latch (E) and set aside.
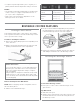
11. Flip over the bottom hinge on
the opposite side.
As shown in the images below
and reverse the process in
step 10.
12. Move hinge to the opposite side and completely tighten
the screws (four total).
13. Reattach the base grill and tighten with the two screws
provided.
14. Place the door straight down and on the bottom hinge.
C
E
D
B
A
C
E
D
B
A
BACK FRONT
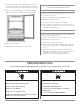
15. Fasten the top hinge with three silver screws and move
the remaining four screws to the opposite side.
Completely tighten all seven screws.
Door Closing
Your Beverage Center has two leveling legs. If your
Beverage Center seems unsteady or you want the door
to close more easily, adjust the Beverage Center’s tilt
using the instructions below.
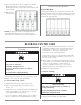
Electrical Shock Hazard
Plug into a grounded 3 prong outlet.
Do not remove ground prong.
Do not use an adapter.
Do not use an extension cord.
Failure to follow these instructions can result in
death, fire, or electrical shock.
1. Plug into a grounded 3 prong outlet.
2. Move the Beverage Center into its final location.
3. Turn the leveling legs to the right to lower the Beverage
Center or turn the leveling legs to the left to raise it.
It may take several turns of the leveling legs to adjust the
tilt of the Beverage Center.
Excessive Weight Hazard
Use two or more people to move and install or
uninstall appliance.
Failure to do so can result in back or other injury.
C
E
D
B
A