
Installation Instructions


12
Install Range Hood
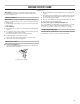
1. Remove the power supply knockout from the top or rear of
the vent hood (depending on the incoming location of your
home power supply cable) and install a UL Listed or CSA
Approved ¹⁄
2
" strain relief.
A. Power supply knockout
2. Align the exterior edge of the mounting brackets with the
exterior edges of the upper cabinet.
IMPORTANT: The brackets should touch the upper cabinet.
With a pencil, mark the upper holes on the brackets.
3. Using a #2 Phillips screwdriver, install the drywall anchors.
Using #8-18 x 1" (4.2 x 25 mm) flat-head #2 Phillips screws,
install the mounting brackets using the upper holes.
NOTE: For installation to a surface other than drywall, it
is recommended that a qualified contractor determine the
anchoring method.
4. Lift the range hood into place and insert the mounting
bracket tabs through the slots in the back of the range hood.
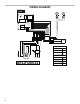
5. From the inside of the range hood, start a #8-18 x
5
⁄
8
"
(4.2 x 16 mm) truss-head screw into the mounting tab (A) on
each side of the range hood as shown in the following inset.
Insert the screws approximately 2 turns into the mounting
tab holes. Bend each mounting tab upward approximately
45°.
6. Lift the range hood into place, positioning the rear slots over
the mounting brackets.
7. Using a Phillips screwdriver, push on the screws that are
started into the top mounting tabs and bend the tabs against
the cabinet side walls. Attach the screws to the cabinet side
walls.
8. For direct wire installations, run the home power supply
cable according to the National Electric Code or CSA
standards and local codes and ordinances. There must be
enough wiring from the fused disconnect (or circuit breaker)
box to make the connection in the range hood electrical
terminal box.
9. Tighten the strain relief screws.
NOTE: Do not reconnect power until the installation is
complete.
OPTIONAL: If you prefer, bend the rear tabs against the rear
of the range hood and attach to the wall using #8-18 x
5
/
8
"
(4.2 x 16 mm) truss-head screws.
A
A
A. Mounting tab