
Owners Manual


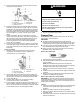
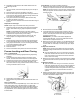

Table Of Contents
- FREEZER SAFETY
- Freezer Safety
- MAINTENANCE AND CARE
- Cleaning Your Frost-Free Freezer (on some models)
- Changing the Light Bulb
- Key Eject Lock
- Ensuring Proper Air Circulation
- Power Interruptions
- Moving Care
- INSTALLATION INSTRUCTIONS
- Unpacking Your Freezer
- Electrical Requirements
- Location Requirements
- Water Supply Requirements (on some models)
- Connect the Water Supply
- Freezer Door
- Freezer Leveling and Door Closing
- Remove and Replace the Handle (on some models)
- SÉCURITÉ DU CONGÉLATEUR
- Sécurité du congélateur
- ENTRETIEN ET RÉPARATION
- Nettoyage du congélateur sans givre (sur certains modèles)
- Dégivrage et nettoyage du congélateur à dégivrage manuel (sur certains modèles)
- Remplacer l’ampoule d’éclairage
- Serrure à éjection de clé
- Pour assurer une circulation d’air correcte
- Pannes de courant
- Précautions à prendre avant un déménagement
- INSTRUCTIONS D’INSTALLATION
- Déballage du congélateur
- Spécifications électriques
- Exigences d’emplacement
- Spécifications de l’alimentation en eau (sur certains modèles)
- Raccordement à la canalisation d’eau
- Porte du congélateur
- Nivellement du congélateur et fermeture de la porte
- Retrait et réinstallation de la poignée (sur certains modèles)

9
5. Reinstall the hinge bracket to the cabinet with the four hex-
head hinge screws.
Door
1. On some models, remove the hinge hole plug from the top of
the door.
2. Remove the door stop from the bottom of the door.
3. Move the door stop to the opposite side, making sure that the
hole in the door stop bracket is aligned perfectly with the hole
in the door for the bottom hinge pin.
4. Using the screws removed in step 2, fasten the door stop
bracket to the bottom of the door.
5. Tighten all screws. Set aside the door until the bottom hinge is
in place.
Replace Door and Hinges
NOTE: Graphic may be reversed if door swing is reversed.
1. Replace the parts for the bottom hinge as shown and tighten
screws. See “Bottom Hinge” graphic. Replace the freezer
door.
NOTE: Provide additional support for the door while the
hinges are being moved. Do not depend on the door magnets
to hold the door in place while you are working.
2. Assemble the parts of the top hinge as shown in the “Top
Hinge” graphic. Do not tighten the screws completely.
Final Steps
1. Check all holes to make sure that hole plugs and screws are
in place. Reinstall top hinge cover. See “Top Hinge” graphic.
2. Using the provided decals, cover the remaining holes located
on the side opposite the bottom hinge.
3. Plug into grounded 3–prong outlet.
4. Reset the control.
5. Return all removable door parts to door and food to freezer.
Freezer Leveling and Door Closing
Style 1 – Without Grille
1. Locate the two front leveling legs taped among the packing
materials.
2. Screw these legs into the front holes on the bottom of the
freezer. The back of the freezer rests on two fixed supports.
3. Adjust the front legs enough to lift the cabinet up off the floor.
4. Place a leveling tool on top of the freezer first side to side,
then front to back. Turn leg counterclockwise to raise a corner.
Turn leg clockwise to lower a corner.
5. Repeat step 4 until freezer is level.
6. After freezer is fully loaded with food, recheck with level as in
step 4.
Style 2 – With Grille
Your freezer has two front adjustable legs—one on each side. The
back of the freezer rests on two fixed rollers. The base grille
covers the adjustable brake feet and roller assemblies located at
the bottom of the freezer below the freezer door. Before making
any adjustments, remove the base grille and move the freezer to
its final location.
Tools Needed: 1/4" hex driver, Phillips screwdriver
1. Remove the base grille screws. Grasp the grille firmly and pull
it toward you. Open the freezer door to access the brake feet.
NOTE: To allow the freezer to roll more easily, raise the brake
feet by turning them counterclockwise. The front rollers will be
touching the floor.
2. Move the freezer to its final location.
3. Lower the brake feet, by turning them clockwise, until the
rollers are off the floor and both brake feet are snug against
the floor. This keeps the freezer from rolling forward when
opening the freezer door.
IMPORTANT: If you need to make further adjustments
involving the brake feet, you must turn both brake feet the
same amount to keep the freezer level.
4. Make sure the door closes easily. If you are satisfied with the
door opening and closing, skip the next section. If, however,
the door does not close easily or the door pops open, adjust
the tilt.
To Adjust the Cabinet Tilt:
NOTE: Having someone push against the top of the freezer
takes some weight off the brake feet. This makes it easier to
turn them.
� Open the freezer door. Use a 1/4" hex driver to turn both
brake feet clockwise the same amount. This will raise the
front of the freezer. It may take several turns to allow the
door to close more easily.
5. Make sure the freezer is steady. If the freezer seems unsteady
or rolls forward when the door is pulled open, adjust the brake
feet.
To Steady the Freezer:
� Open the freezer door. Using a 1/4" hex driver, turn both
brake feet clockwise the same amount until the brake feet
are snug against the floor. Check again. If not satisfied,
continue to adjust the brake feet by half turns of the screw
until the freezer does not roll forward when the door is
opened.
6. Replace the base grille by aligning the ends of the grille with
the leveling assemblies on each side and snapping the grille
into place. Reinstall the Phillips screws.
A. Brake foot
B. Front roller