
Installation Instructions


3
ASSEMBLY INSTRUCTIONS
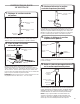
1. Extend mid-pole
Press the release buttons at the bottom of the base pole,
and grasping the mid-pole, extend it upward until it locks
into place.
2. Attach foot assembly to base pole
Insert the base pole into the foot assembly, as shown. Align the
hole in the foot with the pilot hole in the base pole and secure
with one of the included screws. If the hole in the foot is not
visible, turn the Height Adjuster counterclockwise until the hole
in the foot is visible.
NOTE: There may be some resistance when the screw starts
threading into the hole. This is normal.
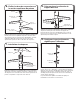
4. Release and extend top pole
Press the release buttons on the mid pole and extend top pole
until it locks into place.
5. Slide arm support collar onto
top pole
Slide the arm support collar onto the top pole, and down past
the release buttons on the top pole. Be sure the toothed end
is facing UP, as shown.
NOTE: To allow proper installation of the hanger arms, the
arm support collar must be below release buttons until the
rest of the hanger arm assembly is complete.
Release
buttons
Base pole
Base pole
Pilot hole
Foot
Screw
3. Lower mid-pole (optional)
To simplify assembly of the hanger arms to the top pole, you
may want to lower the mid pole back into its lowered position.
Press the release buttons at the top of the base pole,
and slide the mid-pole into the base pole.
Release
buttons
Release
buttons
Top pole
Mid pole
Release
buttons
Arm support
collar
Top pole
Mid pole
Mid pole
Height
adjuster