
Installation guide

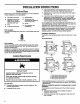


InstaULevellngLegs
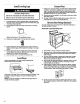
1. To protect the floor, use a large fist piece of cardboard from
the dryer carton. Place cardboard under the entire back edge
of the dryer. See illustration.
2. Firmly grasp the body of the dryar (not the top or conecle
panel).
Gently lay the dryer on the cardboard corners.
3. Examine the leveling legs. Find the diamond marking.
4. Screw the legs into the leg holee by hand. Uss a wrench to
finish turning the legs untilthe diamond marking is no longer
visible.
5. Place a carton corner post under each of the 2 dryer back
corners. Stand the dryer up. Slide the dryer on the corner
posts until it is close to its final location.
6. Leave enough room to connect the exhaust vent.
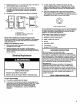
LevelD er
Check the levelness of the dryer. Check levelness first
side-to-aide, then front-to-back.
Ifthe dryer is not level, prop up the dryer using a wood block. Use
a wrench to adjust the legs up or down and check again for
levelness.
NOTE: It might be necsssary to level the dryer again after it is
moved into its final position.
ConnectVent
1. Using a 4 in. (10.2 cm) clamp, connect vent to exhaust outlet
in dryer. If connecting to existing vent, make sure the vent is
clean. The dryer vent must fit over the dryer exhaust outlet
and inside the exhaust hood. Make surethe vent is secured to
exhaust hood with a 4 in. (10.2 cm) clamp.
2. Move dryer into final position. Do not crush or kink vent. Make
sure dryer is level.
3. (On gss models) If flexible metal tubing is ussd, check to be
sure there are no kinks in the flexible gas line.
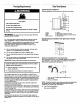
Reverse DoorSwing(Optional)
You can change your door swing from a right-aide opening to a
left-aide opening, if desired.
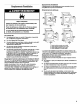
Reversible Large Side-Swing Door
1. Place towel (1) on top of dryer to protect surface.
2. Open dryer door. Remove bottom screws from cabinet side of
hinges (3). Loosen (do not remove) top screws from cabinet
side of hinges.
3. Liftdoor untiltop screws in cabinet are in large part of hinge
slot. Pull door forward off screws. Set door ontop of dryer.
Remove top screws from cabinet.
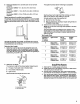
4. Use a small, fist-blade screwdriver to carefully remove 4 hinge
hole plugs (4) on left side of cabinet. Insert plugs in hinge
holes on right side of cabinet.
5. Insert screws in bottom holes on left side of cabinet. Tighten
screws halfway. Position door so large end of door hinge slot
is over screws. Slide door up so screws are in bottom of slots.
_ghtan screws. Insert and tighten top screws in hinges.
6. Cloee door and check thst door strike aiigns with door catch
(2). If needed, slide door catch left or right within slot to adjust
alignment.
6