
PVC Liner for Litter-Robot 3 Open Air Globe Assembly - User Manual
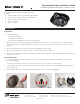

Replacement Liner Installation Guide
InstallatIon
The Litter-Robot 3 Replacement Globe Liner Kit
includes:
y (1) black rubber Globe Liner with weight installed
y (1) 1/4-20 X 1/2” Nylon Phillips Pan Head Screw
y (1) 1/2-20 Flange Head Hex Nut
y (2) 6” foam strips
y (2) screw caps
Preparation
1. Tools you will need:
y Phillips screwdriver
y Flathead screwdriver
y Litter-Robot 3 Manual to reference components
2. Empty all litter from the Globe by pressing the Empty button on the Control Panel. Once complete, brush
any remaining litter through the waste port, then press the Reset button to return the Globe to the Home
position.
3. Press the Power button to turn the unit off and unplug it from the wall.
4. Remove the Bonnet by pressing the tabs on either side, then set it aside.
5. Remove the Globe from the Base and wipe the Globe down with paper towel and disinfectant. Make sure the
waste port is clean.
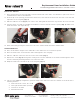
Disassemble Globe
6. On either side of the Globe opening, use the end of a paperclip or a flathead screwdriver to remove the
screw caps (Fig. 1).
Tip: Place your thumb over the screw cap as you wedge it out of place to avoid flinging it.
7. Use a Phillips screwdriver to remove the 8 screws around the equator of the Globe (Fig. 2) and carefully set
the screws aside.
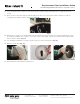
8. Set the Globe flat on the opening and split the halves; set the top half aside (Fig. 3).
Visit www.support.litter-robot.com for installation videos.
Headquarters
2900 Auburn Ct.
Auburn Hills, MI 48326
Assembly
561 S Fairfield Ave
Juneau, WI 53039
Contact Customer Service
Monday - Friday, 9am - 7pm EST
1-877-250-7729 or support@litter-robot.com
Fig. 2Fig. 1
Fig. 3
LR3-8093-0a