SPLIT SYSTEM OWNER’S MANUAL To be used with your system’s UNIT specific Installation Guide The Coolest Thing In Wine Storage
Copyright © 2010. WhisperKOOL. All rights reserved. This manual, the product design, and the design concepts are copyrighted by WhisperKOOL, with all rights reserved. Your rights with regard to the hardware and manual are subject to the restrictions and limitations imposed by the copyright laws of the United States of America.
TABLE OF CONTENTS Introduction ............................................................................................................. 2 Receiving & Inspecting The Unit................................................................................. 3 Preparing the Wine Cellar ......................................................................................47 Installation ...................................................................................................................
INTRODUCTION Customer Service Thank you for purchasing a WhisperKOOL split system. We strive to provide the highest quality products and the best possible customer service. If you have any questions about your WhisperKOOL unit, please call us at 1(800) 343-9463 or visit www.whisperkool.com. Using this Manual This Owner’s Manual is intended to be a general WhisperKOOL split system installation and maintenance guide. Please use the supplied unit specific installation guide in conjunction with this manual.
RECEIVING & INSPECTING THE UNIT Customer Warranty Registration PLEASE COMPLETE AND RETURN THE WARRANTY CARD UPON RECEIPT OF THE UNIT. By completing the Product Registration Card, you will be confirmed in our customer database ensuring that your information is on file to help you obtain efficient warranty service. Please refer to page 25 for complete terms and conditions, warranty guidelines, and policy for your WhisperKOOL split system.
PREPARING THE WINE CELLAR The performance and life of your WhisperKOOL system are contingent upon the steps you take in preparing the wine cellar. Note: Improperly preparing your enclosure or incorrectly installing your WhisperKOOL system may cause unit failure, leaking of condensation, and other negative side effects. IT IS HIGHLY RECOMMENDED THAT YOU OBTAIN THE ASSISTANCE OF A WINE STORAGE PROFESSIONAL.
Unobstructed Airflow Unobstructed airflow to and from both the evaporator and condenser is a critical factor in the system’s overall performance. Make sure there is a 3 ft. horizontal clearance in the front of both units. This will assure that the air can circulate in an efficient manner. Avoid any attempt to camouflage the evaporator by installing racking in front of the unit. This will restrict the airflow and reduce system performance.
SPLIT SYSTEM INSTALLATION General Installation Guidelines and Instructions WhisperKOOL requires that a certified HVAC technician install and charge all split systems. Please take a moment to review state and city building codes to ensure the safe and proper installation of the system. Electrical Needs WhisperKOOL split systems requires a dedicated 110-volt 20-amp circuit. The system draws a large amount of amps at initial start up.
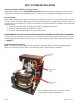
Installing the Condensing Unit The condensing unit can be mounted inside a utility area of the home or outside utilizing the required outdoor condensing unit housing. The condenser requires a dedicated 20 amp circuit, non-GFI. Make sure there is a minimum three-foot horizontal clearance in front and rear of the unit. The unit may either be hard wired or plug-in depending on local electrical codes.
SPLIT SYSTEM INSTALLATION (cont’d) Installing the Evaporator Unit Please refer to the supplied Unit Specific Installation Guide for detailed evaporator installation guidelines. Head Pressure Control, Low Ambient Control Switch, Fan Cycling Switch: These switches are used to cycle the condenser fan at low ambient temperature conditions. If your unit is equipped with a Low Ambient Control, set the switch to 170 psig for cut-in and 70 psig for the differential. Further adjustment may be needed.
REMOTE KEYPAD: INSTALLATION AND CONFIGURATION If you have a system with a remote keypad, please review this section for installation. Note: 50 feet of communication line is included, the keypad can be installed up to 300 line feet away. Longer lengths of communication line can be ordered by calling 1-800-343-9463 ext. 751. Run your communication line to the desired location, be sure not to have any harsh kinks in the lines route.
DUCTED INSTALLATION Ducting the supply and return air to the cellar creates a virtually silent cellar space and also maximizes cellar capacity. It is absolutely crucial to only use insulated duct work as it minimizes cooling loss, prevents sweating, and reduces noise. Failure to use insulated ducting will cause the unit to run excessively and greatly shorten its lifespan.
LIQUID MEASURING THERMOMETER Most WhisperKOOL systems come equipped with a liquid temperature measuring thermometer probe . This self calibrating probe contains a sensor chip, which actually communicates back and forth to the thermostat. This results in a consistent liquid temperature as air temperature fluctuates Measuring liquid temperature has a couple unique advantages: 1. The temperature of the wine can be more precisely controlled, ensuring a more consistent overall temperature. 2.
SYSTEM OPERATION Initial Start-Up When power is applied to the unit, the control will briefly display all symbols, and the Snow Flake symbol will be displayed (if unit is calling for cooling). There may be a brief delay prior to the evaporator fan turning on, as the fan will not turn on until the evaporator probe temperature drops to the perspective start temperature (below 70°F). When the evaporator fan is activated the Fan symbol will be displayed.
CONTROL PANEL OPERATION Defrost Compressor Evaporator Fan Cellar “Pre-Chill” Button 3-5 Energy Reduction Button 1 Hi Bottle Temp History & Scroll Button 1 Energy Reduction Low Bottle Temp History & Scroll Button 1 Set Button •View Set Point 1 •Change Set Point 3-5 •SET + Down = CPSM 3-5 •Reset Hi & Lo Button 3-5 Control “ON/OFF” Button •Turns the Cooling Unit “ON/OFF” 1 ALARM Pre-Chill Display Condenser Fan Note: The 1 or the 3-5 stands for the amount of time (in seconds) that the button must be
Energy Reduction (ER) Set Button CPSM Mode 1. The ER feature can be used to save energy and aids in extending the life of the system. 2. The ER button is located at the top L/H side of the control. The ER feature is activated by pressing the ER button one time, and the ER logo will appear on the digital display. 3.
CPSM Mode (Cont.) CCS – Cellar Pre-Chill Set Point: This parameter is set at 52°f, but can be adjusted to a set point between 45°f - 67°f. bLL/Act – Compressor Off or On for Low (bLL) or High (Act) Temperature Alarm: These parameters are set at “n”. With this parameter set at “n” the refrigeration system will continue to operate normally, if there is a High or Low temperature Alarm.
MAINTENANCE SCHEDULE Monthly 1. Check filters 2. Check for unusual noise or vibration Quarterly Clean filters: 1. Remove grille/ducting on the evaporator 2. Remove the filter covering the coil 3. Wash with warm water 4. Dry off filter by shaking excess water from filter 5.
TROUBLESHOOTING Display Alarm Codes Message Cause Outputs “P1” Room probe failure Compressor output acc. to par. “Con” and “COF” “P2” Evaporator probe failure Defrost end is timed “HA” Max bottle probe temp alarm Outputs unchanged “LA” Min bottle probe temp alarm Outputs unchanged “EA” External alarm Outputs unchanged Fault Cause Solution Water leaking from unit 1. Condensate drain clogged Clear out drain 2. Evaporator coil frozen Clean the coil and / or fan wheel 3.
If the breaker remains set, check to see if compressor is running and condenser fan turns on. After compressor runs a few minutes, check the refrigerant “sight glass” in the ¼” copper tubing. Look for bubbles. If no bubbles are present and compressor is running, refrigerant system is running OK. If bubbles are present, system is low on refrigerant. A CERTIFIED HVAC service technician will have to locate and repair any refrigerant leaks, then add refrigerant.
7. System low on refrigerant. Check refrigerant “sight glass” in 1/4” tubing. Check for bubbles after system has run for several minutes. If bubbles present, call a CERTIFIED HVAC service technician. If sight is clear of bubbles, refrigerant level is OK. 8. Thermostatic expansion valve power element losing its charge. System will operate as if it were low on refrigerant charge. Sight glass will be clear. Evaporator coil icing probable. Call a CERTIFIED HVAC service technician. 9.
Compressor runs, but evaporator does not 1. Faulty blower motor or broken wire connection • Evaporator coil probably frozen • Shut off power to condensing unit • Call a CERTIFIED HVAC service technician for repair 2. Defective low pressure switch not shutting compressor off when pressure drops • Compressor would continue to run when thermostat is satisfied and shuts blower and solenoid off. When space warms up to set point, blower starts and the system runs normally.
5. Evaporator blower not running • Faulty blower motor or broken wire connection. • Call a CERTIFIED HVAC service technician 6. Obstruction to air flow Check for obstruction to air flow and repair 7. Anti-frost control not working With ice or frost in the evaporator coil, the compressor should be OFF and the evaporator blower running. If compressor is running with ice on the coil, call a certified HVAC service technician. Humidity in cellar too high 1.
WIRING DIAGRAMS Platinum Split 4000 & 8000 Evaporator Terminal Board Serves Color Line 1 Black Neutral White Remote to Keypad - Black rketing/MarketingDept/Manuals/Generic Split Manual Solenoid Valve Blue kaged/Links/Mini Split Evap B Black Wiring.
Platinum Split 4000 & 8000 Condenser Terminal Board Page 23
Mini-Split Evaporator Terminal Board Page 24 GSM-01 081310
Mini-Split Condenser Terminal Board Page 25
TECHNICAL ASSISTANCE WhisperKOOL Customer Service is available Monday through Friday from 8:00 am to 4:00 pm PST.
INSTALLATION TERMS AND CONDITIONS WhisperKOOL Split System PLEASE READ THESE TERMS AND CONDITIONS CAREFULLY BEFORE INSTALLING YOUR WhisperKOOL Split System. 1. Acceptance of Terms & Conditions Installation and use of a WhisperKOOL Split System (hereafter referred to as “the product”) constitutes acceptance by the Purchaser (or user) of the Terms and Conditions set forth in this document.
REPAIR OR REPLACEMENT PURSUANT TO THE LIMITED WARRANTY IS THE EXCLUSIVE REMEDY OF THE CONSUMER FOR ANY DEFECTS IN WHISPERKOOL PRODUCTS. WHISPERKOOL SHALL NOT BE LIABLE FOR ANY INCIDENTAL OR CONSEQUENTIAL DAMAGES ARISING FROM THE BREACH OF ANY EXPRESS OR IMPLIED WARRANTY ON THIS PRODUCT, EXCEPT TO THE EXTENT PROHIBITED BY APPLICABLE LAW, ANY IMPLIED WARRANTY OF MERCHANTABILITY OR FITNESS FOR A PARTICULAR PURPOSE ON THIS PRODUCT IS LIMITED IN DURATION TO THE DURATION OF THIS WARRANTY.
the unit, WhisperKOOL will cover the costs of the evaluation by the certified HVAC technician. If the product is malfunctioning due to the improper installation or some other act or omission by a party other than WhisperKOOL, then the user is responsible for the costs of the on-site evaluation by the technician in addition to any repair costs. 8. Request for Product Evaluation and Repair Under Warranty 8.
Any disputes arising out of or in connection with the installation and warranty of the Split System shall be referred to and finally resolved by a WhisperKOOL approved Independent Certified HVAC Technician. The evaluation of the Technician on all issues or matters of identifying the responsible party (WhisperKOOL or Installing Technician) shall be determined in a written report. This report will be made available to all concerned parties.
NOTES
WhisperKOOL 1738 E. Alpine Ave Stockton, CA 95205 1(800) 343-9463 www.whisperkool.