
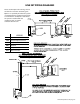
Specifications


www.whisperkool.com | Page 37
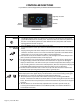
Set 1. Press the “Set” button once and it will display the Set Point. After approximately 5
seconds, the display will return to normal operation and display the Bottle probe
temperature.
2. Press the “Set” button once and it will display the Set Point. Press the up and down
arrows to change the set point. Press the Set button again and the numbers will blink,
conrming the change in Set Point.
3. Press and hold the “Set” button during the display of the Hi/Low “Temperature Data
History” (hold button unit “rst” blinks on display), and it will erase the past recorded data
le and start recording, from the current time and temperature.
4. Press the “Set” and the “Down Arrow” buttons simultaneously, for 3-5 seconds, and you
will access the “Customer Preference Selection Mode” (CPSM). The CPSM allows the
customer to “Fine Tune” the Control Operating System to their applicable choice.
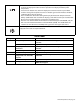
Alarm The Alarm symbol is shown when the unit encounters an issue that needs attention, the
displayed alarm codes are explained below.
Alarm Codes
Message Cause Solution
“P1” Faulty Bottle probe Connection 1. Check Bottle Probe connection at green terminal block on
controller.
Defective Bottle probe Replace the Bottle probe
“P2” Faulty Evaporator Probe
Connection
Check Evaporator Probe connection at green terminal block on
controller
Defective Evaporator Probe Replace the Evaporator Probe
“HA” Defective Bottle probe Replace the Bottle probe
“LA” The Bottle probe is sensing a
temperature of 10° below the
set point
Allow the room to warm up which will increase the temperature
of the wine
Defective Bottle probe Replace the Bottle probe
“POF” The keypad is locked Hold “Up” and “Down” buttons for 3 to 5 seconds to disable,
“PON” should appear