EXTREME SERIES OWNER’S MANUAL Extreme 3500 ti Extreme 5000 ti Extreme 8000 ti The Coolest Thing In Wine Storage
Conforms to ANSI/UL Std 427 Certified to CAN/CSA Std C22.2 No. 120 We manufacture, test and certify 100% of our wine cooling units in the USA. By sourcing the best components and closely controlling our manufacturing processes, we can assure the highest-quality, lowest defect manufacturing rates in the industry. Copyright © 2012. WhisperKOOL. All rights reserved. WhisperKOOL copyrights this manual, the product design, and the design concepts, with all rights reserved.
TABLE OF CONTENTS Introduction . . . . . . . . . . . . . . . . . . . . . . . . . . . . . . . . . . . . . . . . . . . . . . . . . . . . . . . . . . . . . 2 Before You Start . . . . . . . . . . . . . . . . . . . . . . . . . . . . . . . . . . . . . . . . . . . . . . . . . . . . . . . . . 3 Receiving & Inspecting the Unit . . . . . . . . . . . . . . . . . . . . . . . . . .
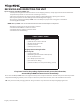
INTRODUCTION Customer Service Thank you for purchasing a WhisperKOOL Extreme Series cooling unit. We strive to provide the highest-quality products and the best possible customer service. If you have any questions about your WhisperKOOL unit, please call us at 1-800-343-9463 or visit www.whisperkool.com. Using the Manual This manual is intended to assist in the proper installation and maintenance of the WhisperKOOL cooling unit.
Extreme Series BEFORE YOU START 1. Inspect the unit before installation. If damage is found, please contact your distributor or WhisperKOOL Customer Service at 1-800-343-9463. 2. The unit should remain in an upright position for 24 hours prior to operation. 3. The WhisperKOOL unit requires a dedicated 115V, 20-amp circuit. Use a surge protector with the WhisperKOOL unit. Do not use a GFI (ground fault interrupter) line. 4.
RECEIVING AND INSPECTING THE UNIT Upon receiving your WhisperKOOL unit: • Lift only at the designated hand-hold locations on the shipping container, or fully support the unit from underneath. A shipment may include one or more boxes containing accessories. • Inspect the packaging for any obvious signs of damage or mishandling before opening the container. • Note any discrepancies or visual damage on the bill of lading before signing.
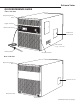
Extreme Series QUICK REFERENCE GUIDE Front / Side View Evaporator grille w/ filter Digital controller Bottle probe input Compressor access panel Control panel (see page 11 for details) Bottle probe Fan speed control Rear / Side View Evaporator grille w/ filter Drain line access Rear power inlet Drain port www.whisperkool.
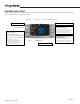
CONTROLLER LAYOUT Note: 1 or 3–5 indicates the amount of time (in seconds) that the button must be pushed to activate the feature. Refer to page 20 for complete listing of buttons and symbols. Anti-Frost Compressor Evaporator and Condenser Fan Cellar Pre-Chill Button 3–5 Energy Saving Button 1 Hi Bottle Temp History and Scroll Down Button 1 Energy Reduction • Push to see the max. stored temperature. • In programming mode, use this button to select parameter codes or increase the set point.
Extreme Series FAN SPEED Fan speed selection is determined by the amount of heat that needs to be removed from the cellar and the type of installation (through-the-wall or fully ducted). Fan speed selection is based on the cellar size, insulation factor, door seal, and desired wine temperature. When initially installing the unit, set the fan speed to the High setting to quickly chill the wine cellar. Once the wine cellar reaches the desired temperature, a lower fan speed may be selected.
PREPARING THE WINE CELLAR The performance and life of your system is contingent upon the steps you take in preparing the wine cellar. Improperly preparing your enclosure or incorrectly installing your unit may cause unit failure, leaking of condensation, and other negative side effects. It is highly recommended that you obtain the assistance of a wine storage professional.
Extreme Series Mounting the Unit The unit must be mounted within 18 inches of the ceiling in order to achieve sufficient cooling. As the room cools down, the warm air will rise to the ceiling. Mounting the unit high in the room will create a consistently cool environment by capturing the warm air and replacing it with cool air.
Ventilation The necessity of dissipating heat away from the unit is critical to the unit’s performance and cannot be overstated. As the unit operates and cools, a greater amount of heat is generated on the exhaust side of the unit. Adequate ventilation is required in order to dissipate heat away from the unit. If ventilation is inadequate, the exhaust will heat the area or room and adversely affect the unit’s ability to cool.
Extreme Series PREPARING THE UNIT FOR INSTALLATION The WhisperKOOL Unit requires a dedicated 115V, 20-amp circuit. The unit draws a large amount of amps during its initial startup. By designating a dedicated circuit breaker, you will guarantee the unit has enough power to run effectively. Contact an electrician for assistance with the installation of this dedicated electrical circuit. The unit must sit upright for 24 hours prior to installation.
PREPARING THE INSTALLATION LOCATION Minimum Tools Needed: Level Hammer Screwdriver Saw Locate the desired installation location (no more than 18 inches from the ceiling). Using a stud finder, locate the studs on either side of the center point and mark them with vertical lines. Using a level and a pencil, mark a horizontal line on the wall between the two studs, no less than 11/2 inches and no more than 18 inches from the ceiling.
SINGLE-PIECE MOUNTING BRACKET This sturdy bracket is used to frame the installation location and secures the unit to the wall studs. The bracket has been designed to hold the unit at a two-degree (2°) angle. This helps project air into the space and aids in condensation drainage. Extreme Series 1 3 Applying Insulation Tape Locate the six-foot piece of black foam tape included with the unit. Align one end of the foam tape with the upper left corner of the rear side of the mounting bracket.
OPTIONAL EXTERIOR GRILLE The exterior grille is required on all installations where the exhaust side of the unit is exposed to the outdoors (i.e., rain and other adverse weather conditions). Non-Flush Installation Install the unit according to the standard through-the-wall procedure. After the unit is installed, place the exterior grille over the exhaust side filter grille and line up the screw holes on the top, bottom, and sides.
Extreme Series INSTALLING THE UNIT Slide the unit from the outside wall into your wine cellar with the outer flange flush with the wall. Secure the flange to the wall using the pre-drilled holes. The screws should penetrate the studs as well as the upper and lower supports to provide adequate support for the WhisperKOOL unit (see illustration). Seal all cracks and gaps around the WhisperKOOL Extreme unit with an airtight sealant or caulking to prevent air leakage.
CONDENSATION DRAIN LINE The condensation drain line tube is used to drain excess condensation from the unit to a proper discharge location. It is important that the drain line tube be properly connected in order to prevent leakage and other problems associated with excess condensation. Failure to use the condensation drain line tube will void the warranty on the unit. All units come with a drain line for additional removal of excessive condensate.
Extreme Series LIQUID-MEASURING THERMOSTAT SYSTEM (BOTTLE PROBE) WhisperKOOL cooling units come with a liquid-temperature-measuring thermostat. The self-calibrating bottle probe contains a sensor which communicates back and forth with the thermostat. This results in a consistent temperature setting and accuracy. Wine should be kept at a very precise, controlled temperature and humidity. By measuring the liquid temperature rather than air, the unit will operate 75–80% of the time.
MULTI-SPEED FAN CONTROL Designed for wine cellars up to 1000 and 2000 cubic feet, the Extreme 3500ti, 5000ti, and 8000ti feature multi-speed fans. These fans have a high setting for maximum performance in high-temperature (+110°F) environments and a low setting for super-quiet operation. Fan Speed Selector Switch (Low/Med/High) The cooling unit fans operate on three speed settings: Low, Medium, and High.
Extreme Series SYSTEM OPERATION Initial Start-Up When power is applied to the unit, the snowflake symbol will be displayed (if unit is calling for cooling). There may be a delay of up to 60 seconds before the evaporator fan turns on. When the evaporator fan is activated, the fan symbol will display. Display The bottle probe temperature is displayed by default. “Def” is displayed during Anti-Frost.
CONTROLLER FUNCTIONS Button/Symbol Normal Functions ON/OFF The ON/OFF button allows the customer the convenience of turning the refrigeration unit ON or OFF from the control panel. This feature does not disconnect power from the unit. In order for the power to be shut off from the unit, the power cord must be unplugged from the wall outlet. UP/DOWN ARROWS Use these buttons to scroll through the CPSM (Customer Preference Selection Mode) menu.
Extreme Series Button/Symbol SET BUTTON Normal Functions Press the SET button once and it will display the set point. After approximately 5 seconds, the display will return to normal operation and display the bottle probe temperature. Change Set Point ALARM Press and hold the SET button for 3–5 seconds until the set point is displayed and the °F symbol blinks. Press the UP or DOWN ARROW buttons to select a new set point.
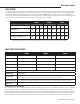
EXTREME 3500ti, 5000ti, & 8000ti WIRING DIAGRAM white 5 4 3 2 1 Rear Receptacle black black white black 3 5 6 8(3)A 250V~ 4 7 8 Evap. ! FRONT/REAR SWITCH Capacitor red grey black Capacitor 9 10 11 12 8(3)A 250V~ D.I.
Extreme Series NOTES www.whisperkool.
TROUBLESHOOTING GUIDE Unit has ice forming on the evaporator Possible cause Solution Evaporator coil is dirty Clean the coil with a vacuum. If coil is very dirty, use a spray bottle with a small amount of liquid dish detergent or coil cleaner. Spray coil, let set for five minutes, then flush with fresh water.
Extreme Series Unit leaks water Possible cause Solution Unit is level System should have a two-degree (2°) pitch towards the exhaust side Drain line clogged or kinked Check drain line to make sure water can flow freely Drain is clogged, preventing water from escaping 1. Disconnect exterior drain line and clear it out; run provided drain line brush through the drain port and into the interior drain line. 2.
MAINTENANCE SCHEDULE Monthly 1. Check filters 2. Check for unusual noise or vibration 3. Check drain line to see if it is above the waterline (when draining into a vessel) Every Six Weeks Using the supplied drain line brush, clean the interior drain line leading from the drip tray and drop a pan tab into the drip tray (see illustration below for more details). Quarterly 1. Clean filters 2. Replace filters on ducted units (see diagram below) Annually 1.
Extreme Series TECHNICAL ASSISTANCE WhisperKOOL Customer Service is available Monday through Friday from 6:00 a.m. to 4:00 p.m. Pacific Standard Time. The appointed customer service representative will be able to assist you with your questions and warranty information more effectively if you provide them with the following: • • • The model and serial number of your WhisperKOOL system(s).
PRODUCT WARRANTY INFORMATION The Coolest Thing In Wine Storage WhisperKOOL Product Terms and Conditions Including Product Limited Warranty And Product Installation Requirements For WhisperKOOL Extreme Series ATTENTION: PLEASE READ THESE TERMS OF USE CAREFULLY BEFORE INSTALLING YOUR WHISPERKOOL COOLING SYSTEM. INSTALLING YOUR WHISPERKOOL COOLING SYSTEM INDICATES THAT YOU ACCEPT AND AGREE TO EACH OF THE TERMS AND CONDITIONS SET FORTH HEREIN (“TERMS OF USE”).
8. This limited warranty is voided if installed in an enclosure of insufficient design that does not follow the Product installation requirements stated herein and in the Owner’s Manual. 9. Removing the rivets from the Product’s unit housing without prior authorization from WhisperKOOL voids this limited warranty. 10.
5. Additional End User Costs And Responsibilities The following items are not covered under any warranty and are the sole responsibility of the End User: A. End Users should satisfy themselves that the Product they are purchasing is suitable for their particular needs and requirements, and thus no responsibility will be placed with WhisperKOOL for the End User’s decisions in this regard. B.
9. Questions, Additional Information And Technical Assistance A. Questions: If you have any questions regarding these Terms and Conditions or wish to obtain additional information, contact us via phone at 1-800-343-9463 or please send a letter via U.S. Mail to: Customer Service WhisperKOOL Corporation 1738 E Alpine Ave Stockton, CA 95205 E-mail: support@whisperkool.com Web: www.whisperkool.com B. Technical Assistance: WhisperKOOL Customer Service is available Monday through Friday from 6:00 a.m.
WhisperKOOL 1738 E. Alpine Ave Stockton, CA 95205 1-800-343-9463 www.whisperkool.