5000ti EXTREME OWNER’S MANUAL For: 5000ti 5000tiR The Coolest Thing In Wine Storage
Copyright © 2011. WhisperKOOL. All rights reserved. This manual, the product design, and the design concepts are copyrighted by WhisperKOOL, with all rights reserved. Your rights with regard to the hardware and manual are subject to the restrictions and limitations imposed by the copyright laws of the United States of America.
TABLE OF CONTENTS WhisperKOOL Extreme Series Quick Reference Guide . . . . . . . . . 4 Controller Quick Reference Guide. . . . . . . . . . . . . . . . . . . . . . . . . . . . . 5 Fan Speed Reference. . . . . . . . . . . . . . . . . . . . . . . . . . . . . . . . . . . . . . . . . 6 Introduction. . . . . . . . . . . . . . . . . . . . . . . . . . . . . . . . . . . . . . . . . . . . . . . . . 7 Receiving & Inspecting The Unit. . . . . . . . . . . . . . . . . . . . . . . . . . . . . . 8 Quick Start Guide. .
WHISPERKOOL Series QUICK REFERENCE GUIDE Front / Side View Bottle Probe Controller Probe Input HIGH MED LOW Control Panel (see page 15 for details) Speed Control Front Grille Rear View Posterior Grille Rear Power Option Page 4 Drain Port PT-EXPL5000 060311
QUICK CONTROLLER REFERENCE GUIDE Standard Controller Layout - XR70CX If your unit is installed through the wall and does not have a remote keypad you will have the XR70CX Controller Note: The 1 or 3-5 qualifies the amount of time in seconds that the button must be pushed to activate the feature. Refer to page 25-27 for complete instructions. Defrost Energy Saving Button 1 Compressor Evaporator and Condenser Fan Hi Bottle Temp History & Scroll Button 1 Push to see the max stored temperature.
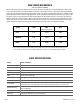
FAN SPEED REFERENCE (Extreme 5000ti or 5000tiR) Your fan speed selection will depend on the amount of heat that needs to be removed from the cellar, as well as the application of the unit (Thru the Wall Installation or Ducted).
INTRODUCTION Customer Service Thank you for purchasing a WhisperKOOL Extreme Series cooling unit. We strive to provide the highest quality products and the best possible customer service. If you have any questions about your WhisperKOOL unit, please call us at 1(800) 343-9463. Using the Manual This User’s Manual is intended to assist in the proper installation and maintenance of the WhisperKOOL Extreme cooling system.
RECEIVING & INSPECTING THE UNIT Customer Warranty Registration PLEASE COMPLETE AND RETURN THE WARRANTY CARD UPON RECEIPT OF THE UNIT. By completing the Product Registration Card, you will be confirmed in our customer database ensuring that your information is on file to help you obtain efficient warranty service. Please refer to pages 37 - 39 for complete terms and conditions, warranty guidelines, and policy for your WhisperKOOL Extreme Series cooling unit.
QUICK START GUIDE This guide is meant to serve as a quick reference for installation of the WhisperKOOL unit. The remainder of this Owner’s Manual will provide more detailed information and instructions. Upon receiving the WhisperKOOL unit: 1. Inspect the unit before installation. If damage is found, please contact your distributor or WhisperKOOL Customer Service at 1.800.343.9463 ext 799. 2. The unit should remain in an upright position for 24 hours prior to operation. 3.
PREPARING THE WINE CELLAR The performance and life of your WhisperKOOL unit are contingent upon the steps you take in preparing the wine cellar. Note: Improperly preparing your enclosure or incorrectly installing your WhisperKOOL unit may cause unit failure, leaking of condensation, and other negative side effects. IT IS HIGHLY RECOMMENDED THAT YOU OBTAIN THE ASSISTANCE OF A WINE STORAGE PROFESSIONAL.
Mounting the Unit Unobstructed Airflow The unit must be mounted within 18“ of the top of the room in order to achieve sufficient cooling. As the room cools down, the warm air will rise to the ceiling. Mounting the WhisperKOOL high in the room will create a consistently cool environment by capturing the warm air and replacing it with cool air.
Ventilation The necessity of dissipating heat away from the unit is critical to the unit’s performance and cannot be overstated. As the unit operates and cools, a greater amount of heat is generated on the exhaust side of the unit. Adequate ventilation is required in order to dissipate heat away from the unit. If ventilation is inadequate, the exhaust will heat up the area or room and adversely affect the unit’s ability to cool.
Sizing the Unit to the Room Model Cellar Volume AMP’s AMP’s Product Dimensions (cubic feet) (starting) (running) (W x H x D) 5000ti/tiR 1000 high 32 7.2 14.25” x 16” x 28” 5000ti/tiR 5000ti/tiR 1000 med 1000 low 31 30 6.4 5.9 14.25” x 16” x 28” 14.25” x 16” x 28” Cutting the Hole for the WhisperKOOL Unit Tools Needed Level Hammer Screwdriver Saw Locate the desired installation location.
Once the horizontal lines have been cut, make vertical cuts using the inside edge of the studs as a guide. Once you have made both vertical cuts, you should have a rectangular hole in the sheetrock. Now you have to make the same hole on the other side of the wall. Since you already have one hole, this is an easy process. Using a nail, mark all four corners of the first hole by making nail holes through the sheetrock. Then on the other side of the wall, connect the holes with a pencil mark and cut.
INSTALLATION TEST THE UNIT PRIOR TO INSTALLATION To prepare it for testing before installation in wall: • Unit needs to be in the upright position for 24 hours before starting. • Remove unit from box • Place unit on tabletop • Plug in unit to electrical outlet • Plug in bottle sensor • Turn on to test (Should be 10°F- 15°F across coils) approx. 20-30 minutes • Turn off after test • Remove bottle sensor Electrical Needs The WhisperKOOL Extreme System requires a dedicated 115-volt 20-amp circuit.
THROUGH-THE-WALL INSTALLATION (without ductwork) Mounting Bracket Installation There are four individual mounting brackets, one for each side of the unit. There will be two long brackets and two short brackets: upon receiving the unit these brackets will be located on top of the packaging foam on top of the unit. These brackets are designed to mount toward the rear of the unit and mount to the exterior side of the cellar wall.
Placement of Unit Slide the unit from the outside wall into your wine cellar with the outer flange flush to the wall. Secure the flange to the wall through the pre-drilled holes. The screws should penetrate the studs as well as the upper and lower supports to provide adequate support for the WhisperKOOL system (see illustration). Seal all cracks and gaps around the WhisperKOOL Extreme unit with an air-tight sealant or caulking to prevent air leakage.
Condensation Drain Line Tube The condensation drain line tube is used to remove excess condensation from the unit to a proper discharge location. It is important that the drain line tube is properly connected and used to prevent leakage and other problems associated with excess condensation. Failure to use the condensation drain line tube will void the warranty on the unit. Drain Line All units come with a drain line for additional removal of excessive condensate.
INSTALLATION OPTIONS Exterior Grille Installation The exterior grille is required on all installations where the condenser side of the unit is exposed to the outside of the dwelling (i.e. rain and weather). STEP 1: Now determine at what depth the unit will be installed: • For a non-flush installation (i.e. holes location #2 WhisperKOOL retrofit or #1 Middle Wall or #3), place the grille on the condenser end and line up the holes on the grille with the holes on unit location #4.
LIQUID MEASURING THERMOSTAT SYSTEM The WhisperKOOL Series cooling units come equipped with a liquid temperature measuring thermostat system. This system incorporates the following advantages: 1. Self-Calibrating Probe: The probe contains a sensor chip, which actually communicates back and forth to the thermostat. This results in a consistent temperature setting and accuracy. Do not remove the tip from the probe! 2.
REMOTE CONTROLLER: INSTALLATION AND CONFIGURATION The WhisperKOOL Extreme Series can be configured with a remote controller system. If you have a unit with a remote controller, please review this section. The controller can be installed up to 50 feet away from the cooling unit, or up to 300 feet away with the extended connection wire. To install the remote controller, remove the mounting bracket and secure the bracket to the wall in the desired location. Reattach the controller to the bracket.
TM TM TM TM Connection wire in Side Mount configuration Connection wire in Rear Mount configuration Below is an illustration of one possible way to configure the remote controller in a wine cellar.
MULTI SPEED CONTROL Designed for wine cellars from up to 1000 cubic feet, the Extreme 5000ti features multi-speed fans with a “high” setting for maximum performance in high-temperature (+110°F) environments and a “low” setting for superquiet operation. Fan Speed Selector Switch (Low/Med/High): The cooling unit fans operate on 3 speed settings: Low, Medium, and High. For optimum sound and energy efficiency, select the lowest fan speed that will maintain the desired cellar temperature.
SYSTEM OPERATION: Standard and Remote Controllers Initial Start-Up When power is applied to the unit, the control will briefly display all symbols, and the Compressor symbol will be displayed (if unit is calling for cooling). There may be a brief delay prior to the evaporator and condenser fans turning on, as the fans will not turn on until the sensors reach their perspective start temperatures (below 120°F for the evaporator and condenser).
STANDARD CONTROLLER FUNCTIONS - XR70CX If your unit is installed through the wall and does not have a remote keypad you will have the XR70CX Controller. Button ON/OFF Up and Down Arrows Cellar PreChill (CPC) Normal Functions • The ON/OFF button allows the customer the convenience of turning the refrigeration system ON or OFF, from the control panel. This feature does not disconnect power from the unit.
Energy Reduction (ER) Set Button CPSM Mode 1. The ER feature can be used to save energy and aids in extending the life of the system. 2. The ER button is located at the top L/H side of the control. The ER feature is activated by pressing the ER button one time, and the ER logo will appear on the digital display. 3.
CPSM Mode (Cont.) CCS – Cellar Pre-Chill Set Point: This parameter is set at 52°f, but can be adjusted to a set point between 50°f - 67°f. CCT - Cellar Pre-Chill Duration: This parameter is set to 6 hours, but can be changed between 0-23.5 hours. Con/Cof – Compressor On time (Con) and Off time (Cof ) with a Probe 1 failure/Alarm. These parameters are set at Con 40 min/Cof 10 min.
STANDARD WIRE SCHEMATIC - XR70CX Front Receptacle Rear Receptacle 15 Amp Circuit Breaker Compressor Crankcase Heater Max 20A 1 Line 2 Fan 3 16/60 4 8A Cmp 5 6 7 Evap Fan ! BROWN WHITE BROWN WHITE RED GREY BLACK RED GREY BLACK 8 C 6 NO 3 4 2 Evap.
REMOTE CONTROLLER FUNCTIONS - XW260K If your unit has a remote keypad then you will have the XW260K controller. High Temp / Pre-Chill Low Temp Display Set Point ON / OFF TEMPERATURE Button ON/OFF Up and Down Arrows Cellar PreChill (CPC) Normal Functions • The ON/OFF button allows the customer the convenience of turning the refrigeration system ON or OFF, from the control panel. This feature does not disconnect power from the unit.
Set Button CPSM Mode 1. Press the “Set” button once and it will display the Set Point. After approximately 5 seconds, the display will return to normal operation and display the Bottle Probe temperature. 2. Press the “Set” button once and it will display the Set Point. Press the up and down arrows to change the set point. Press the Set button again and the numbers will blink, confirming the change in Set Point. 3.
CPSM Mode (Cont.) CCT - Cellar Pre-Chill Duration: This parameter is set to 6 hours, but can be changed between 0-23.5 hours. Con/Cof – Compressor On time (Con) and Off time (Cof ) with a Probe 1 failure/Alarm. These parameters are set at Con 40 min/Cof 10 min. In the event that there is a Probe 1 failure/Alarm, the compressor/refrigeration system automatically starts a predetermined ON/OFF cycle, which is controlled by the Con and the Cof parameters.
REMOTE WIRE SCHEMATIC - XW260K Front Receptacle Rear Receptacle + - RED GREY BLACK - WHITE BROWN BROWN WHITE RED GREY BLACK 8 C 6 NO 3 4 2 + 15 Amp Circuit Breaker Evap Fan BLUE Cond Fan 7 CMR NC 5 2 4 1 6 3 PT-EXPL5000 060311 Page 32 Compressor Crankcase Heater BLUE 1 0 Neutral Line
MAINTENANCE SCHEDULE Monthly 1. Check filters 2. Check for unusual noise or vibration 3. Check the drainline to see if it is above the waterline if draining into a vessel. Quarterly Clean filters: 1. Remove grille/ducting on both ends of unit. 2. Remove the filter covering the coil. 3. Wash with warm water 4. Dry off filter by shaking excess water from filter. 5. Open access door and add chlorine tablets to drip tray. Annually 1. Replace filters if worn or plugged beyond cleaning. 2.
TROUBLESHOOTING GUIDE Unit has ice forming on the evaporator Possible Cause Solution Evaporator filter and/or coil are dirty. Clean filter and coil with a vacuum. If coil is very dirty, use a small hand spray with a small amount of liquid dish washer detergent. Spray coil, let set for 5 min, then flush with fresh water. There is something blocking the supply and or return air Remove blockage The evaporator fan is not turning on.
TROUBLESHOOTING GUIDE Unit leaks water Possible Cause Solution Unit is not level Unit should be level in wall to prevent leaking Drain line clogged or kinked Check drain line to make sure water can flow freely. Drain is clogged preventing water form escaping Disconnect drain and clear out, open access door and check drain for blockage Drain line does not have a downward slope Fix Drain line so there is a downward slope from the unit to the drain.
TECHNICAL ASSISTANCE WhisperKOOL Customer Service is available Monday through Friday from 8:00 a.m. to 4:00 p.m. Pacific Time. The customer service representative will be able to assist you with your questions and warranty information more effectively if you provide them with the following: • The model and serial number of your WhisperKOOL Series Unit. • Location of unit and installation details, such as ventilation, ducting, construction of your wine cellar, and room size.
INSTALLATION TERMS AND CONDITIONS WhisperKOOL Cooling System WHISPERKOOL PRODUCT BASE TERMS WhisperKOOL Corporation (“WhisperKOOL”) is in the business of manufacturing and selling wine cabinets, cooling units and related goods; each such wine cabinet, cooling unit and related good is referred to herein as a “Product”. As used herein, the term “WhisperKOOL” includes any Product sold under the names WhisperKOOL, Vinotheque and CellarCool. “Purchaser” means the original purchaser of a WhisperKOOL Product.
than a technician approved by WhisperKOOL to service the Product. (3) This limited warranty does not cover any Product sold “AS IS” or “WITH ALL FAULTS.” (4) This limited warranty is valid only in the continental United States, Alaska and Hawaii. Sales elsewhere (including Puerto Rico) are excluded from this warranty.
(b) It is the End User’s responsibility to secure safe haven/storage for ANY AND ALL items that are being kept and stored in the End User’s wine cellar, including any Product. WhisperKOOL takes no responsibility for the safety and preservation of the aforementioned items in the event that the environment becomes unsuitable to maintain a proper storage environment. 6.
NOTES
NOTES
WhisperKOOL 1738 E. Alpine Ave Stockton, CA 95205 1(800) 343-9463 www.whisperkool.