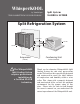
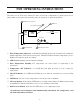
WhisperKOOL by Vinothèque “THE COOLEST THING IN WINE STORAGE.” Split System SS4000 & SS7000 Split Refrigeration System Liquid Line 115 VAC 115 VAC Suction Drain Evaporator Condensing Unit (Indoor) (Indoor/Outdoor) ! The WhisperKOOL Split Cooling System requires professional installation by a Certified HVAC\R technician. Thank you for choosing WhisperKOOL Split Cooling System for your wine preservation needs.
Copyright ©1998-2008 Vinothèque Wine Cellars All rights reserved. This manual, the product design, and the design concepts are copyrighted by Vinothèque Wine Cellars, with all rights reserved. Your rights with regard to the hardware and manual are subject to the restrictions and limitations imposed by the copyright laws of the United States of America.
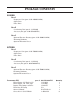
TABLE OF CONTENTS WhisperKOOL Split Cooling System Features & Benefits....................................................................................... 4 System & Features......................................................................................... 5 PDT Thermostat Operating Instructions...................................................... 6 Package Contents........................................................................................... 7 Wine Cellar / Space Preparation........
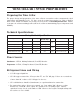
FEATURES & BENEFITS Designed specifically for wine storage, the WhisperKOOL system is a specialized refrigeration unit designed for one purpose only: to maintain the optimal temperature and humidity levels conducive to the proper aging of fine wines. Humidity Control As the temperature begins to drop within the cellar, the relative humidity will rise. The WhisperKOOL units do not create humidity. If you live in a dry area of the country, you may need to add humidity in the wine cellar.
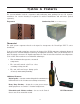
System & Features The system includes both the evaporator and condensing units packaged in two (2) separate containers. An exterior housing is required for outdoor installations and will arrive packed separately. Evaporator Condensing Unit (Shown With Housing) Thermostat The split system evaporator has been designed to incorporate the Vinothèque PDT ™ series thermostat.
PDT OPERATING INSTRUCTIONS The unit is set at 55°F at the factory. To raise or lower the temperature set point, press the set button while at the same time pressing either the arrow up or arrow down button. 1 WINE Temperature Indicator Wine Temperature Reading WINE ON SET 2 3 LED Screen PDT 55F Precision digital Technology Thermostat Temperature SET 4 5 7 Temperature SET Indicator Unit ON Indicator 6 UP Arrow Button 8 DOWN Arrow Button SET Temperature Button 1.
PACKAGE CONTENTS SS4000 Box 1 Evaporator Unit (part #: 03-4000SS-0120) Sight Glass Filter Drier Box 2 Condensing Unit (part #: 1-122100) Accessory Kit (par #: 09-950-9997SS) Box 3 Optional Exterior Housing (part #: 03-4000SS-0120) Mounting Hardware Optional Electrical Cover SS7000 Box 1 Evaporator Unit (part #: 03-7000SS-0120) Sight Glass Filter Drier Box 2 Condensing Unit (part #: 1-122101) Accessory Kit (part #: 09-950-9997SS) Box 3 Optional Exterior Housing (part #: 03-7000SS-0120) Mounting Ha
WINE CELLAR / SPACE PREPARATION Preparing the Wine Cellar The proper design and preparation of the wine cellar is essential in order to maintain the ideal temperature and humidity levels. We have created a typical presentation on “How to Build a Wine Cellar” which is available for viewing on our web site at www.whisperkool.com. Failure to prepare the cellar accordingly will result in the cellar not maintaining proper temperature and humidity.
SPLIT SYSTEM INSTALLATION GUIDELINES General Installation Guidelines and Instructions Vinothèque requires that a certified HVAC technician install and pipe the Split System unit modules. Please take a moment to review State and City building codes to insure the safe and proper installation of the unit. Installing Condensing Unit The condensing unit can be mounted inside a utility area of the home or outside utilizing the required outdoor condensing unit housing.
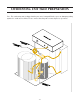
CONDENSING UNIT SKID PREPARATION Note: The condensing unit is shipped with a protective foam pad/ block to prevent damaging tubing against the condenser coil fins. Please ensure that this pad is removed prior to operation.
Head Pressure Control, Low Ambient Control Switch: The switch is used to cycle the condenser fan at low ambient temperature condition. Set the switch to 170 psig for cut-in and 70 psig for the differential. Further adjustment may be needed. Verify the settings via refrigeration manifold gauge and perform the final adjustments to the readings on the gauge manifold.
MOUNTING THE EVAPORATOR UNIT 1. Disassemble evaporator unit. In order to mount the housing to the wall, the internal components will need to be removed and reinstalled after mounting the housing. Remove front cover and thermostat by unscrewing four captive screws located on each corner of the cover and five at bottom of front cover. Note: Thermostat is not plugged into electrical line. 2. Remove interior assembly. The interior assembly is one piece.
3. Identify and remove appropriate knockouts. There are knockouts located on the rear panel, right side panel and on top. Remove knockouts for the two refrigeration lines and install the two grommets supplied. Remove knockout for electrical line. Keep the refrigerant pipes capped to prevent any foreign material from entering, until ready to braze. 4. Mounting housing to wall. The unit has six mounting holes on 16 inch wide centers.
5. Installing refrigeration lines into evaporator housing. With knockouts removed, install grommets supplied. Install housing, mark location and center line of holes to be drilled in wall. Slide interior into place, measure the distance from the suction and liquid line connection locations to the housing knockout opening.
6. Run the electrical line into evaporator on bottom of left side over insulation. Wires should be at least 36” long going into the cabinet. 7. Re-install interior assembly. Slide interior assembly back into housing gently. Re-attach using the two screws. Flow a small amount of dry nitrogen through the tubing during brazing. This is to displace oxygen and prevent the formation of copper oxide. The solenoid should be energized for a free flow without building up pressure in the tubing.
8. Attaching refrigeration lines. Line up the piping connections. Energize the liquid line solenoid valve, connect Dry Nitrogen, and adjust to a slight flow through the tubing, being sure no pressure develops in the piping. Connect flare fittings if a flare fitting model, tighten securely, braze other fittings, leak check, evacuate to 200 microns, charge with R-134 refrigerant, start and check out.
9. Electrical wires will need to be approximately 36 inches long. Attach lines according to schematic shown. Power Source 115V 60Hz L8 L2 L1 J1 T8 T2 T1 T3 Legend Thermostat J1 Fan F8 F1 F2 J1 S1 S2 Solenoid Valve L1 - White (neutral) L2 - Black (hot) L3 - Black Silver Stripe L8 - Green (ground) T1 - White T2 - Black T3 - Black / White T8 - Green F1 - White F2 - Black F8 - Green S1 - White S2 - Black J1 - White Jumper 10. Install drain line fitting and drain line.
11. Install thermostat. Thermostat mounts on the bottom front of the unit. Plug electrical outlet to thermostat and mount from underneath with screws supplied. 12. Install front cover. 13. Energize unit. Note: Thermostat has a 5 minute time delay.
Refrigeration Lines A 1/4 inch O/D copper “liquid line” and a ½ inch O/D copper “suction line” connect the two units. The refrigerant drier and sight glass shall be installed in that order in direction of refrigerant flow in the liquid line between the condensing unit and evaporator. Enclose the suction line in a cellular insulation ½” wall thickness Armaflex (brand name) or equal to reduce heat transfer.
Split Unit Wiring Diagram -20-
! Charging the System (by Certified HVAC technician) After all the piping is complete: • Open both of the service valves on the condensing unit. The unit is pressurized with Nitrogen and you should hear the gas escaping through the service ports. • With electrical power connected to the evaporator unit energize the solenoid valve (pressurize with dry Nitrogen) to 100psi. Leak test all fittings. Must hold 100psi for 30 minutes.
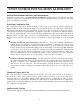
TECHNICAL ASSISTANCE Vinothèque Customer Service is available Monday through Friday from 8:00 a.m. to 4:00 p.m. Pacific Time. Please make sure that you have the following information available before you call: • The model and serial number of your WhisperKOOL unit. • Type of thermostat used with your WhisperKOOL. • Location and installation details, such as ventilation, construction, and size of room.
TROUBLESHOOTING Fault Cause Solution Water leaking from unit 1. Condensate drain clogged Clear out drain 2. Evaporator coil frozen Clean the coil and / or fan wheel 3. Drain line improperly installed Call a CERTIFIED HVAC service technician. Wine cellar temperature above thermostat set point 1. Large quantity of warm wine placed in cellar Allow time for wine to cool 2. Wine Cellar Door left open for long period. Close Door. Allow time for wine to cool. 3.
If the breaker remains set, check to see if compressor is running and condenser fan turns on. After compressor runs a few minutes, check the refrigerant “sight glass” in the ¼” copper tubing. Look for bubbles. If no bubbles are present and compressor is running, refrigerant system is running OK. If bubbles are present, system is low on refrigerant. A CERTIFIED HVAC service technician will have to locate and repair any refrigerant leaks, then add refrigerant.
7. System low on refrigerant. Check refrigerant “sight glass” in 1/4” tubing. Check for bubbles after system has run for several minutes. If bubbles present, call a CERTIFIED HVAC service technician. If sight is clear of bubbles, refrigerant level is OK. 8. Thermostatic expansion valve power element losing its charge. System will operate as if it were low on refrigerant charge. Sight glass will be clear. Evaporator coil icing probable. Call a CERTIFIED HVAC service technician. 9.
Compressor runs, but evaporator does not 1. Faulty blower motor or broken wire connection • Evaporator coil probably frozen • Shut off power to condensing unit • Call a CERTIFIED HVAC service technician for repair 2. Defective low pressure switch not shutting compressor off when pressure drops • Compressor would continue to run when thermostat is satisfied and shuts blower and solenoid off. When space warms up to set point, blower starts and the system runs normally.
5. Evaporator blower not running • Faulty blower motor or broken wire connection. • Call a CERTIFIED HVAC service technician 6. Obstruction to air flow Check for obstruction to air flow and repair 7. Anti-frost control not working With ice or frost in the evaporator coil, the compressor should be OFF and the evaporator blower running. If compressor is running with ice on the coil, call a certified HVAC service technician. Humidity in cellar too high 1.
WhisperKOOL SPLIT SYSTEM INSTALLATION TERMS AND CONDITIONS PLEASE READ THESE TERMS AND CONDITIONS CAREFULLY BEFORE INSTALLING YOUR WhisperKOOL Split System. 1. Acceptance of Terms & Conditions Installation and use of a WhisperKOOL Split System (hereafter referred to as “the product”) constitutes acceptance by the Purchaser (or user) of the Terms and Conditions set forth in this document.
Vinothèque’s Limited Warranty does not cover damage to the product caused by third parties or damage due to acts of God, accident, misuse, abuse, negligence, or modification of, or to any part of the product. The Limited Warranty does not cover damage due to improper operation or lack of proper maintenance, connection to improper voltage supply, or attempted repair by anyone other than an HVAC technician approved by Vinothèque to service the product.
(d) Purchasers should satisfy themselves that the product they are purchasing is suitable for their needs and requirements. (e) Purchasers are responsible for assuring the safety of any and all items that are kept and stored in the wine cellar. Vinothèque takes no responsibility for the safety of such items in the event that the environment becomes unsuitable for proper storage. 6. Customer Service Vinothèque customer service department is available Monday through Friday, from 8:00 a.m. to 4:00 p.m.
8.3 Product Installation The following parts or causes of failure are not the responsibility of the manufacturer: improper voltage supply, line set with screw connectors (high end and low end), leaks found at the braze points when performing pressure check, unit that has been charged incorrectly, incorrect tubing diameter used on line set, a unit that has been wired incorrectly.
(b) GOVERNING LAW/ CHOICE OF FORUM: The laws of the State of California (without regard for conflicts of law) shall govern the construction and enforcement of these Terms and Conditions, except that the Terms and Conditions shall be interpreted as though drafted jointly by Vinothèque and the Purchaser.
-33-
1738 East Alpine Avenue Stockton, California 95205 www.Vinothèque.