
User Manual


7
ASSEMBLY / INSTALLATION
STEP 2
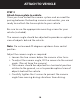
1. Peel the backing from the adhesive disks and apply one
spacer over each license plate mounting hole. Apply
pressure to set the adhesive tape.
2. Slide your license plate into the assembly. If two of
the license plate mounting holes are not required for
attachment to your vehicle, insert the short machine
screws and tighten with the supplied machine nuts.
3. If needed, two cushions are provided to protect your
vehicle. Attach to the back of the spacers containing the
machine nuts.
4. Connect the solar panel connectors to the mating
connectors from the main camera housing and place the
tie wrap adhesive pads as shown. Use two tie wraps to
neatly hold the cables in place and cut the excess length
of the tie wrap if desired. Follow illustration for correct
wiring. Connect the A wires and connect the B wires.
Adhesive
disks backing