
User's Manual


23861-1-0308 Page 7
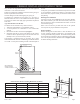
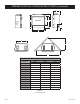
Locating Firebox
Place firebox in framing opening. Use the four (4) framing brackets
provided on the firebox to attach firebox to framing. Different hole
locations can be used for finishing materials with thicknesses of
3/8", 1/2" and 3/4". Attach these materials with screws provided,
two (2) per framing bracket. See Figure 7.
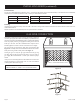
Framing brackets should fit directly against framing material. Use
at least one (1) nail per bracket to secure in place.
Check squareness of the firebox prior to securing to framed opening.
See Figure 8.
Figure 7
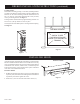
A black hood that is furnished with each firebox (or optional hood)
MUST be installed before the firebox is used. Failure to do so may
create a possible fire hazard. The hood is located inside the firebox
on flush face units. If brass, stainless steel, or hammered pewter
hoods are desired, they can be purchased as an option. Attachment
is the same as the standard black hood.
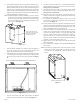
Flush Face Models
1. On flush face models, loosen the two screws (A) holding firebox
top to face panel, then slide the hood flange between the firebox
top and face panel and re-tighten the screws.
2. Install one (1) screw at each end of the hood as shown (C).
A
C
A
C
Flush Face Models
Figure 9
FIREBOX OPENING
CHECK TO SEE
THA
T BOX IS SQUARE
PRIOR TO AT
TACHING TO
FRAMING
Figure 8
FIREBOX INSTALLATION INSTRUCTIONS (continued)
INSTALLING HOOD