
Operator`s manual


24
6
Maintaining
Your Lawn
Tractor
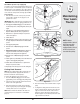
IMPORTANT: Use a torque wrench to tighten the blade
spindle hex flange nut to between 70 foot-pounds and
90 foot-pounds.
Changing the Deck Belt
WARNING: Be sure to shut the engine
off, remove ignition key, disconnect
the spark plug wire(s) and ground
against the engine to prevent unin-
tended starting before removing the
belt.
All belt on your tractor are subject to wear and should be
replaced if any signs of wear are present.
IMPORTANT: The V-belt found on your tractor are
specially designed to engage and disengage safely. A
substitute (non-OEM) V-belt can be dangerous by not
disengaging completely. For a proper working machine,
use factory approved belts.
To change or replace the deck belt on your tractor,
proceed as follows:
1. Lower the deck by moving the deck lift lever into the
bottom notch on the right fender.
2. Remove the belt guards by removing the self-tapping
screws that fasten them to the deck.
3. Remove the belt keeper rod from around the engine
pulley.
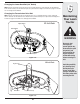
4. On the 42-inch deck only, loosen but do not remove,
the idler pulley nuts. This will enable the belt to be
easily removed from the idler pulleys. See Fig. 6-10.
Engine Pulley
38-Inch Deck
Idler Bracket
Deck Idler Pulleys
Figure 6-11
Periodically inspect
the blade spindles for
cracks or damage,
especially if you strike
a foreign object.
Replace immediately
if damaged.
Be sure to shut the
engine off, remove ig-
nition key, disconnect
the spark plug wire(s)
and ground against
the engine to prevent
unintended starting
before removing
the cutting blade(s)
for sharpening or
replacement. Protect
your hands by using
heavy gloves or a rag
to grasp the cutting
blade.
WARNING
Figure 6-10
Idler pulley nuts
Idler pulleys
IMPORTANT: Carefully allow the ratchet to pivot rearward
before removing it from the square hole.
WARNING: Avoid the possibility of
a pinching injury. Do not place your
fingers on the idler spring or between
the belt and a pulley while removing the
belt.
5. Remove the deck belt from around all pulleys, including
the deck idler pulley.
6. Route the new belt as shown in and Fig. 6-11, 6-12 or 6-13.
7. Remount the belt guards removed earlier.