
Service manual


Single Stage Snowthrower Service Manual 7 - 7
MAINTENANCE
Replacement
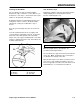
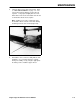
1. Holding the vane firmly at the base, slide the base
of the vane into the small slot in the shroud
(Figure 176).
Note: Sliding the vane at an angle to the slot will
ease installation.
Figure 176 0217-083
2. At the vane mount, turn the vane 90° either to the
left or right. Slide the vane into the vane mount
and turn the vane either right or left to the upright
position.
Note: The vanes to the far right and left of the
snowthrower may be retained by mounting
screws. It will be necessary to remove these
when replacing these vanes.
VANE CONTROL SERVICING ON 14” AND
21” SNOWTHROWERS FROM 1965-1967
The 14” and 21” snowthrowers produced between
1965 and 1967 were designed with a notched selector
plate. To service this design, please consult the parts
manual for your unit.
VANE CONTROL SERVICING
14” Units 1968-1980
21” Units 1968-1975
1. Remove all the mounting screws retaining the
upper shroud to the unit. Remove the shroud.
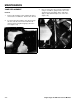
2. Remove eye bolt nut from eye bolt at the lower
handle (Figure 177). If the rubber grommet is
worn or missing, replace. Next, slide the vane
control rod from the small slot in the vane bracket.
Figure 177 0217-084
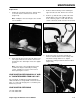
3. Remove the push-on retainer and slide the
washers and vane bracket off the carriage bolt.
Should the carriage bolt be loose, tighten.
Replace the carriage bolt and locknut if needed
(Figure 178).
Figure 178 0217-085