
Specifications


4
INSTALLER CONFIGURATION
BEFORE TURNING POWER ON, please
read the following instructions. Before
operating the system, you must configure
the thermostat to operate properly with
your equipment.
The thermostat, as it comes from the factory,
is configured to operate a standard multi-
stage electric forced hot air system with a
single stage air conditioning compressor.
In this configuration, the thermostat will turn
on the fan immediately on a call for heat. If
you are unsure whether your system requires
the thermostat to control the fan, contact
your furnace/air conditioning system
manufacturer or a qualified heating/air
conditioning service person.
Your new thermostat has an Installer menu,
which allows you to customize the thermostat
to meet your requirements. (The thermostat
also has a User menu and a Keypad
Lockout menu; these menus are explained
further in the Operating Instructions.)
The menu settings can be changed at any time
to meet system or personal requirements.
ENTERING THE CONFIGURATION
MENUS.
After properly wiring the thermostat, turn on
power to the system. Momentarily press
PROGRAM
RUN
to make certain the
thermostat is in the run program mode, then
press TIME
FWD
and TIME
BACK
at the
same time to enter the User Configuration
menu. When the display changes to the first
item in the configuration menu, release the
buttons. Then press and hold SET
TIME
and
SET
DAY
for approximately 3 seconds to
enter the Installer menu. The display will
change to show the first item on the Installer
menu (Electric Heat Fan selection). Use the
following text, along with the Installer table
on page 5, to guide you through the menu.
Once in the menu, you set each item to the
proper selection using
or , then
momentarily press TIME
FWD
to change
the display to the next item or TIME
BACK
to return to the previous item.
To exit the menu at any time, press PRO-
GRAM
RUN
.
ELECTRIC HEAT FAN
CONFIGURATION.
(Installer table step 1.) This menu item
determines whether fan control will be
through the thermostat or through the heating
system. If you have an electric heat or other
system that REQUIRES the thermostat to
control the fan, set this item ON. This allows
the thermostat to energize the fan immedi-
ately on a call for heat. If you are unsure if
the system requires the thermostat to control
the fan, contact the equipment manufacturer
or a qualified heating and air conditioning
service person. If your system controls fan
operation (as with most fossil fuel systems),
set this item to OFF.
SET CYCLE HEAT, COOL
(ANTICIPATION).
(Installer table steps 2 and 3). These items
allow the cycle times in heating and cooling
to be increased or decreased. The factory set
values can be adjusted higher for longer
cycles or lower for shorter cycles.
NOTE: Some manufacturers still instruct you
to set the anticipator to the current draw of
the equipment. That instruction applies only
to mercury bulb or mechanical thermostats; it
does not apply to this digital thermostat. As
configured at the factory, this thermostat will
maintain an accurate temperature. No
further adjustment is necessary, although
you can use these menu items to customize
the performance of the thermostat to your
requirements.
The adjustment range for HEATING is from
1 to 40. The factory preset is 5. The adjust-
ment range for COOLING is from 9 to 40.
The factory preset is 13. The cooling will not
go below 9 because compressors require a
longer cycle.
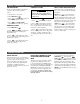
The chart below shows how this adjustment
range affects thermostat performance.
PROGRAMMABLE COOL FAN-OFF
AND FAN-ON DELAY.
(Installer table steps 4 and 5.) These items
allow a selection of 0 to 127 seconds of fan-
off delay after the thermostat has satisfied the
call for cool, or a fan-on delay of 1 to 30
seconds on a call for cool.
The fan-off delay allows the fan to continue
running after the compressor has shut off.
This distributes the cool air that would
otherwise stay trapped in the air conditioning
coils through the ducts. Ideally the timing
would be set so the fan shuts off just as the
cool air is exhausted. If this timing is set too
long the fan may begin blowing warm air
before it shuts off. Shortening the fan-off
delay will prevent this.
A short delay to allow the A-coil to cool
off before the fan turns on may be pre-
ferred. This also allows the compressor and
the fan to come on at slightly different
times, which allows full power to the
compressor on start up. Recommended
setting for fan-on delay is 10 seconds or
less. A system that does not have a high
head pressure cutout should have a delay of
10 seconds or less.
PROGRAMMABLE HEAT FAN-OFF
DELAY.
(Installer table step 6.) This item allows a
selection of 0 to 127 seconds of fan-off delay
after the thermostat has satisfied the call for
heat if ELECT HEAT FAN (step 1) is
selected ON.
The fan-off delay allows the fan to continue
running after the burner, heating element,
etc. has shut off. This distributes the heat that
would otherwise stay trapped in the ducts.
Ideally the timing would be set so the fan
shuts off just as the warm air is exhausted. If
this timing is set too long the fan may begin
blowing cool air before it shuts off. Shorten-
ing the fan-off delay will prevent this.
COMPRESSOR LOCKOUT.
(Installer table step 7). This thermostat is
capable of protecting the system against
premature compressor failure by “locking
out” the compressor for at least five minutes
after each cycle. When the thermostat is in
compressor lockout, the word COOL will
flash on the display. With heat pump
systems, the word HEAT will flash if the
lockout occurs during a heat cycle. During
this period, the compressor will not be
energized.
(Continued on page 6)
HEATING COOLING
Anticipation Value Cycle Length Differential Temperature Cycle Length Differential Temperature
Shorter 0.4–0.6°F (0.2–0.3°C) N/A1–8 N/A
Longer Shorter9–20 0.6–1.0°F (0.3–0.6°C) 0.6–1.0°F (0.3–0.6°C)
Hydronic Longer21–40 1.0–1.6°F (0.6–0.9°C) 1.0–1.6°F (0.6–0.9°C)
These numbers are approximate and represent operation with a typical system. Actual
temperature differentials and run times may vary widely based on your building and equip-
ment, as well as outdoor temperature conditions.