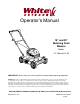
Operator’s Manual 18” and 20” Mulching Push Mowers Models LC-106 and LC-40 IMPORTANT: Read safety rules and instructions carefully before operating equipment. Warning: This unit is equipped with an internal combustion engine and should not be used on or near any unimproved forestcovered, brush-covered or grass-covered land unless the engine’s exhaust system is equipped with a spark arrester meeting applicable local or state laws (if any).
TABLE OF CONTENTS Content Page Important Safe Operation Practices................................................................... 3-5 Slope Gauge...................................................................................................... 6 Unpacking.......................................................................................................... 7 Assembling Your Lawn Mower........................................................................... 7 Know Your Lawn Mower ..............
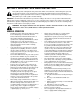
SECTION 1: IMPORTANT SAFE OPERATION PRACTICES This symbol points out important safety instructions which, if not followed, could endanger the personal safety and/or property of yourself and others. Read and follow all instructions in this manual before attempting to operate your lawn mower. Failure to comply with these instructions may result in personal injury. When you see this symbol, heed its warning.
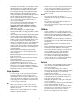
• • • • • • • • • • • • The blade control handle is a safety device. Never attempt to bypass its operation. Doing so makes the safety device inoperative and may result in personal injury through contact with the rotating blade. The blade control handle must operate easily in both directions and automatically return to the disengaged position when released. Never operate the mower in wet grass. Always be sure of your footing. A slip and fall can cause serious personal injury.
• • • • • To reduce fire hazard, keep mower free of grass, leaves, or other debris build-up. Clean up oil or fuel spillage. Allow mower to cool at least 5 minutes before storing. Before cleaning, repairing, or inspecting, make certain the blade and all moving parts have stopped. Disconnect the spark plug wire, and keep the wire away from the spark plug to prevent accidental starting. We do not recommend the use of pressure washers or garden hose to clean your unit.
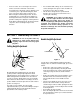
IN WARNING 15° G NTIN E S E EPR E, R OPE ° SL 5 1 A Do not mow on inclines with a slope in excess of 15 degrees (a rise of approximately 2-1/2 feet every 10 feet). A riding mower could overturn and cause serious injury. If operating a walk-behind mower on such a slope, it is extremely difficult to maintain your footing and you could slip, resulting in serious injury. Operate RIDING mowers up and down slopes, never across the face of slopes.
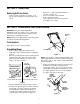
SECTION 3: UNPACKING Removing Unit From Carton • • Remove staples, break glue on top flaps, or cut tape at carton end and peel along top flap to open carton. • • • Remove loose parts if included with unit (i.e., operator’s manual, etc.). Cut corners and lay carton down flat. Remove packing material. Roll or slide unit out of carton. Check carton thoroughly for loose parts. SECTION 4: ASSEMBLING YOUR LAWN MOWER IMPORTANT: This unit is shipped WITHOUT GASOLINE or OIL.
• Insert post on cable ties into holes provided on the lower handle. Pull the cable tie tight and trim the excess. See Figure 4. • Cable Tie Post • • Hole on Lower Handle With the spark plug wire disconnected and grounded, hold the blade control handle against the upper handle, and pull the starter rope out of the engine. Release the blade control handle. Slip the starter rope into the rope guide. Tighten the wing nut. See Figure 5. Make certain all nuts and bolts are tightened securely.
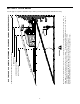
Recoil Starter Blade Control Handle The recoil starter handle is attached to the handle. See Figure 7. Stand behind the unit in the operating position to start the unit. Cutting Height Adjustment Lever Recoil Starter Handle Mulching Plug Spark Plug Wire Figure 7 SECTION 6: OPERATING YOUR LAWN MOWER Keep hands and feet away from the chute area on the cutting deck. See safety labels on page 5.
• • For best results, do not cut wet grass because it tends to stick to the underside of the mower, preventing proper discharge of grass clippings, and could cause you to slip and fall. New grass, thick grass or wet grass may require a narrower cut. When using the side-discharge mower, the best mowing pattern is one that allows the clippings to discharge towards the uncut part of the lawn. This permits recutting of the clippings to further pulverize them.
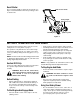
SECTION 8: SERVICE WARNING: Always stop engine and disconnect spark plug wire before cleaning, lubricating or doing any kind of work on lawn mower. Lubrication Chart: Lubricate Blade Control Lubricate the pivot points on the blade control handle and the brake cable at least once a season with light oil. See Figure 10. The blade control must operate freely in both directions. Wheels Lubricate the wheel bearings (if so equipped) at least once a season with light oil (or engine oil).
• Before reinstalling the blade and the blade adapter to the unit, lubricate the engine crankshaft and the inner surface of the blade adapter with light oil (or engine oil). Lubricating the bolt holes, bolts and inner surface of the nuts is also recommended. • To Reinstall Blade: • • • • • • Be sure to install the blade with the side of the blade marked “Bottom” (or with part number) facing the ground when the mower is in the operating position.
SECTION 11: TROUBLE SHOOTING GUIDE Trouble Engine fails to start Engine runs erratic Engine overheats Occasional skip (hesitates) at high speed Idles poorly Excessive vibration Mower will not mulch grass Uneven cut Possible Cause(s) 1. Control handle disengaged. 2. Spark plug wire disconnected. 3. Dirty air cleaner. 4. Primer button not depressed. 5. Throttle control lever not in correct starting position . 6. Fuel tank empty or stale fuel. 7. Blocked fuel line . 8. Faulty spark plug. 9.
SECTION 12: PARTS LIST FOR MODELS LC-106 AND LC-40 2 1 3 8 19 14 28 4 22 7 21 13 26 6 5 15 25 17 23 16 15 16 20 18 5 17 6 27 9 14 24 12 19 29 22 10 7 11 Ref. No. 1 2 3 4 5 6 7 8 9 10 11 12 13 14 Part No. 17098 731-0872A 731-1028 682-3025 682-3001A 682-3024 682-3000A 736-0356 712-0798 731-0981A 682-0139 682-0018B 753-0588 736-0524A 710-1044 742-0740 742-0738 738-0213 736-0105 Ref. No.
Models LC-106 and LC-40 NOTE: For painted parts, please refer to the list of color codes below. Please add the applicable color code, wherever needed, to the part number to order a replacement part. For instance, if a part, numbered 700-xxxx, is painted Oyster Gray, the part number to order would be 700-xxxx-0662. Oyster Gray: 0662 Powder Black: 0637 Red Metallic: 0650 1 7 6 2 5 8 11 20 17 15 9 10 21 10 18 11 12 13 19 14 Ref. No. 1 2 5 6 7 8 9 10 11 12 13 14 15 Part No.
MANUFACTURER’S LIMITED WARRANTY FOR: The limited warranty set forth below is given by White Outdoor Products Co. with respect to new merchandise purchased and used in the United States, its possessions and territories. White Outdoor Products Co. warrants this product against defects in material and workmanship for a period of two (2) years commencing on the date of original purchase and will, at its option, repair or replace, free of charge, any part found to be defective in material or workmanship.