
Assembly Instructions

6021-7276 Expandable Garment Rack ©2016 Whitmor, Inc.
A 2 ea
Base
B 1 ea
Base outer tube with holes
C 1 ea
Base inner tube with push pin
F 1 ea
Outer hanging rod
G 1 ea
Inner hanging rod
H 3 ea
Square tube end
J 1 ea
Small
rod endcap
D 2 ea
Vertical outer tube with holes
E 2 ea
Vertical inner tube with push pin
Assembly Time: Less than 45 minutes.
This product's intended use
is for hanging garments.
Tools Needed: No additional tools required.
MADE IN CHINA
Part Reference
A
B
C
D
E
F
G
H
F8429
F8430
F8431
F8432
F8433
F8434
F8435
F8436
Part Reference
I
J
K
L
M
N
O
P
Q
F8437
F8438
F8439
F8440
F8441
F8442
F8443
F8444
F8463
Rev#0 6.14.16
Printed in China
8680 Swinnea Road • Suite 103 • Southaven, MS • 38671
NEED HELP? For help with assembly, or if you are missing a part,
please call Whitmor’s Customer Service Department, 1-888-944-8667
between 8 a.m. and 4:30 p.m. (Central Standard Time) Monday
through Friday. Or email: help@whitmor.com. Visit us online at
www.whitmor.com
K 2 ea
Long
screw
L 2 ea
Medium
screw
M 4 ea
short screw
NOTE: Make sure
vertical outer tubes with
holes (D) are assembled
with the holes facing the
front or back of the
garment rack, not inside
or outside.
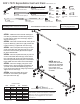
STEP 1. Install base outer tube with holes (B) to
one base (A) and base inner tube with push pin (C)
to other base (A) using short screws (M). Tighten
with hex wrench (P).
STEP 2. Insert each vertical tube with holes (D) into
top of two bases (A). (See note to right). Attach with
medium screws (L). Tighten with hex wrench (P).
STEP 3. Insert one square tube end (H) over end
of (B). Insert base inner tube with push pin (C) into
base outer tube with holes (B) and lock the push
pin at the desired width.
STEP 4. Insert two square tube ends (H) over end
of each vertical tube with holes (D). Insert vertical
inner tube with push pin (E) into vertical outer tube
with holes (D) and lock the push pins at the desired
height. Make sure each side is at the same height.
STEP 5. Insert inner hanging rod (G) into outer
hanging rod (F). Insert a hanging rod endcaps (I &
J) at each end. Install assembled hanging rod to
top of vertical inner tubes (E) using long screws (K).
Tighten with hex wrench (P).
STEP 6. Screw the wheels (N & O) into
the bottom of each base (A) and tighten
with open end wrench (Q).
A
D
H
H
H
E
F
K
I
J
M
N
O
O
N
M
M
M
K
G
D
E
B
C
A
N 2 ea
Wheel
O 2 ea
Wheel with
lock
P 1 ea
Hex wrench
Q 1 ea
Open end wrench
I 1 ea
Large
rod endcap
L
L