
Assembly Instructions

6744-10159-BLK 2-Tier Garment Rack
©
2019 Whitmor, Inc.
D 1 ea
Bottom hanging bar
Tools Needed:
No tools required.
Part Reference
A
B
C
D
E
F
G
H
I
J
F10250
F10251
F10253
F10254
F10252
F10249
F10255
F10256
F10257
F10258
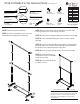
STEP 2: Firmly insert bottom vertical tubes (A) into the base, make
sure the pinholes are on top and facing each other.
STEP 3: Insert bottom hanging bar (D) into two middle connectors (H).
STEP 4: Place assembled hanging bar section on bottom vertical
tubes (A).
STEP 5: Slide top vertical tube (B) through middle connectors (H) into
the pinholes at the top of bottom vertical tubes (A). Align pinhead with
the pinhole, press on pinhead and push until locked.
STEP 6: Insert top hanging bar (C) into the corner connectors (G).
STEP 7: Place assembled top
horizontal bar section on tubes (B)
and press down firmly.
STEP 8: Insert wheels (I) and (J)
into bottom of base.
STEP 1: Start by assembling the base. Insert two
horizontal base tubes (E) into two bases (F).
E 2 ea
Horizontal base tube
H 2 ea
Middle connector
G 2 ea
Corner connector
C 1 ea
Top hanging bar
I 2 ea
Locking wheel
J 2 ea
Wheel
NEED HELP? For help with assembly, or if you are missing a part,
please call Whitmor’s Customer Service Department, 1-888-944-8667
between 8 a.m. and 4:30 p.m. (Central Standard Time) Monday
through Friday. Or email: help@whitmor.com. Visit us online at
www.whitmor.com
Rev. 0 | 1.15.19 Printed in Taiwan
8680 Swinnea Road • Suite 103 • Southaven, MS • 38671
B 2 ea
Top vertical tube
F 2 ea
Base
F
E
E
A
D
H
B
C
G
G
B
H
A
F
J
I
I
J
A 2 ea
Bottom vertical tube
NOTE: Wheels should be inserted last.