Assembly Instructions WC 8000 Part List QTY Hardware QTY 1 | Top Panel 1 A Allende 1 2 | Left Side Panel 1 B| Wood Dowel Right Side Panel 1 C|JCBC W Screw M6x40 {muss Top Back Panel 1 D| Mini Fix Bolt Middle Panel 1 E | Mini Fix Housing Middle Left Panel 1 F | Mini Fix Cap Small Middle Panel 2 G| CSK Screw M3.
Step This is how a mini fix works... The head of the mini fix ‘housing goes into the open mouth of the mini fix bolt. You then turn the mini fix ‘housing so it tightens. over the mini fix bolt. *Attach Mini fix Cap as shown. *Lay a piece of sheet to protect the top surface Step 4 veneer facing downward § *Without edging/ we ® This is how a mini fix works... The head of the mini fix ‘housing goes into the open ‘mouth of the mini fix bolt. You then turn the mini fix ‘housing so it tightens.
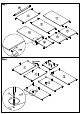
Step 5 This is how a mini fix works... The head of the mini fix a0 housing goes into the open mouth of the mini fix bolt. You then turn the mini fix Se housing so it tightens over the mini fix bolt. *Without edging/veneer facing downward J *Attach Mini fix Cap as shown. Step 6 This is how a mini fix works... The head of the mini fix iP ‘housing goes into the open. a mouth of the mini fix bolt. You then turn the mini fix ow, ‘housing so it tightens over the mini fix bolt. *Attach Mini fix Cap as shown.
Step 7 This is how a mini fix works... The head of the mini fix housing goes into the open mouth of the mini fix bolt. You then turn the mini fix housing so it tightens over the mini fix bolt. *Without edging/veneer facing downward § Step 8 This is how a mini fix works... +: The head of the mini fix SF housing goes into the open mouth of the mini fix bolt. You then turn the mini fix na housing so it tightens over the mini fix bolt. *Attach Mini fix Cap as shown.