
Installation Manual


6
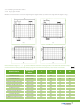
3.1.2 Operating temperature: -40
℃
to +85
℃
3.1.3 Mechanical load on panels (e.g., from wind or snow): less than 5400Pa
3.1.4 Tilt Angle selection: The installation should be facing north in the southern hemisphere and facing south in the northern
hemisphere.
3.1.5 To maintain the modules’ Class C re rating, the re class of the roof and building materials should be higher than Class C.
3.1.6 To maintain the modules’ re performance type 1(for US market), it could be possible to achieve the Class A system re
rating, with the Class A class racking system.
3.2 Installation Methods
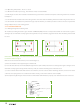
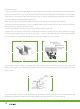
3.2.1 Bolting through the mounting holes
All modules (excluding the double glass module CHSM6610P(DG)) must be securely fastened with at least 4 bolts ( Figure a
and Figure b). For maximum security against strong winds or heavy snow falls, suggestion for all of the mounting holes should
be used.
(a)
(b)
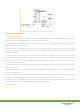
(c)
Module Frame
M6 Bolt
Washer
Washer
M6 Nut
Spring Washer
Mounting Structure
Remark: As for above diagram, the solid red arrows indicate primary bolt positions; dashed blue arrows indicate positions where bolts can
be added for additional support.
Bolts are inserted as described in the process below (Figure c).
a) Place the module on the supporting bars underneath.
b) Insert the four stainless-steel bolts (M6) through the holes (7x11.5mm) in the frame according to the Figure a & Figure b. For
maximum security against strong winds and heavy snow, all available mounting holes should be used.
c) Secure each bolt to the frame with stainless-steel washers, one for each side of the mounting structure; and screw on either
a stainless-steel spring washer or a toothed lock washer. Finally, secure with a stainless steel nut (M6).
d) The torque for tightening the nut and bolts recommended 13Nm when the property class of bolts and screws is Class 8.8.