
Installation Guide


FLUSH MOUNT INSTALLATION MANUAL - 4©
2016 IRONRIDGE, INC. VERSION 1.10
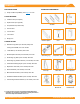
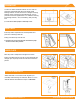
1. ATTACH BASES
Install roof attachments. Mount Slotted L-Feet on
FlashFoot or other compatible roof attachments per
manufacturer's instructions.
í IronRidge's all-in-one FlashFoot roof attachment is for pitched,
composition shingle roofs. Refer to Page 7 or provided manual.
í Tested or evaluated third-party roof attachments:
• Anchor Products - U-Anchor
• S-5! Standing Seam Metal Roof Clamps - Certication of metal
roof clamps includes bonding to both painted and galvalume
metal roofs. Tighten clamp set screws to 130-150 in-lbs (≥ 24
gauge) or 160-180 in-lbs (22 gauge) roofs. Tighten S-5! M10 bolt
to 240 in-lbs or S-5! Mini M8 bolt to 156 in-lbs.
• EcoFasten
Green Fasten GF-1 Anchors
• QuickMount PV Roof Mounts and Tile Hooks - Tile Hook
attaches to XR Rail using 3/8" Bonding Hardware Kit torqued to
250 in-lbs.
• Quickscrews Solar Roof Hooks, Ejot Aluminum Roof Hooks, or
Unirac Creotecc Tile Hooks - Attach to XR Rails using either
L-Foot Kit or 3/8” Bonding Hardware Kit torqued to 250 in-lbs.
í Refer to
Page 7 for installing Standos
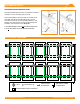
A. CONNECT SPLICES
Use Bonded Splices, when needed, to join multiple
sections of rail. Insert Bonded Splice 6" into rst rail
and secure with two self-drilling screws, spacing them
approximately 1” apart and tightening to 20 in-lbs. Slide
second rail over Bonded Splice and secure with two more
self-drilling screws.
í Rows exceeding 100 feet of rail must use Expansion Joints.
í For XR10 and XR100 rails, insert screws along the provided lines.
í Refer to Structural Certication letters for rail splice location
requirements.
í Screws can be inserted on front or back of rails.
í If using Bonding Bolt Rail Splices, refer to addendum (version 1.0).
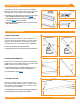
B. PREPARE HARDWARE
On the ground, slide square-headed 3/8”-16 hardware
into side-facing rail slot. Space out bolts to match L-Feet
spacing.
í Tape ends of rail, to keep bolts from sliding out while moving.
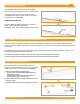
C. ATTACH RAILS
Drop rail with hardware into Slotted L-Feet. Level rail at
desired height, then torque to 250 in-lbs.
í Rail and L-Feet can face either upslope or downslope on roof.
2. PLACE RAILS
C
Torque to
250 in-lbs
B
Preload and Space Bolts
A
Torque to
20 in-lbs
6" Inside Rail
1"