
Installation Guide


FLUSH MOUNT INSTALLATION MANUAL - 7©
2018 IRONRIDGE, INC. VERSION 1.60
FLASHFOOT2
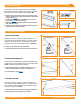
Locate roof rafters and mark locations on roof. Drill 1/4”
pilot holes and backll with approved sealant. Slide
ashing between 1st and 2nd course of shingles, ensuring
ashing doesn't overhang the downhill shingle. Line up
with pilot hole and insert supplied lag bolt with washer
through ashing. Fully seat lag bolt. Place Cap onto
ashing in desired orientation for E/W or N/S rails and
rotate 180 degrees until it locks into place.
í Rail can be installed on either side of FlashFoot2 Cap.
End Caps add a completed look and keep debris and
pests from collecting inside rail.
Firmly press End Cap onto rail end.
í End Caps come in sets of left and right. Check that the proper
amount of each has been provided.
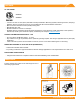
WIRE CLIPS
Wire Clips offer a simple wire management solution.
Firmly press Wire Clip into top rail slot. Run electrical wire
through open clip. Snap closed once all wires have been
placed.
Press Clip
into Slot
Run Wire
Snap Clip
Closed
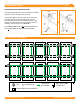
END CAPS
Attach Standoffs to roof locations with lag bolts (not
included). Place ashing over Standoff. Attach L-Foot on
Standoff washer with hardware. Torque to 140 in-lbs.
Torque to
140 in-lbs
FLUSH STANDOFFS
Flashing
Provided by
Others