WHYNTER PORTABLE AIR CONDITIONER MODEL# : ARC-13PG Instruction Manual Thank you for your purchase of this WHYNTER product. Please read this Instruction Manual carefully before using product to ensure proper use. Keep this manual in a safe place for future reference.
Thank you for choosing the Whynter portable air conditioner. Please follow the instructions given in this booklet to obtain the very best performance from your portable air conditioner and take full advantage of the many advance features that your portable air conditioner offers you. We trust that your Whynter air conditioner will provide the performance and reliability that we stand for. Please keep this user manual in a safe place for future reference.
PARTS OVERVIEW 1. Exhaust hose 5. Window Suction Cup 2. Rectangle Connector 6. User Manual 3. Round Connector 7. Remote Control 4. Round Cover 8. Window Slide Bars For this portable air conditioner to operate correctly, the hot air from the back of the unit must be vented to the outside. Please follow the instructions below for window kit installation. 1. Extend the exhaust hose (Part 1) at least 6” and insert it to the outdoor exhaust outlet at back of the air conditioner. 2.
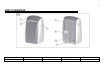
UNIT OVERVIEW 1. Control panel 6. Outdoor exhaust 2. Air outlet grille 7. Handle 3. Air filter grille 4. Drain plug 5.
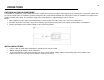
Incorrect Assembly: Ensure curtains or other objects are not obstructing the air inlet filters. (Fig 3) Do not bend or crush the exhaust hose while in use. (Fig.
SAFETY PRECAUTIONS Ensure curtains or other objects are not obstructing the air inlet filters. Do not bend or crush the exhaust hose while in use. Transport the unit in an upright position only, or leave it in an upright position for at least 2 hours before first use. Always place the unit on even and hard and level surface. The power cord is UL listed. It has a built-in L.C.D.I. (leakage, current, detection, interruption) circuit breaker for added safety.
INSTALLATION When you use this air conditioner unit, hot air must be exhausted out of the room to complete the air exchange of the condenser. When the unit is operating in fan-only mode, no exhaust is required. Exhaust hose Installation The exhaust hose must be installed onto the unit. 1. Pull out about 6” of one end of the exhaust hose. 2. Screw the exhaust connector on the exhaust hose in a clockwise motion. 3. Snap the exhaust connector in place in the back of the unit. 4.
Window Installation 1. Make sure the exhaust hose is properly installed onto the portable air conditioner. 2. Open window or sliding door for approximately 5” (130 mm) 3. Adjust the length of the window kit to the same length and width of the opening of the window or the sliding door. Cut the window piece if necessary to fit the length of your window or sliding door. 4. Place the window kit on your window or sliding door, with the exhaust hole as near to the portable air conditioner as possible. 5.
CONTROL PANEL Indicator Light: Standby mode LED (red). 1: Power – Turns the unit on and off. 2: Mode Control – Controls the 4 function modes: Cooling, Automatic, Fan only & Dehumidification. 3: Fan Speed Control – Controls the 3 fan speeds: High, Medium, Low. 4: Plus – Increases set temperature or timer hours. 6: Timer – Turns the timer function on and off. S1: Timer indicator 5: Minus – Decreases set temperature or timer hours.
OPERATIONS SWITCHING ON THE AIR CONDITIONER The portable air conditioner can be switched on by the remote control or by pressing the Power button on the control panel. To transmit signals from the remote control to the air conditioner, point the front part of the remote handset towards the control panel on the air conditioner. Reception of the signal is confirmed by a beep. The maximum signal transmission distance is approximately 8 meters / 26 feet.
REMOTE CONTROL BUTTONS B1: POWER – Turns the unit on and off. B2: MODE – Controls the 4 function modes: Cooling, Automatic, Fan only & Dehumidification. B3: TUBRO – Turns the unit on Cooling mode, lowest temperature (61°F) and maximum fan speed. B4: Plus – Increases set temperature or timer hours. DISPLAY 1: Set temperature 2: Delay time setting B5: Minus – Decreases set temperature or timer hours. B6: FAN SPEED - Controls the 3 fan speeds: High, Medium, Low.
SWITCHING ON/OFF THE AIR CONDITIONER The appliance can be switched ON or OFF by pressing the Power button (1) on the control panel or the Power button (B1) on the remote control. FAN ONLY MODE In this mode, only the fan of the air conditioner runs and circulates the air in the room. To activate this function mode, press the MODE button (B2 on remote control or 2 on control panel) until fan only symbol ( )appears on the displays. In this function mode, the temperature cannot be set.
AUTOMATIC MODE In this mode, the air conditioner is set to run at the optimum comfort temperature. When the Automatic (comfort) mode is selected, the cooling function stops when the temperature is below 73°F. The cooling function and low fan speed starts when temperature is between 73°F - 77°F Cooling function and medium fan speed starts when temperature is between 77°F - 81°F. Cooling function and high fan speed starts when temperature is above 81°F.
SETTING SWITCH OFF TIMER FROM CONTROL PANEL With the air conditioner operating in any function mode, press the Timer button (6 on control panel) and set the desired time delay OFF hours (from 1 to 12 hours) by pressing the + and – buttons. Once the delayed switch off timer is set, press the Timer button (6 on control panel) to confirm the setting. The symbol and the delay countdown timer will appear on the control panel display.
TRANSPORTATION The air conditioner is equipped with wheels and handles for easy portability. Before moving the air conditioner, proceed as follows: Switch off the air conditioner and disconnect the plug from the power outlet Drain water by removing the drain plug. Always transport the air conditioner in an upright position only.
DRAINING THE AIR CONDITIONER ALWAYS switch off the air conditioner and disconnect the plug from the power supply outlet before cleaning the air conditioner. Position a flat container or dish under the drain hole. Do not allow the water to drip continuously into the container, as it might easily overflow. Remove the drain stopper from the drain hole. The condensed water will drain out automatically. When the container is almost full, insert the drain stopper back to the unit. Empty the container.
TROUBLESHOOTING Problem The portable air conditioner does not turn on Possible Causes Solutions Power failure / outage. Restore the power supply. The automatic switch, line fuse, or breaker has been tripped. Flip the switch / change the fuse / turn the breaker back on. Also note that you may have too many appliances drawing power on one circuit, you may need to move the other appliances to another circuit. Move the unit onto another circuit with the correct voltage.
The unit is set to low fan speed. The unit has worked for a long time, but the room is not cold enough The unit is very noisy Windows or doors are open. Set the unit to a higher fan speed. Close all windows and doors. There are too many people in the room. You may need additional cooling or another air conditioner. There is direct sunshine into the room. Close curtains or blinds and try to minimize the amount of direct sunlight into the room.
TECHNICAL DATA Cooling capacity Recommended room size* E.E.R. – Energy efficiency rate Power supply Maximum power input Maximum input Dehumidifying capacity Thermostat Refrigerant Compressor Air flow (max) Fan speeds Exhaust hose length Unit Dimensions Unit Weight 13,000 BTU 420 sq. ft. 14.3 115v/ 60Hz 910 Watts 8.20 Amps 43 Pts / Day 61°F to 86°F / 16°C to 32°C R-410A Rotary 380 m3/ Hour 3 (H, M, L) 5 ft. 18” W x 15.
ONE YEAR LIMITED WARRANTY & THREE YEAR WARRANTY ON COMPRESSOR This WHYNTER portable air conditioner is warranted, to the original owner within the 48 continental states, for one year from the date of purchase against defects in material and workmanship under normal use and service.